
2.3.2 Initial pitch inside the total oval — Edge vs. Center & Pitch Included Yes/No
2.3.2 oval
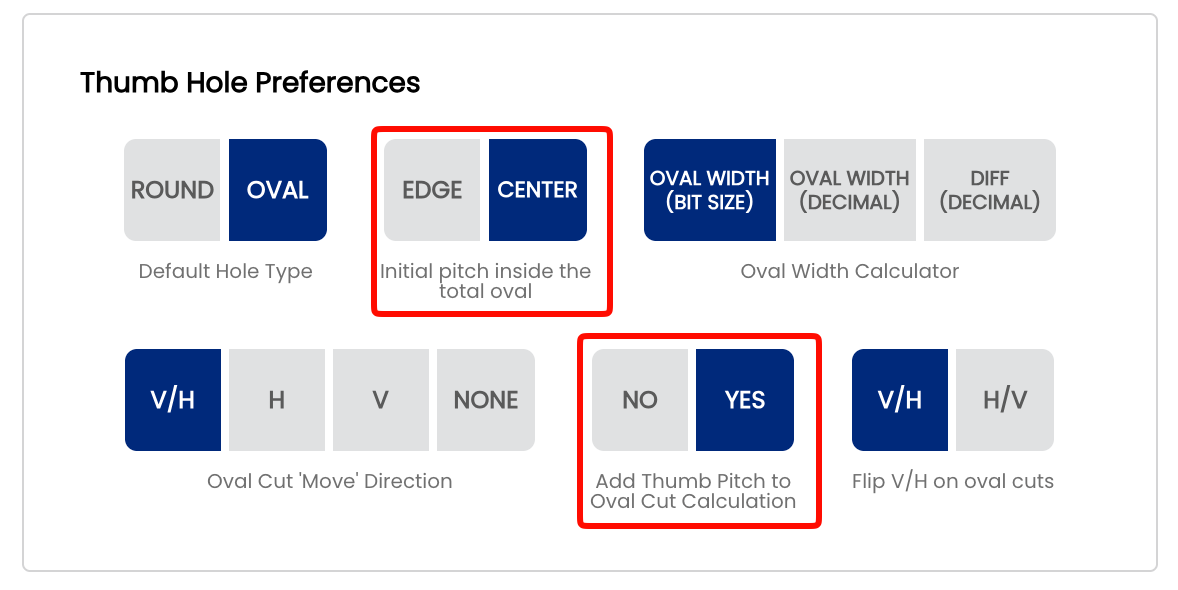
When drilling an oval hole, Spectre Cloud needs a reference point from which to calculate the initial pitch of that hole. Because an oval opening has width — unlike a round hole, which has a single center point — there are two valid ways to define that reference. This page covers two related settings that work together: Initial pitch inside the total oval (Edge vs. Center) and Add Thumb Pitch to Oval Cut Calculation (Yes vs. No). The combination of these two settings determines how Spectre Cloud displays your oval cut values on screen.
Not sure which to pick? Ask yourself two questions before setting these up in Spectre: (1) When you cut an oval, is the intended pitch of the hole at the edge (top) of the total oval cut, or in the center? (2) Do you zero out your digital readouts when starting to cut your oval, or do you keep the desired pitch on the readout? Your answers will identify exactly which scenario applies to your shop.
📐 Setting 1 — Initial Pitch Inside the Total Oval
This setting defines the reference point Spectre Cloud uses when calculating the pitch offset for an oval hole.
Edge
The Edge method measures initial pitch from the near edge of the oval opening — the edge closest to the bowler's palm. Your starting point on the press is always the top of the oval hole, with digital readouts initialized to 0/0 at that position. This is the traditional approach that mirrors how most drillers learned to cut ovals using charts or ratios.
- ✅ Consistent with how round hole pitch has historically been measured
- ✅ Familiar to operators trained on conventional pitch measurement techniques
- ✅ Use this setting if you zero out your digital readouts each time you start an oval cut
- ❌ Can introduce slight inconsistency as oval width increases, since the near edge shifts further from the hole's geometric center
Center
The Center method measures initial pitch from the geometric center of the oval opening. Your starting point on the press is always the center of the oval hole, with digital readouts initialized to 0/0 at that position. This is a mathematically consistent reference point regardless of oval width, and makes it straightforward to properly center a slug or interchangeable.
- ✅ Consistent reference regardless of oval width
- ✅ The oval will always be perfectly geometrically centered — no need to touch the press to re-center
- ✅ The easiest method to teach a novice ball driller how to cut ovals
- ✅ Use this setting if you keep the desired pitch on the readout rather than zeroing out
- ❌ Less intuitive for operators accustomed to traditional edge-based measurement
Mark's preference: Center is Mark Buffa's preferred method for measuring and drilling oval holes. If you are following the Spectre drilling methodology or learning from the Spectre YouTube channel, Center is the recommended choice.
📋 Setting 2 — Add Thumb Pitch to Oval Cut Calculation
This setting controls whether the bowler's thumb pitch is included in the oval cut values that Spectre Cloud displays on screen, or whether the cut values are shown as raw oval geometry only with pitch applied separately at the press.
No — Pitch not included
Spectre Cloud displays the oval cut values based on geometry only. The pitch offset is not baked into the numbers. Use this setting if you prefer to zero out your digital readouts before starting each oval cut and set your pitch manually on the press.
- ✅ Clean, simple cut values — pitch handled separately
- ✅ Familiar to drillers who learned using charts or ratio tables
- ✅ Works for both Edge and Center reference methods
Yes — Pitch included
The bowler's thumb pitch is baked directly into every cut value that Spectre Cloud displays. There is no need to zero out the readouts or adjust the press for pitch between cuts — Spectre handles the math and the cuts already account for it. Use this setting if you prefer to keep the desired pitch on the readout throughout the oval cutting sequence.
- ✅ No manual pitch adjustment needed at the press
- ✅ Reduces steps during the oval cutting sequence
- ✅ Easier to teach and less prone to error for new drillers
Mark's preference: Mark Buffa recommends using Yes — pitch included — combined with the Center method. This combination (Scenario 4) is the most consistent and easiest to teach, and is what Mark uses in his own shop.
📊 The Four Scenarios
These two settings combine to produce four possible scenarios. All four result in the exact same oval hole — the difference is only in how the cuts are displayed on screen and how you set up your press. The examples below use a Starting Bit of 3/4", Oval Width of 7/8", and a degree of 45°.
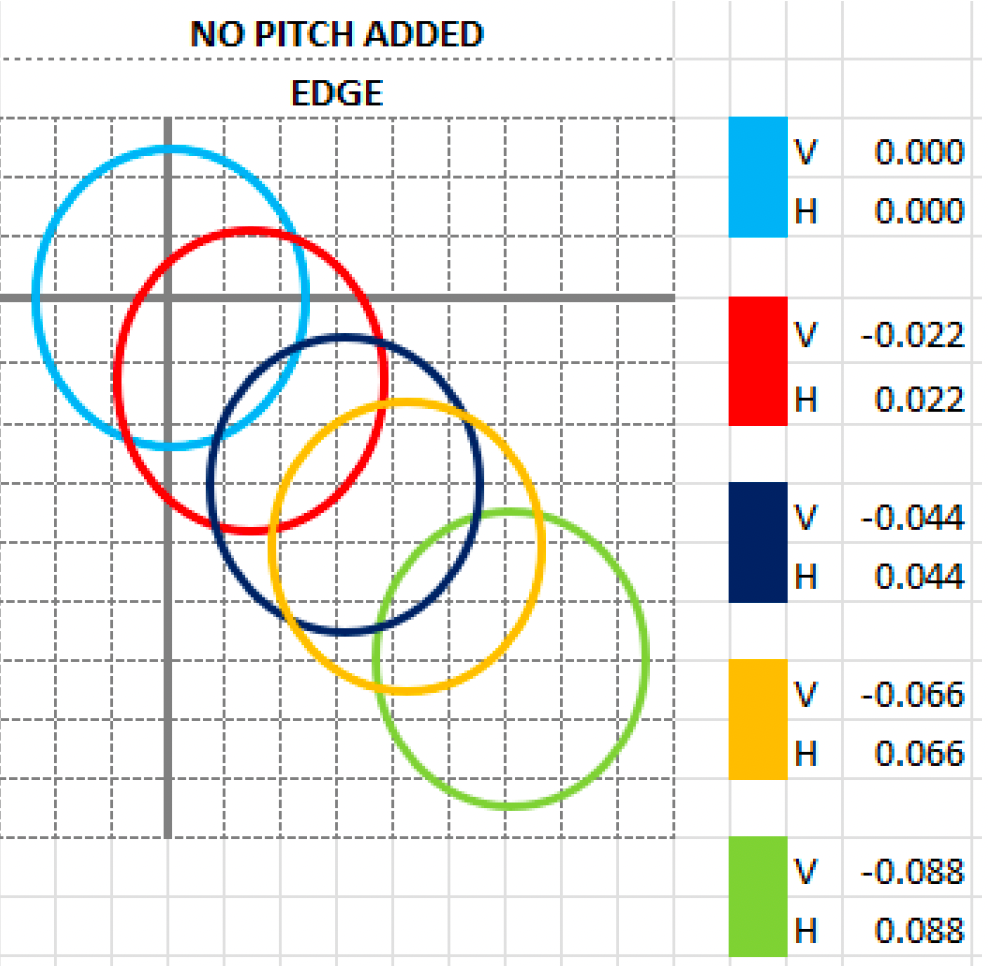
Scenario 1 — Edge, No Pitch
Settings:
| Initial pitch inside the total oval | Add Thumb Pitch to Oval Cut Calculation |
|---|---|
Edge |
No |
Your starting point is always the top of the oval hole at 0/0. This is the traditional method — how most drillers learned to cut ovals using charts or ratios. Zero out your readouts before every cut and set your pitch manually on the press.
- ✅ Traditional method — most familiar to experienced drillers
- ✅ Clean cut values with no pitch offset applied
- ✅ Best if you prefer to dial in pitch manually on the press
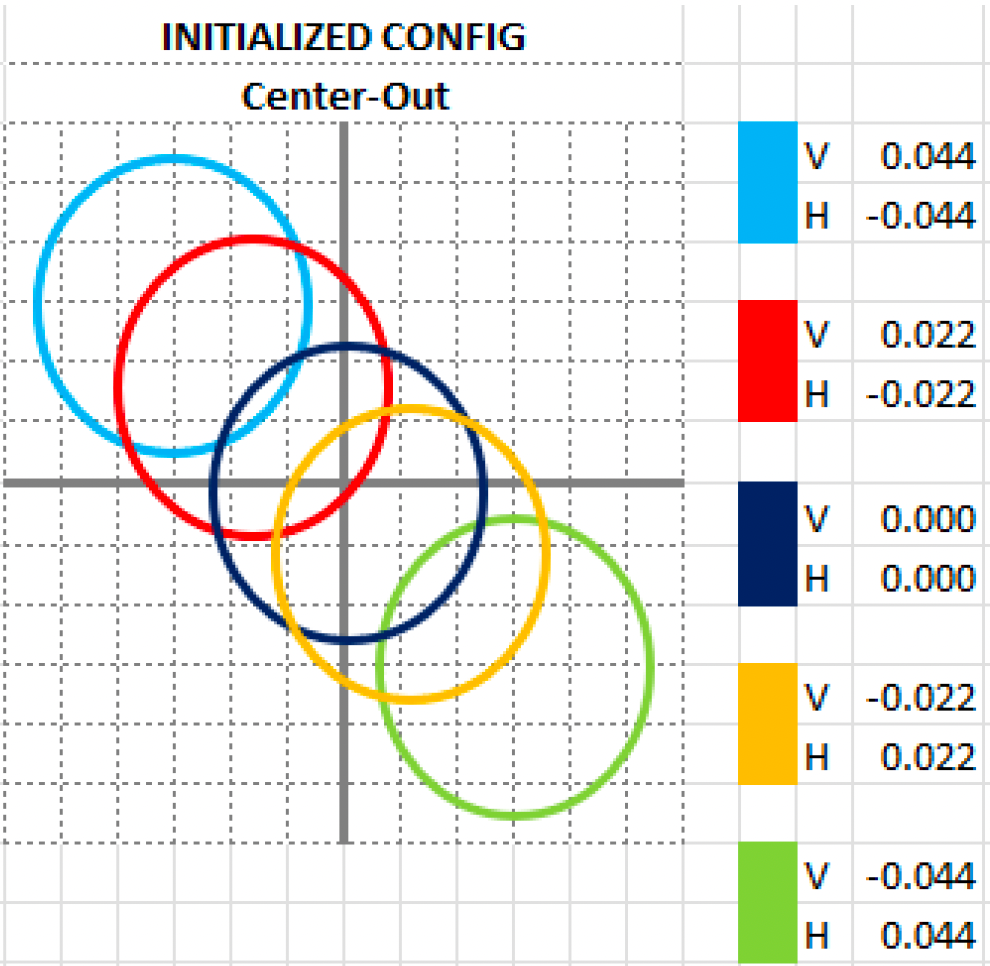
Scenario 2 — Center, No Pitch
Settings:
| Initial pitch inside the total oval | Add Thumb Pitch to Oval Cut Calculation |
|---|---|
Center |
No |
Your starting point is always the center of the oval hole at 0/0. The oval is always geometrically centered. Use this if you zero out your readouts at the center of the oval and prefer to set pitch manually on the press. A great method for learning to center slugs and interchangeables.
- ✅ Oval is always geometrically centered — consistent results every time
- ✅ Excellent for learning to center slugs and interchangeables
- ✅ Clean cut values — pitch handled separately on the press
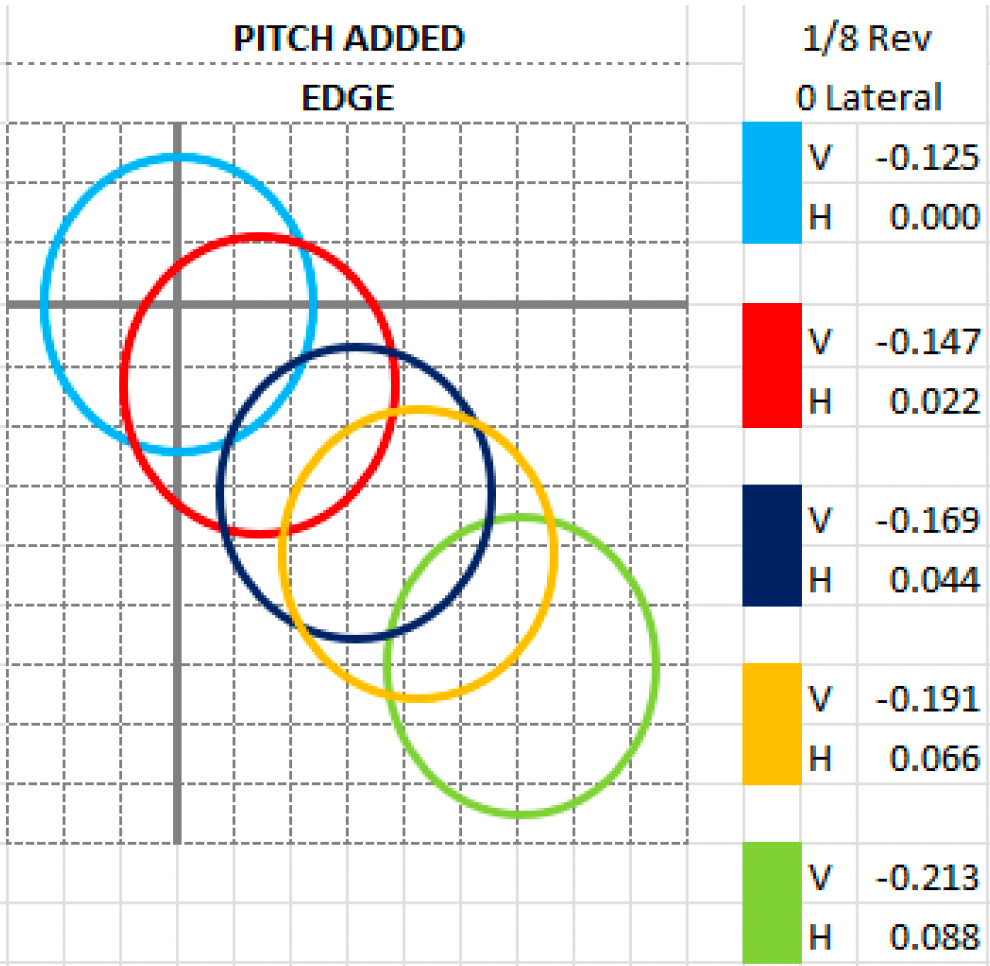
Scenario 3 — Edge, Pitch Included
Settings:
| Initial pitch inside the total oval | Add Thumb Pitch to Oval Cut Calculation |
|---|---|
Edge |
Yes |
Same geometry as Scenario 1, but the bowler's thumb pitch is baked into the cut values from the first cut. In the example below, a pitch of 1/8" reverse / 0 lateral is included. Use this if you do not want to zero out your readouts — the pitch offset is already built into every value Spectre displays.
- ✅ No need to zero out readouts — pitch is included in every cut
- ✅ Familiar edge-based starting point for experienced drillers
- ✅ Reduces manual press adjustments during the oval cutting sequence
| Cut | V | H | Note |
|---|---|---|---|
| 1 | -0.125 |
0.000 |
Pitch offset applied at first cut |
| 2 | -0.147 |
0.022 |
|
| 3 | -0.169 |
0.044 |
|
| 4 | -0.191 |
0.066 |
|
| 5 | -0.213 |
0.088 |
Scenario 4 — Center, Pitch Included
Settings:
| Initial pitch inside the total oval | Add Thumb Pitch to Oval Cut Calculation |
|---|---|
Center |
Yes |
Your starting point is the center of the oval hole with pitch already included in every cut value. There is no need to touch the press at all between cuts — the oval will be perfectly geometrically centered and the pitch offset is built into everything Spectre displays. This is by far the easiest method to teach a novice ball driller how to cut ovals.
- ✅ No press adjustment needed — oval is perfectly geometrically centered automatically
- ✅ Pitch is baked in — no manual offset required at the press
- ✅ The easiest combination for training new drillers
- ✅ Produces a perfectly consistent oval every time with minimal room for error
| Cut | V | H | Note |
|---|---|---|---|
| 1 | -0.081 |
-0.044 |
Center + pitch offset combined |
| 2 | -0.103 |
-0.022 |
|
| 3 | -0.125 |
0.000 |
Center point — pitch only |
| 4 | -0.147 |
0.022 |
|
| 5 | -0.169 |
0.044 |
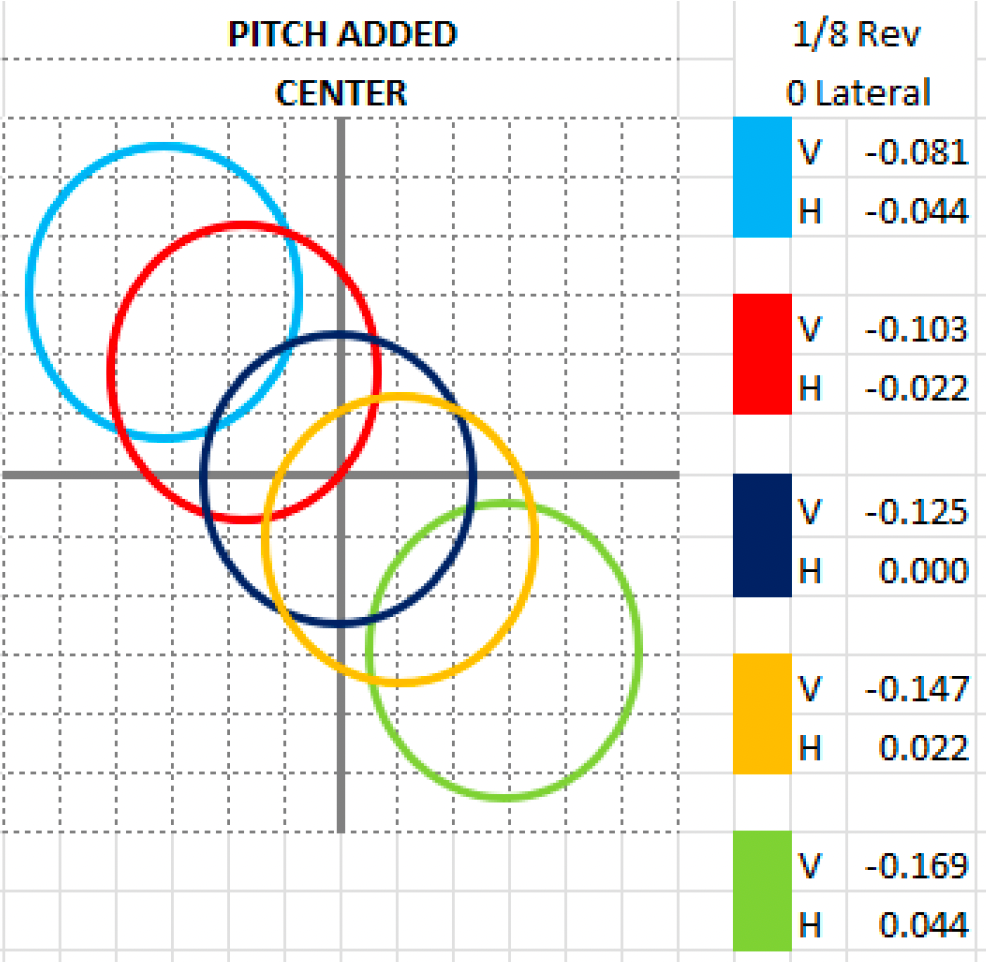
Mark's preference: Scenario 4 — Center + Pitch Included — is what Mark Buffa uses in his own shop and recommends above all others. The oval is always perfectly geometrically centered, pitch is handled automatically, and there is nothing to adjust on the press between cuts. This is the recommended starting point for any shop adopting the Spectre drilling methodology.
Note: All four scenarios above use the same base values (Starting Bit 3/4", Oval Width 7/8", Degree 45°) and produce the exact same physical oval hole. The only difference is the reference point and whether pitch is included in the displayed cut values.
📐 Quick Reference — Which Scenario Are You?
| Do you zero out readouts? | Is pitch at the edge or center? | Your Scenario |
|---|---|---|
| Yes — zero out at top of oval | Edge | Scenario 1 — Edge, No Pitch |
| Yes — zero out at center of oval | Center | Scenario 2 — Center, No Pitch |
| No — keep pitch on readout | Edge | Scenario 3 — Edge, Pitch Included |
| No — keep pitch on readout | Center | Scenario 4 — Center, Pitch Included ⭐ |
⚙️ Changing These Settings
- Open Spectre Cloud at
cloud.spectrebowling.comand log in. - Select Settings from the menu.
- Navigate to the Thumb Hole Preferences section.
- Locate the Initial pitch inside the total oval field and select either
EdgeorCenter. - Locate the Add Thumb Pitch to Oval Cut Calculation field and select either
NoorYes. - Changes are saved automatically.

Note: Like all system defaults, these settings control only the pre-selection on new spec sheets. They can always be changed on a per-sheet basis without affecting your shop defaults.
🎬 See It in Action
Watch Mark Buffa walk through the full oval thumb cutting process step by step using Spectre Pro Shop Software: How to Cut an Oval Thumb! | Full Pro Shop Tutorial!
For a deeper dive into the oval drilling process including the tapering method, watch Mark Buffa and Jacob Imoo from Jr Pro Shop walk through measuring for bit size, determining oval width and degree, and using the Spectre Oval Calculator step by step: Oval Calculator — Tapering Process
A full reference presentation covering all four scenarios, the math behind the oval calculator, and cut direction explanations is attached to this page: CUTTING OVALS.pdf
Related Sections
Tip: If you are new to oval drilling or setting up Spectre for the first time, select Center and Yes — Scenario 4. It is the most consistent, the most forgiving, and the method Mark Buffa recommends above all others.