
4.3.3 Inputing Vertical and Lateral pitch for fingers
4.3.3 measurement
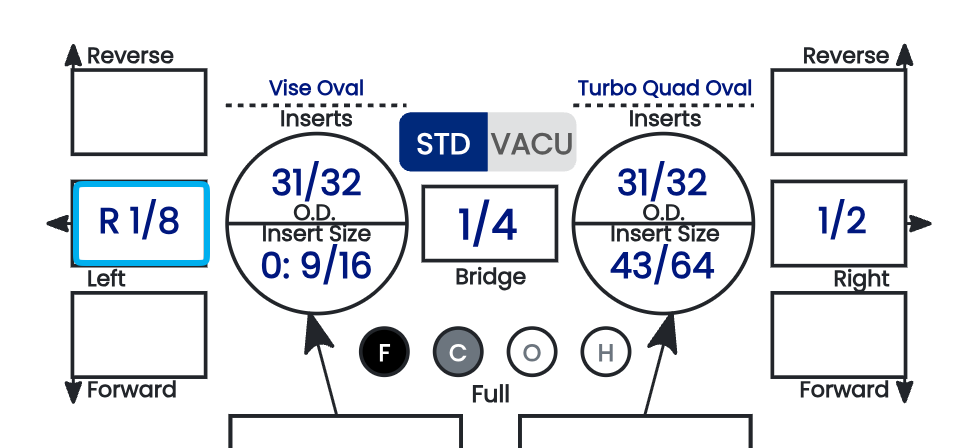
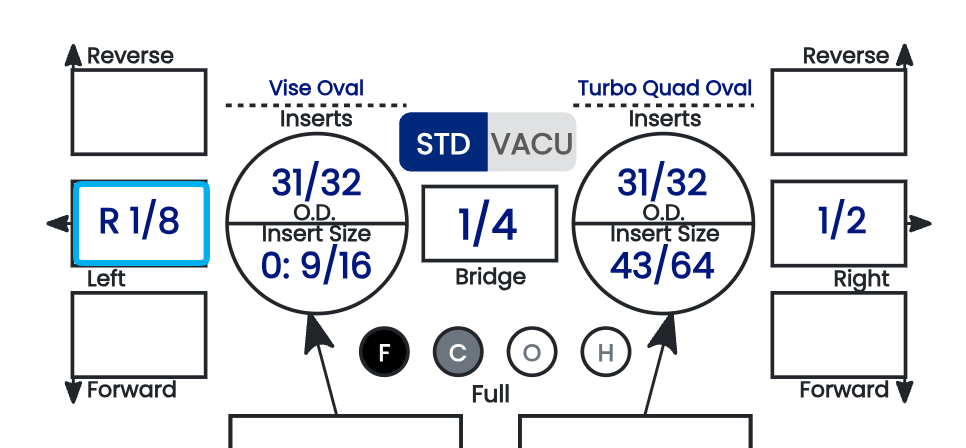
Finger pitch is entered directly into the pitch tiles surrounding each finger hole on the spec sheet. There's no direction to "select" — the tile you put the value in is the direction. This page covers how to read and enter those tiles for the middle and ring fingers.
🛠️ How the Pitch Tiles Work
Each finger hole is framed by pitch tiles, and the tile's position on the sheet determines the direction of the pitch:
- ✅ Forward — always points toward the middle of the sheet. Enter your forward pitch in the forward tile.
- ✅ Reverse — always points toward the outer side of the sheet. Enter your reverse pitch in the reverse tile.
- ✅ Lateral — the Left and Right tiles, self-explanatory by position.
You don't set a direction from a dropdown — you enter the value in the tile that corresponds to the direction you want. Forward/reverse and lateral are separate tiles, so a finger can carry both at once.
Note: To apply a pitch against a tile's default direction — for example, Right pitch on the left finger — scroll to the absolute bottom of that tile's drop-down. There you'll find values listed as Rx, where x is the desired pitch. These cross-direction entries live at the very end of the list, below the standard values.
Note: On fingertip fits, it is quite rare to see forward pitches on the fingers — most fingertip finger pitch is zero or reverse. Treat a forward finger pitch on a fingertip sheet as something worth double-checking against your source.
⚙️ Finger Pitch Is Fully Manual
There is no automation for finger pitch. Every finger pitch value — forward, reverse, and lateral, on both fingers — is manual data entry. Spectre Cloud records exactly what you type, with no auto-suggestion and no error validation behind these fields, so accuracy is entirely on the person entering it.
📋 Entering Finger Pitch — Step by Step
- Locate the pitch tiles around the middle finger and ring finger holes.
- For each finger, enter the forward or reverse value in the correct tile — forward points toward the middle of the sheet, reverse toward the outer side.
- Enter the lateral value in the Left or Right tile as needed.
- Repeat for both fingers.
- Review all the finger pitch entries before moving on to thumb pitch.
- For a cross-direction pitch (e.g. Right on the left finger), use the
Rxvalues at the bottom of the drop-down.
Related Sections
- 4.3.2 — Entering span measurements
- 4.3.4 — Inputting thumb pitch
- 4.1.4 — Pitch terminology: Forward, Reverse, Lateral, Zero
- 4.2.4 — Identifying grip type from a measurement sheet
- 4.5 — IBPSIA auto-suggestions
Tip: Because forward points to the middle of the sheet and reverse to the outer side, the sheet's own layout tells you the direction — you don't have to remember a sign convention. Enter each value in the tile that matches the direction you measured, and read the finger pitches back before saving, since nothing here is validated for you.