
Step-by-step guide
Following these steps will ensure a proper fit
- Warm up your hand ( either massage or bowl)
- Measure the MIDDLE FINGER
- Measure THUMB FLEXIBILITY
- Measure FINGER & THUMB hole sizes
Constants to fill out on the spec sheet
- Before starting the measurement, you can already write down some data on your spec sheet.
-
- Bowler Hand (Left or Right)
- Bridge between the fingers = 1/4
- Lateral pitches: 3/8 (middle finger) and 1/2 (ring finger)
- 5/16's rule

Mark the bowler's hand with a pen
- Mark the MIDDLE FINGER
- Find and mark the bending point of the FIRST joint.
- Find and mark the bending point of the SECOND joint.
- Measure the distance between both lines.
- Divide that distance in half.
- Draw a line.
- Use this line with your fitting tools.

5/16's Rule:
This rule is used to find the measurement of the RING finger.
-
Find and mark the FIRST joint of the RING FINGER
-
Slightly cup the client’s hand, similar to the curvature of a bowling ball.
-
Draw a line from the FIRST joint of the MIDDLE FINGER onto the RING FINGER
-
Measure the distance between both lines on the RING FINGER.
-
Use the following equation: Measurement from #4 is hereby designated X. --- 5/16 – X = +/- distance of the RING FINGER
Ex #1 : If X (distance between both lines on the ring finger.)is 7/16 --- 5/16 – 7/16 = -1/8
The span of the RING FINGER is 1/8 shorter than the span of the MIDDLE FINGER.
Ex #2: If X is 1/8 --- 5/16 – 1/8 = 3/16
The span of the RING FINGER is 3/16 longer than the span of the MIDDLE FINGER.

Using the fitting tools
- BT Ball Fitter
- Innovative Fitting Ball Prendre un photo avec le bal fitter pour montrer where to measure ??
Fingertip Pitches


Pitch what you see! 3/4 or more is very possible and sometimes required
Evaluate the thumb flexibility
The bowler's hand must be relaxed.
- Pull back on the thumb to measure the flexibility
- Follow the chart provided for the correct pitch based on span/flexibility
give a link to the chart ??
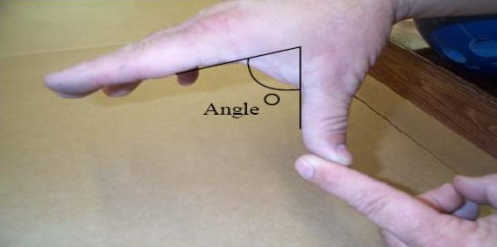

You might modify pitch for the following reasons:
-A longer thumb (Over 2 5/8'')
-
- Add 1/16 - 1/8'' reverse
- A shorter thumb (Under 2'')
-
- Subtract 1/16 - 1/8'' reverse
- Very moist skin
-
- Add 1/16 - 1/8'' reverse
- Extremely dry skin
-
- Subtract 1/16 - 1/8'' reverse
- If the bowler uses excessive grip pressure
-
- Check hole sizes to determine if they are too large
Recap of measurements
FINGERS:
- Check finger flex.
- For 80+% of your clients use REVERSE pitch only.
- ALWAYS REMEMBER TO COMPENSATE FOR GRIPS.
- Write down pitch on spec sheet to avoid confusion.


THUMB:
- Refer to thumb pitch chart.
- No lateral pitch for beginner/novice bowlers
Choosing Ball Weight:
Choosing the correct ball weight is crucial for first time and novice bowlers. Improper weight can make a comfortable grip uncomfortable.
- If the bowler is using a house ball comfortably for one game, and then gets tired... The same weight as the house ball, when fitted properly, should be fine
- If the bowler uses a house ball for three games with little to no problem, two pounds heavier than the house ball with a proper fit, should be fine
- For Junior bowlers; 10% of their body weight + 2 pounds as a maximum. You could also do same weight as their age to one pound less than their age will be fine
- Always let the customer test out the weight of the ball before drilling, to confirm the choice ( put undrilled ball in a see-saw)


Checking the Hand
Your customers hand will not always be perfect, the importance of checking for the unusual cannot be overstated.
Possible modifications are necessary for:
- Arthritic joints
- Tendinitis
- Sensitive nerve or tendon
- Pain, soreness or swelling
- Callus, pathological callus
- Missing fingers


Fitting Checklist:
- Determine and record hole sizes and shape
- Determine flexibility of the hand
- Measure and record the span
- Determine and record vertical thumb pitch


MEASURE THUMB AND FINGERS HOLE SIZE:
-FINGERS
. Check using grips
. Grip should be slide in with slight restriction. Once inside hole, it will contract slightly.
. Indicate OD size
-THUMBS
. If round , aim small and work with tool.
.If oval, consult chart.
. Measure base of thumb for taper.

"