Layout
Understanding the layout and ball motion !!!
- Basic Layout
- Dual layout
- Suggested layouts ( based on axis rotation )
- Layout Selection
- Sum of angles
- Completing the bowler’s arsenal
- Ratio of Angles
Basic Layout
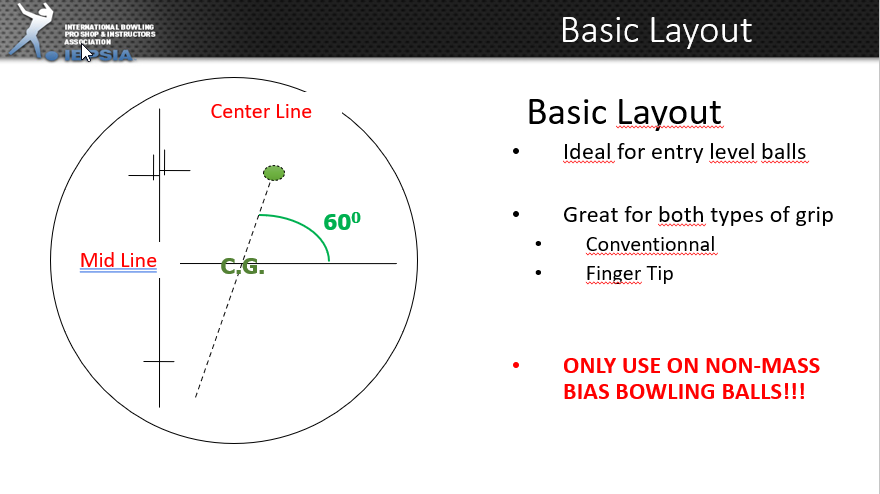
The basic 60-degree layout in relation to the CG is ideal for beginner bowlers and applies only to symmetrical balls. It’s also a great option regardless of your grip type, whether conventional or fingertip!
? Why this layout is considered “basic”
A 60-degree angle is an intermediate value — not too small (which would make the ball start rolling too early), and not too large (which would delay the reaction).
This creates a balanced and predictable ball motion, perfect for learning how to read lane conditions.
The CG is positioned slightly below and to the right of the pin (for right-handed bowlers) or left of the pin for left hander, which maintains good static balance without the need for balance holes or extra weight adjustments.
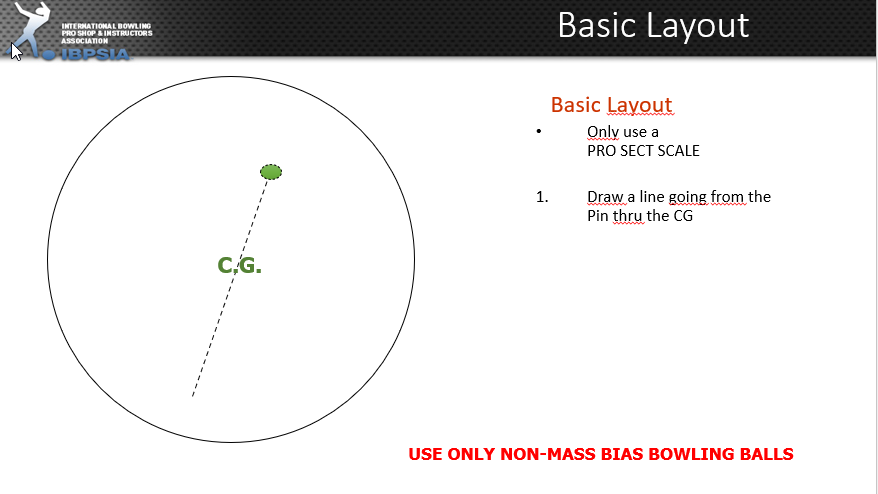
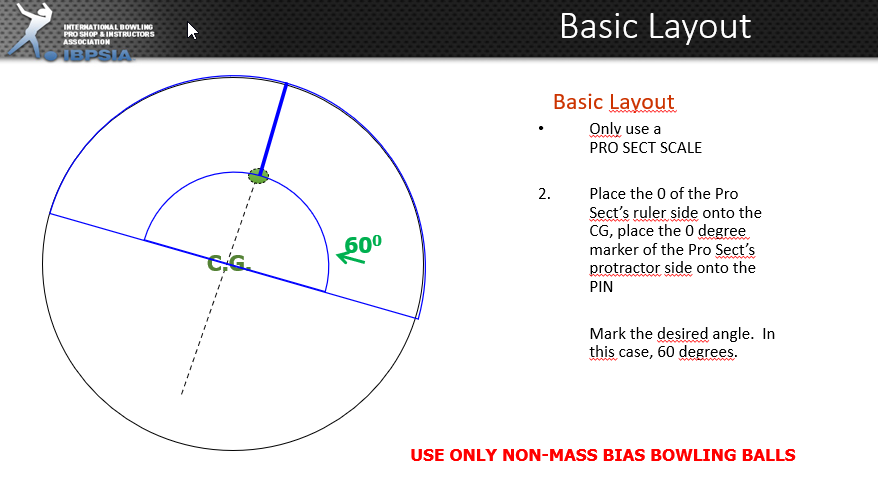
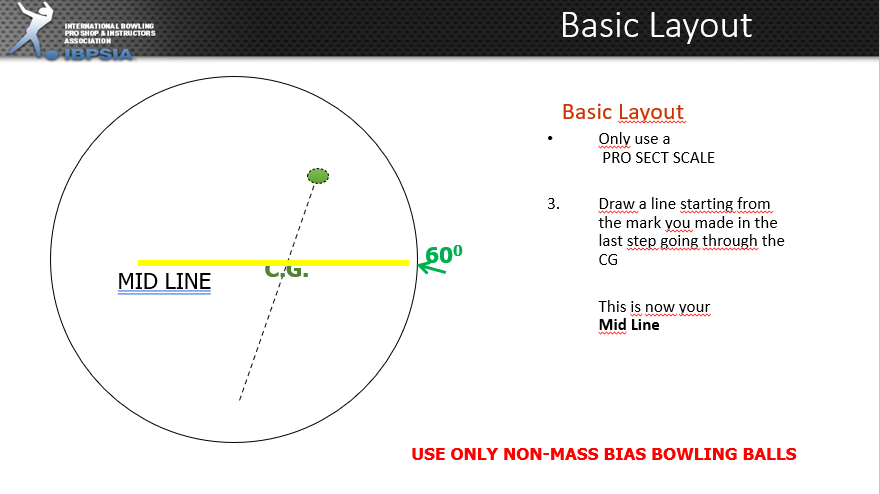
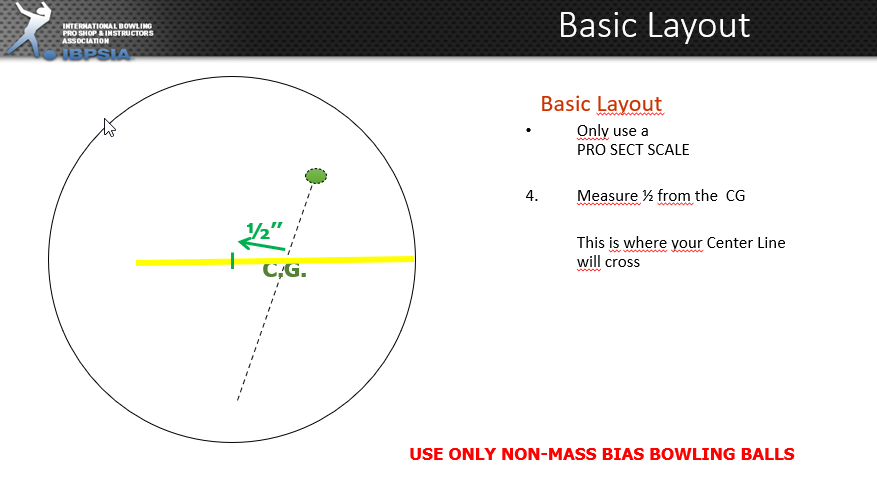
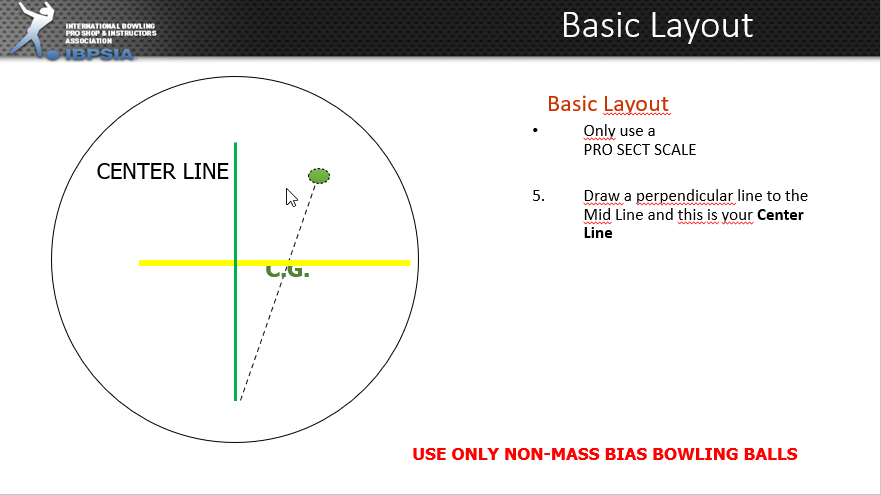
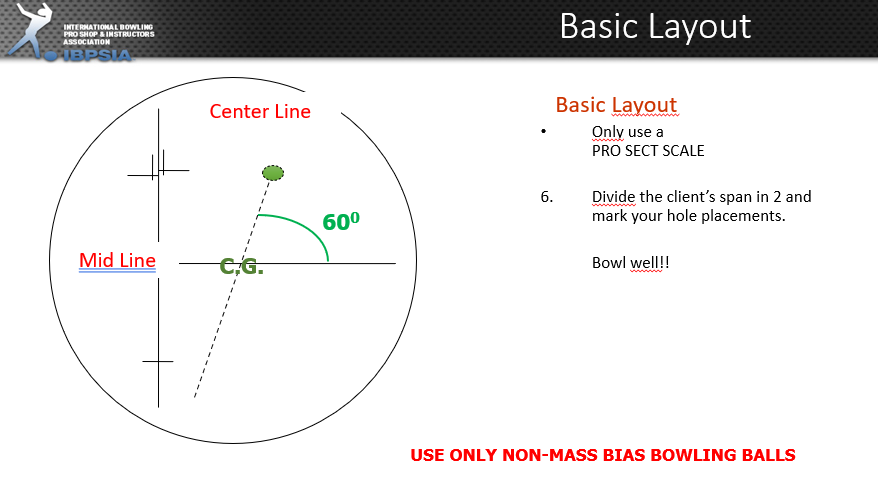
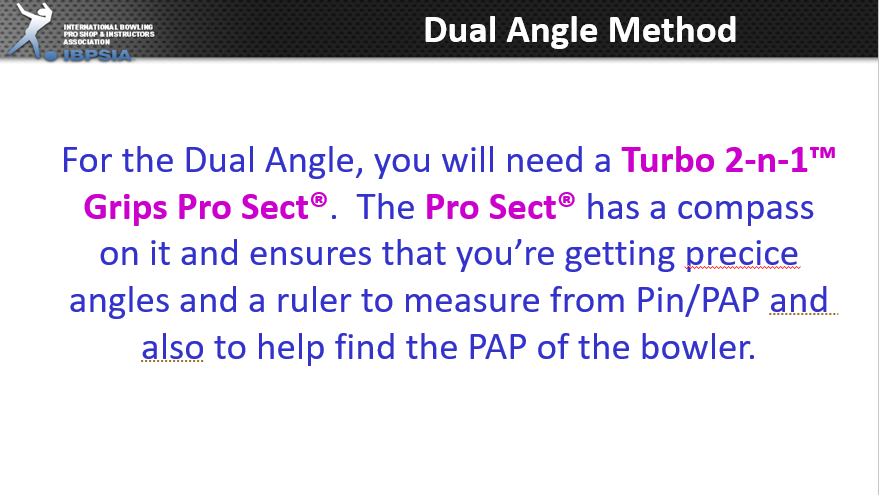
Use a prosect quart scale in order to process the layout . Here how it work in 6 steps :
STEP 1:
STEP 2:
STEP 3:
STEP 4:
STEP 5:
STEP 6:
Dual layout
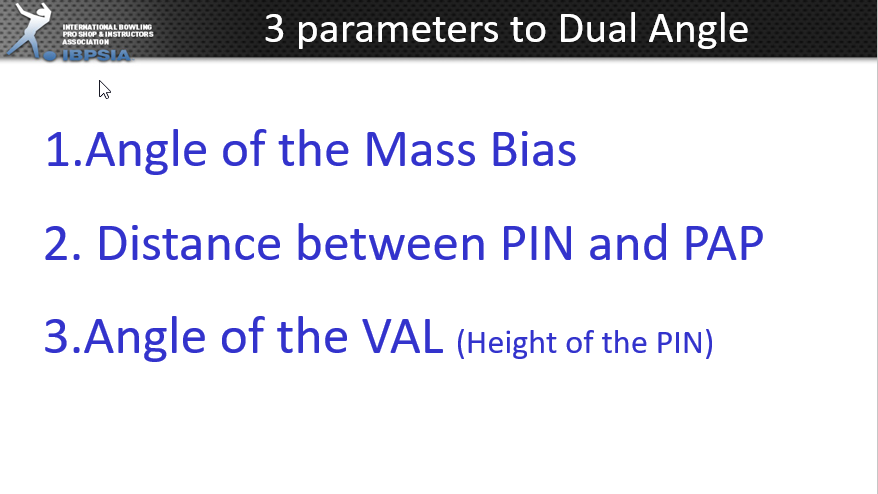
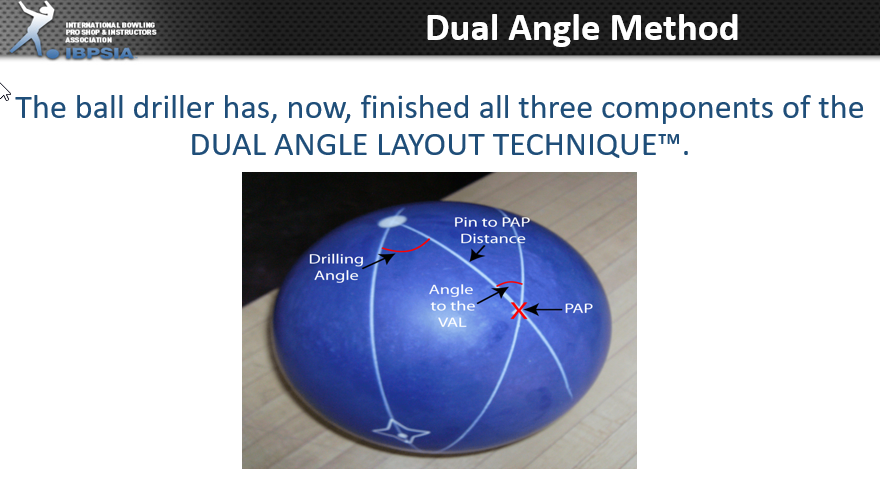
? The 3 Parameters of the Dual Angle Layout
-
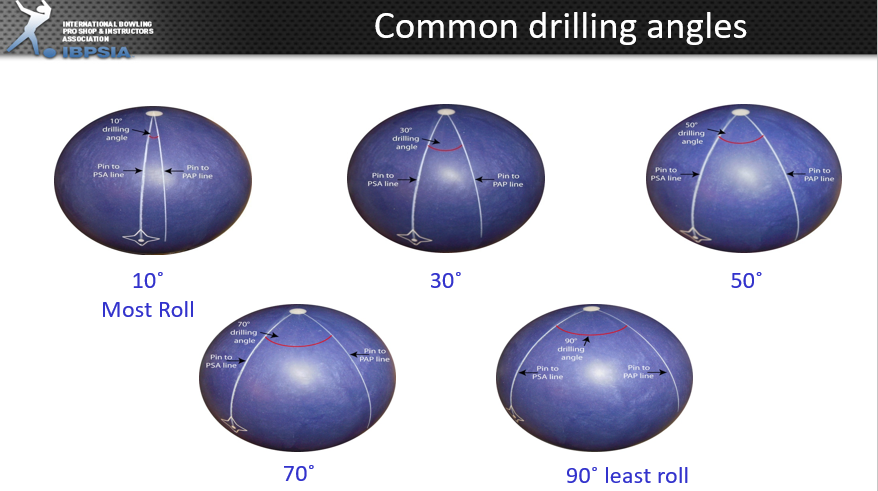
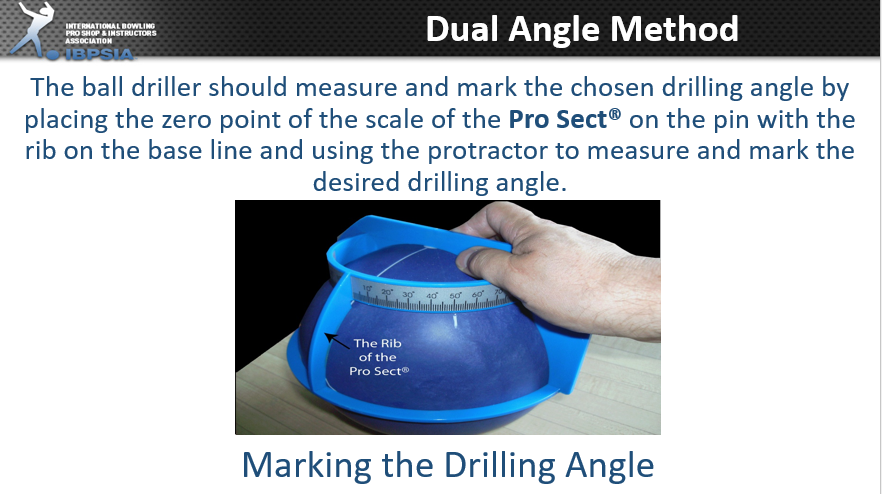
Drilling Angle (First Angle)
-
Pin-to-PAP Distance
-
VAL Angle (Second Angle)
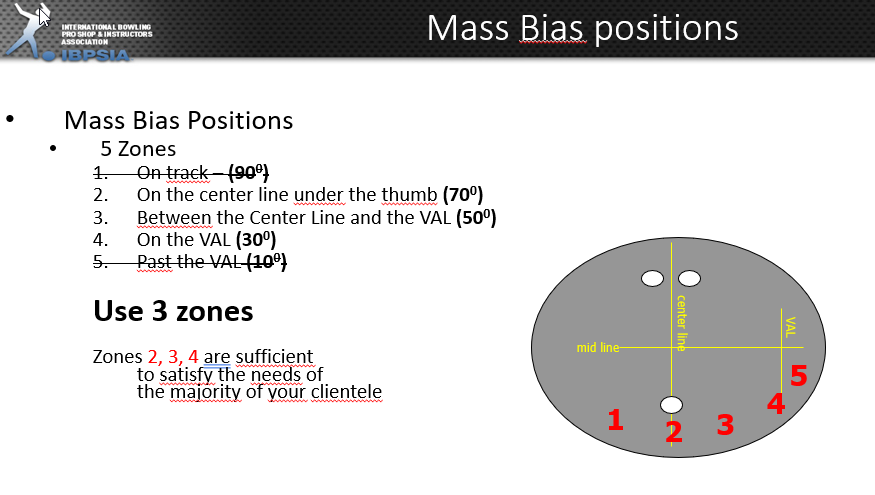
? Why does the Mass Bias angle matter?
-
A smaller MB angle means the ball will transition more smoothly from hook to roll, with less aggressive backend movement.
-
A larger MB angle increases the angularity and sharpness of the backend reaction.
-
Ball drillers use this angle to tailor the ball’s reaction for your style and lane conditions.
See exemple :

-
- Here the 3 zones recommended on the Mass Bias position :

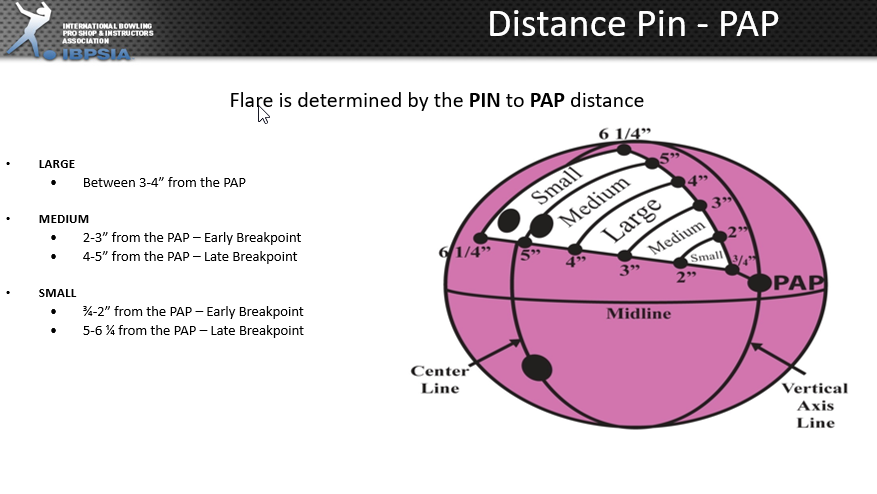
? What is Pin-to-PAP Distance?
-
Pin: The marker on the ball indicating the top of the core.
-
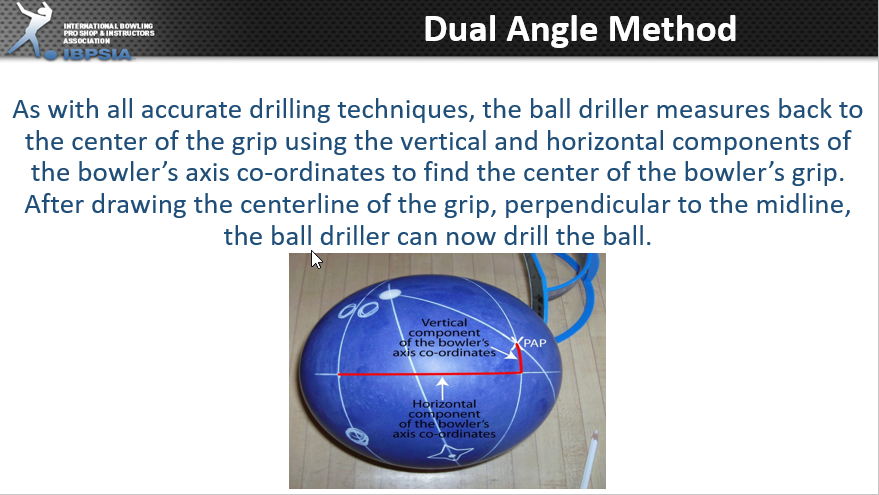
PAP (Positive Axis Point): Your personal axis of rotation on the ball, unique to your release.
-
Pin-to-PAP Distance: The straight-line distance between your PAP and the pin.
? How Does Pin-to-PAP Distance Affect Ball Reaction?
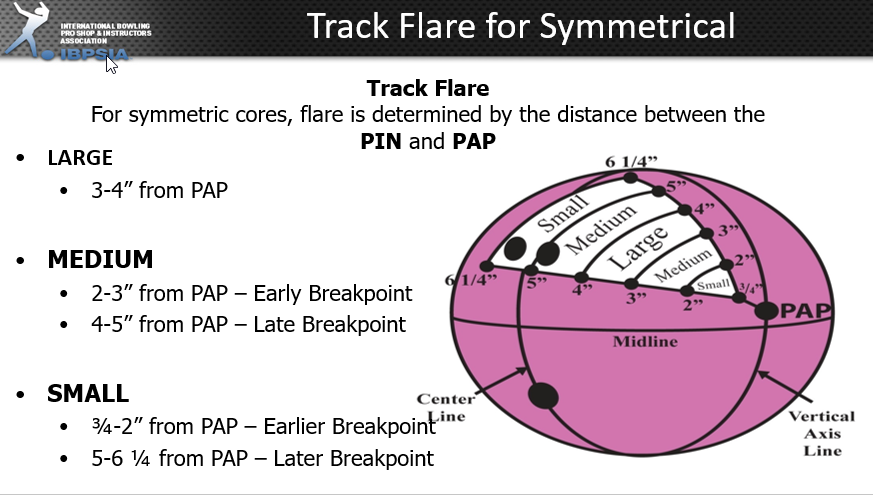
- Short pin-to-PAP distance (e.g., less than 3 3/8 inches): Places the core in a more stable position, leading to less track flare and an earlier, smoother roll.
- Medium pin-to-PAP distance (e.g., around 3 3/8 to 4 inches): Creates the most track flare and instability, resulting in a more aggressive reaction and a stronger hook. This distance is often considered the "max flare" position for symmetrical balls.
- Long pin-to-PAP distance (e.g., over 4 inches): Puts the core in a less stable position, causing the ball to hook later and roll longer down the lane. This can be useful for getting the ball to the pocket with more energy on specific lane conditions.

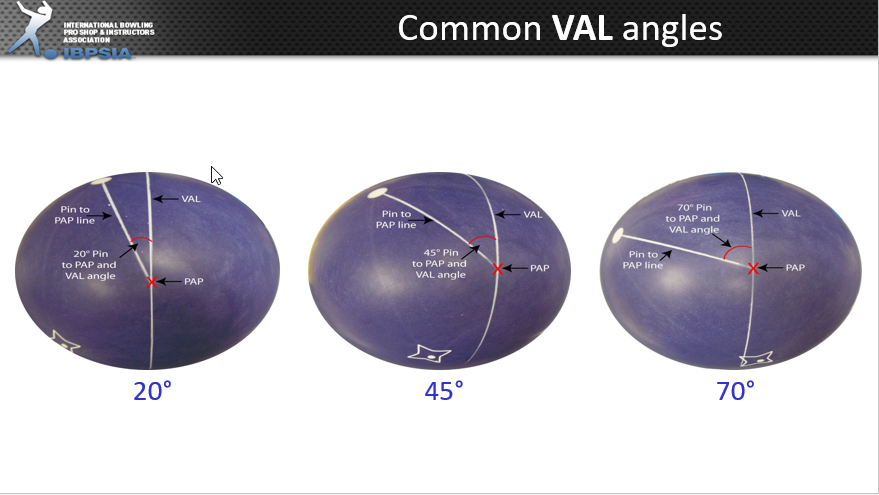
? What is the VAL Angle?
-
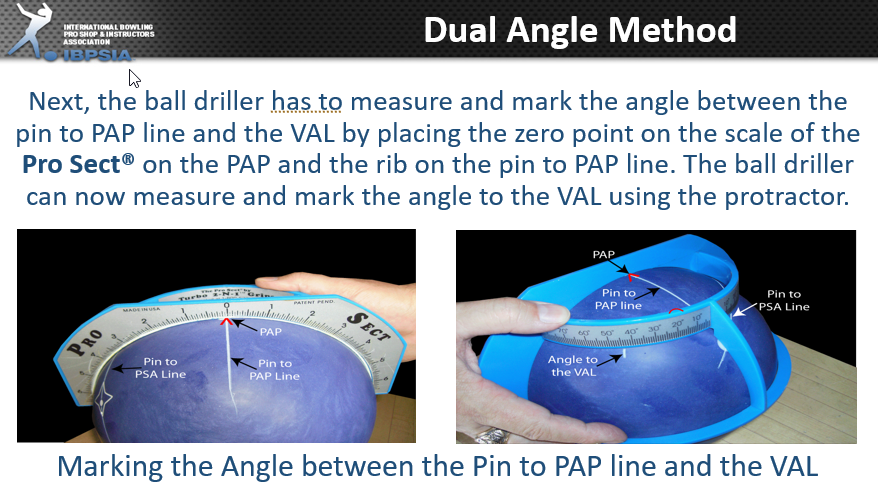
The VAL angle (Vertical Axis Line angle) is the angle between the line from your Positive Axis Point (PAP) to the Pin and the line from the PAP .
-
It’s a key that influences the shape and sharpness of the ball’s backend reaction.
? Effects of Different VAL Angles:
VAL Angle (degrees) Effect on Ball Reaction 25° or lower Sharper , more angular and agressive backend 30° to 45° Balanced backend with moderate angularity 50° or higher Smoother ,more controlled backend motion 
-
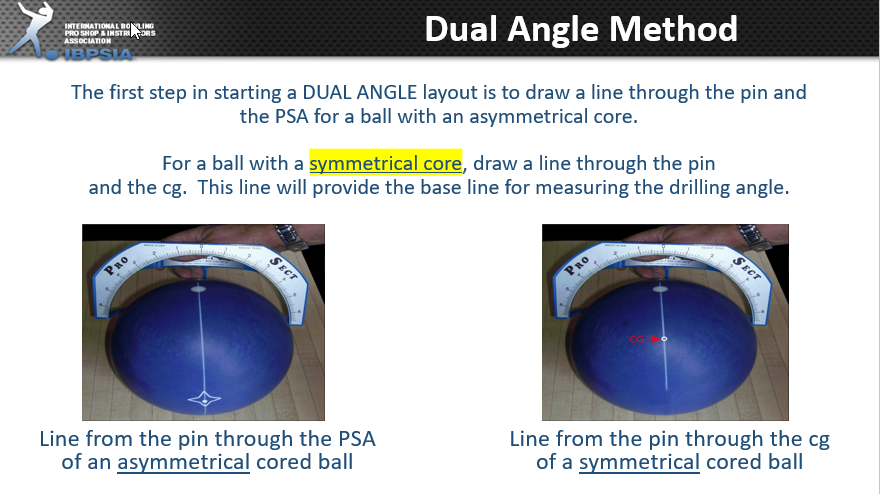
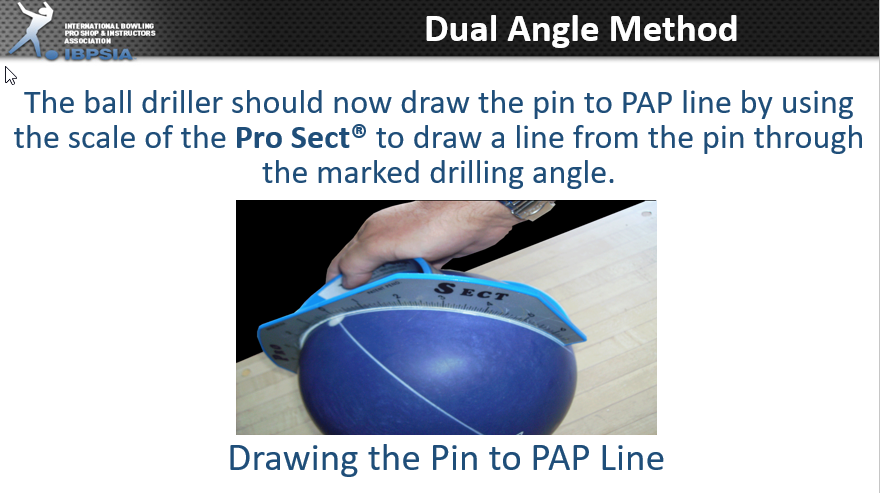
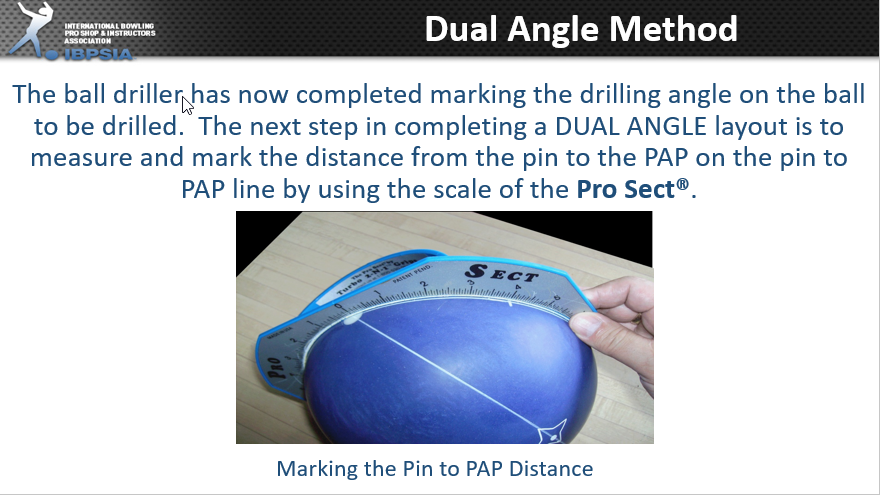
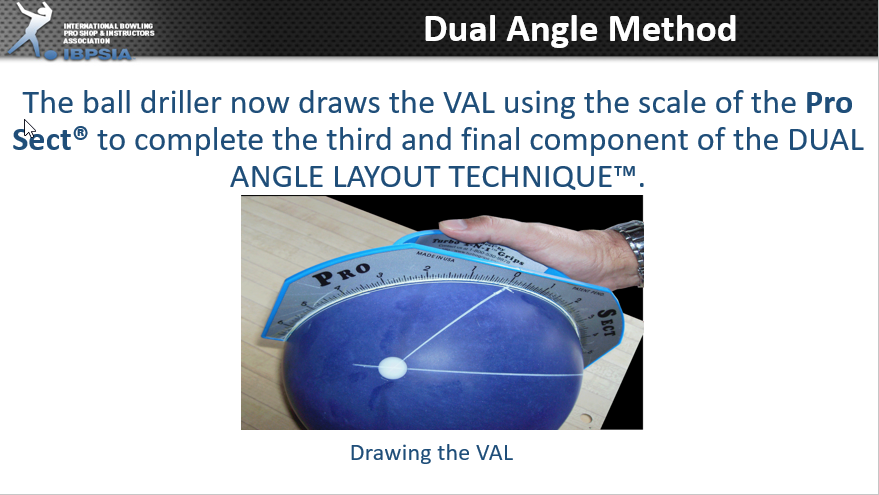
- Here the process in 8 steps how to create a Dual Angles layout:

- STEP 1:

STEP 2:

- STEP 3:

- STEP 4:

- STEP 5:

- STEP 6:

- STEP 7:

- STEP 8:
*This is an example of a layout based on a 5 x 1 PAP measurement. The holes can be positioned differently on the ball depending on your PAP
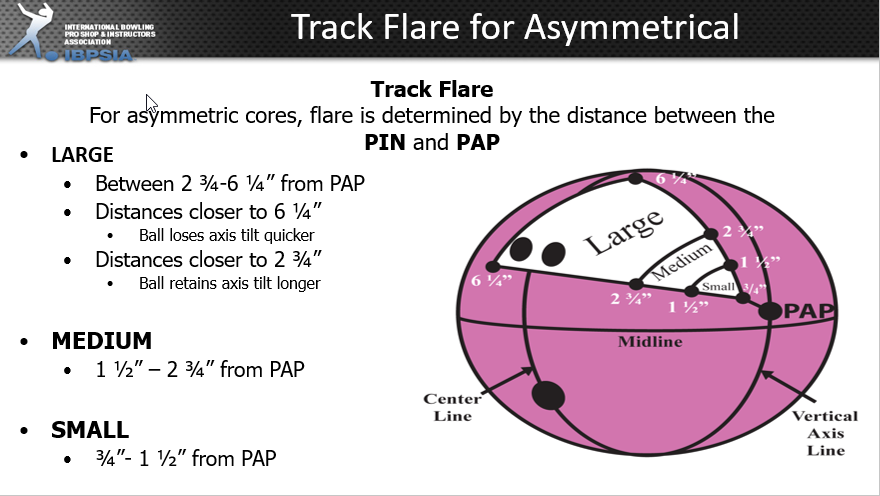
Take note for the track flare on Symmetrical and Asymmetrcial bowling :


-
Suggested layouts ( based on axis rotation )
Here a couples suggestions of layouts based on axis rotation .
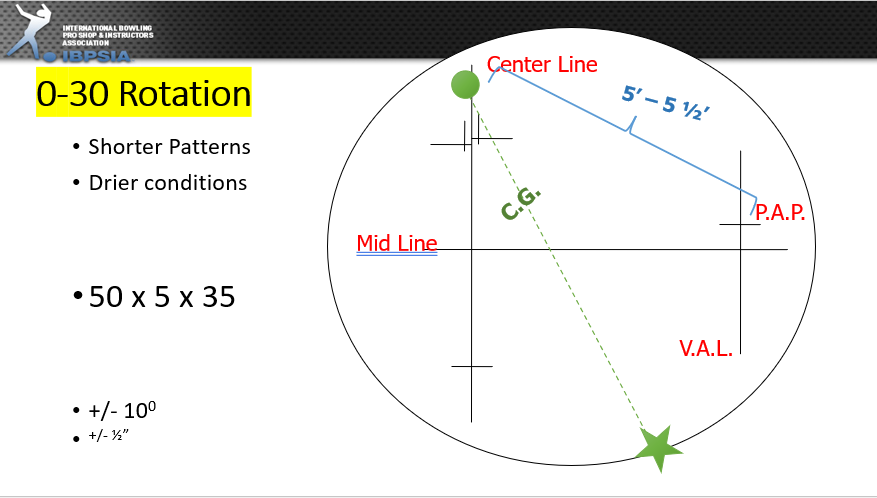
For bowlers have ( 0-30 degrees ) axis rotation :
For heavy or long patterns:
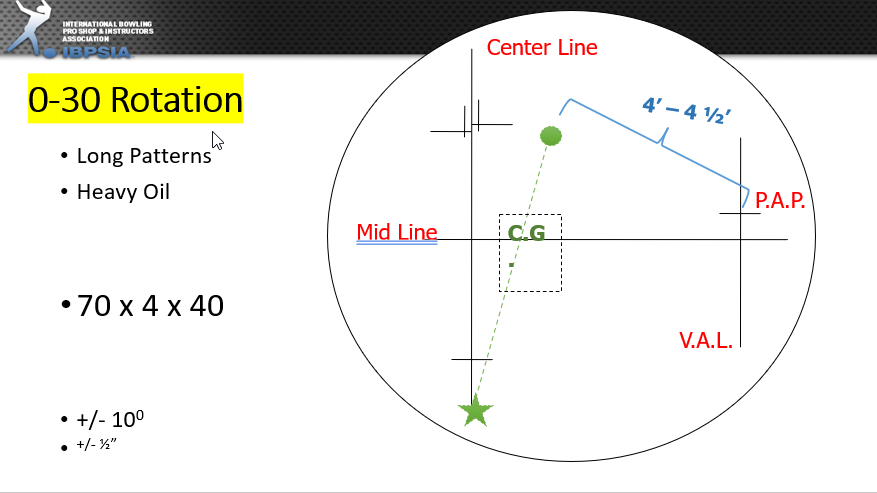
For shorts or driers conditions:
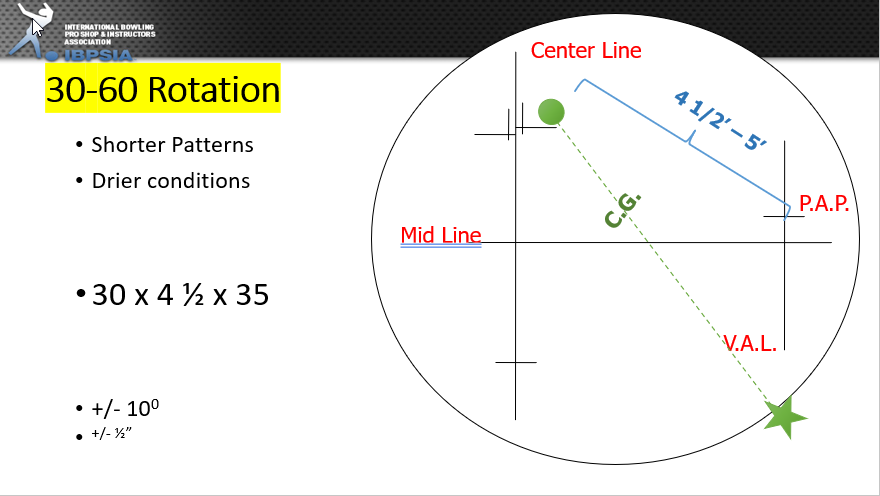
For bowlers located between ( 30-60°) axis rotation :
Heavy or long pattern :
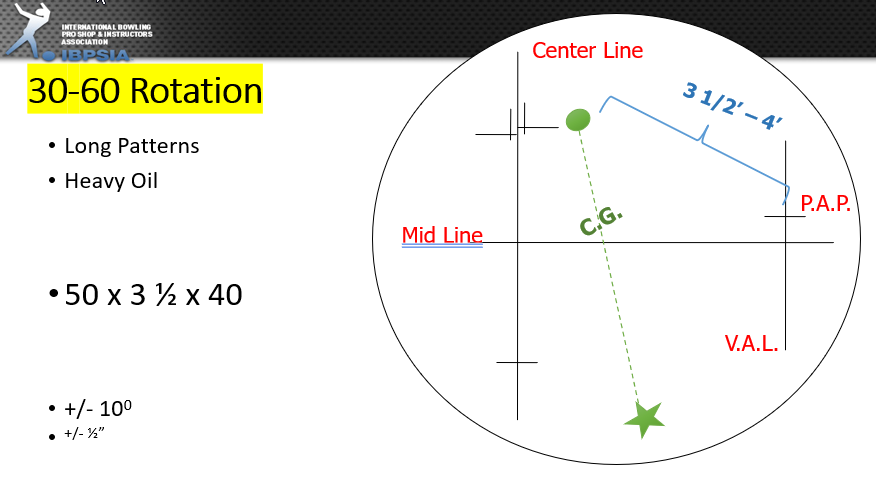
Short or drier conditions :
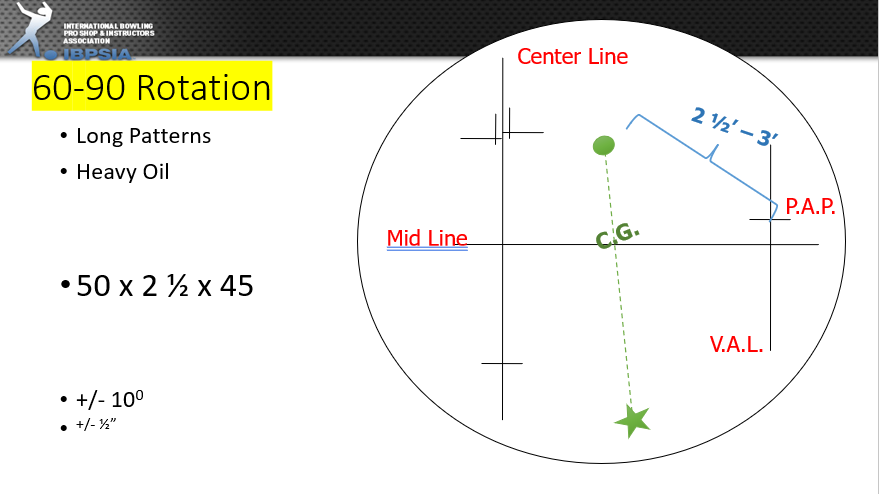
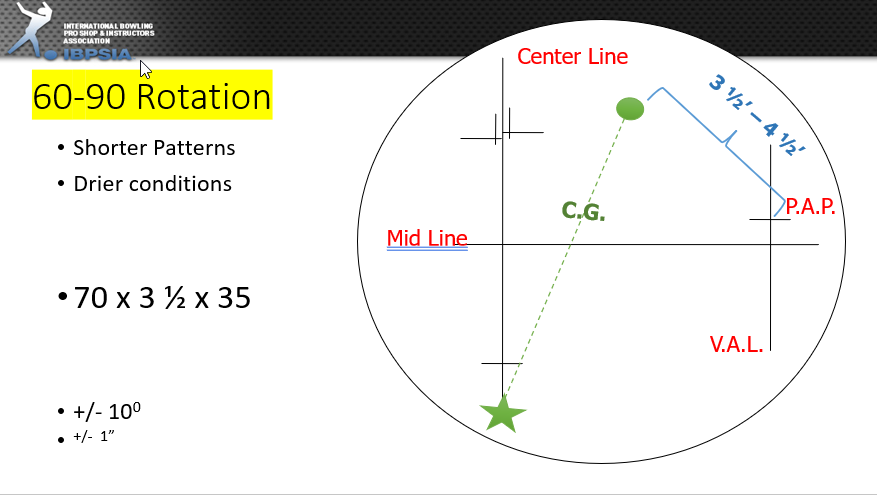
For bowlers located between ( 60-90°) axis rotation :
For Heavy or long pattern :
For short or drier conditions :
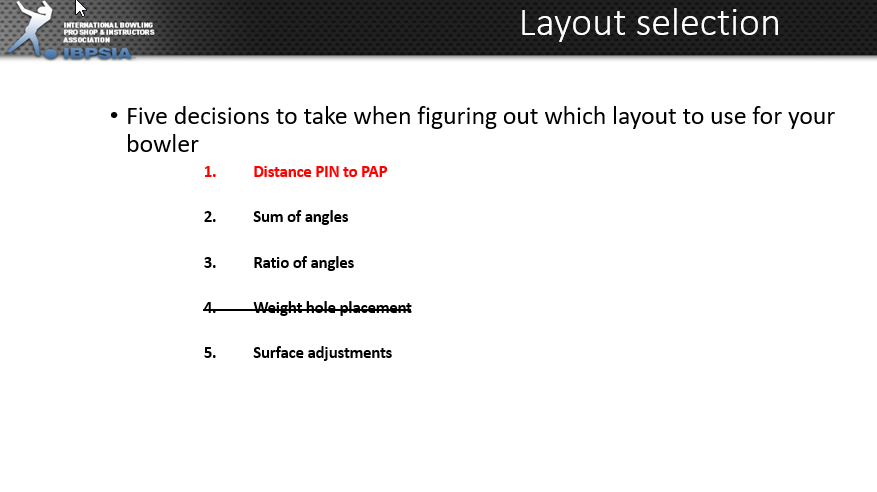
Layout Selection
There are now four decisions to make when choosing layout selection, since the weight hole is banned by USBC since August 2020.
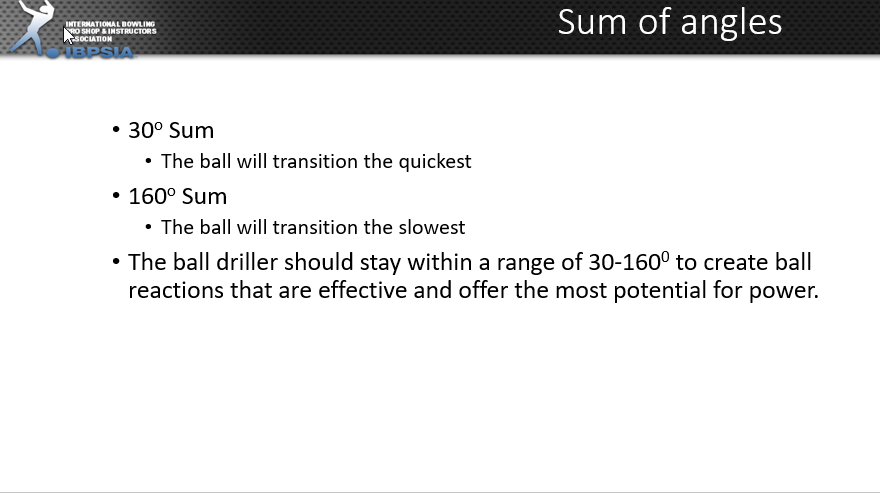
Sum of angles
? What Is the "Sum of Angles" in Bowling Ball Layouts?
In the Dual Angle system, a layout is described by three measurements:
Drilling Angle / Pin-to-PAP Distance / VAL Angle
Example:
60° × 4" × 40°
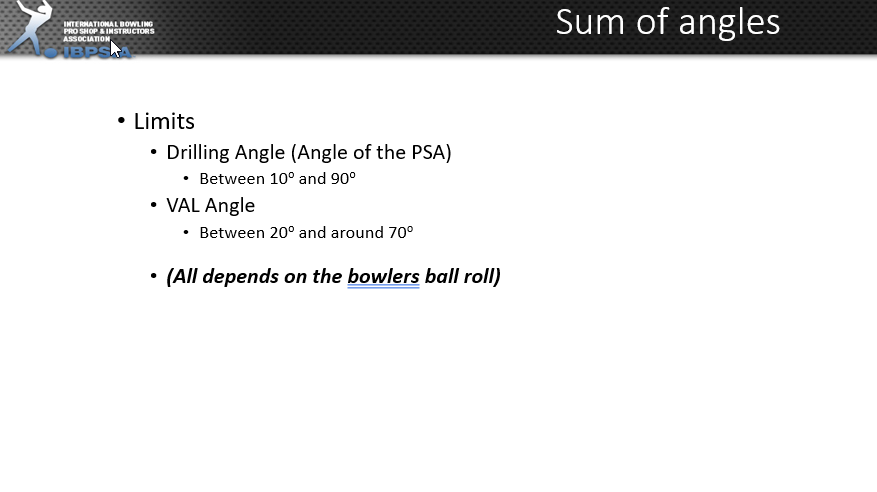
The sum of angles is simply the Drilling Angle + VAL Angle:
? 60° + 40° = 100° (Sum of Angles)
? What Does the Sum of Angles Control?
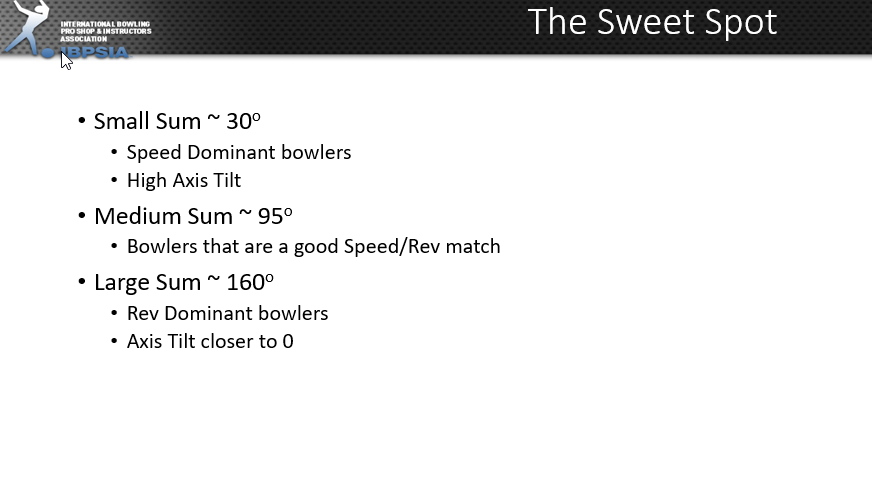
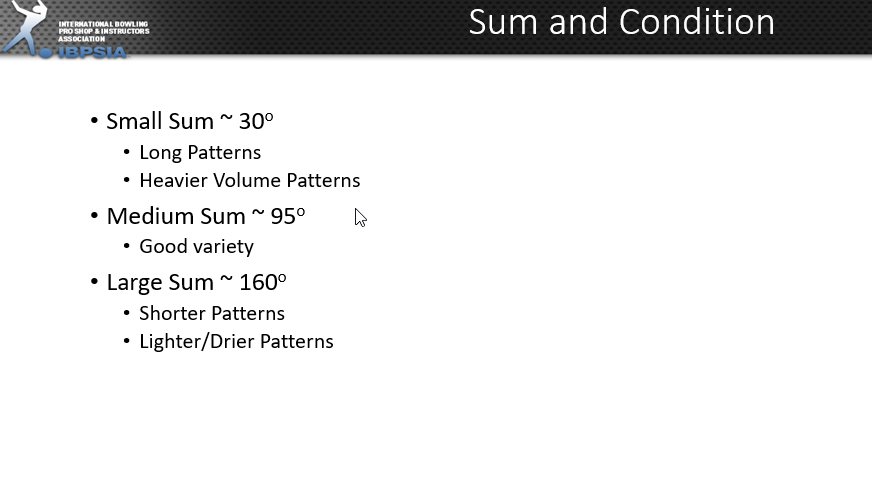
The sum of angles determines how early or late the bowling ball transitions from skid → hook → roll.
| Sum of Angles | Ball Motion | Lane Read |
|---|---|---|
| Small sum (≈ 70°–90°) | Earlier roll, stronger mid-lane read | Heavier oil or lower rotation players |
| Medium sum (≈ 100°–120°) | Benchmark reaction, balanced motion | Medium oil conditions |
| Large sum (≈ 130°–160°) | Delayed hook, sharper backend | Drier lanes or high rotation players |
?Recommended Sweet Spot (Base Values)
| owler Type | rilling Angle | VAL Angle | Sum of Angles (Sweet Spot) | Type of Reaction |
|---|---|---|---|---|
| Stroker (low rotation, medium speed) | 40°–50° | 30°–40° | 70°–90° | Smooth and predictable reaction |
| Tweener (medium rotation) | 50°–60° | 40°–50° | 90°–110° | Balanced / benchmark reaction |
| Cranker (high rotation, higher speed) | 60°–70° | 50°–60° | 110°–130° | Longer and more angular reaction |
? Example Layouts by Condition
| Lane Condition | Example Layout | Sum of Angles | Reaction Type |
|---|---|---|---|
| Heavy oil | 40° × 4" × 30° | 70° | Early, smooth arc |
| Medium oil | 60° × 4.5" × 40° | 100° | Benchmark motion |
| Light oil | 80° × 5" × 60° | 140° | Long, angular backend |
Completing the bowler’s arsenal
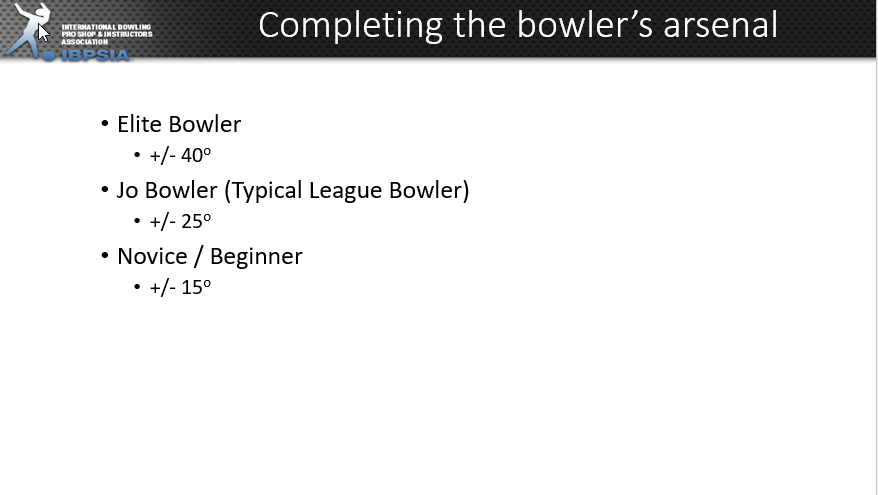
? 1. Novice Bowler (Beginner or Entry-Level Player)
Profile:
Learning basic fundamentals — approach, release, targeting, and spare shooting.
Focus is on building confidence and consistency rather than variety.
Goal:
Develop a simple, reliable setup that teaches how the ball reacts to the lane.
Suggested Arsenal:
| Purpose | Ball Type | Description |
|---|---|---|
| Strike Ball | Medium-strength reactive or hybrid | Forgiving motion on house conditions |
| Spare Ball | Plastic/polyester | Straight roll for picking up spares |
| Optional Ball | Urethane | Useful for controlling dry lanes or learning hook motion |
Key Focus:
-
Repeat shots consistently
-
Learn how oil affects ball motion
-
Build a strong spare-shooting routine
? Completing the Arsenal:
When a novice can control one strike ball and one spare ball effectively, their basic arsenal is complete.
? 2. Typical League Bowler (Intermediate Player)
Profile:
Has good mechanics and competes regularly in league or local tournaments.
Understands lane play and makes small adjustments during transitions.
Goal:
Build a versatile arsenal that can handle different house patterns and moderate oil changes.
Suggested Arsenal:
| Purpose | Ball Type | Description |
|---|---|---|
| Heavy Oil Ball | Solid reactive (asymmetrical or strong symmetrical) | Strong traction on fresh oil |
| Benchmark Ball | Hybrid or medium-strength solid | Reads the lane well — first ball out of the bag |
| Dry Lane Ball | Urethane or weaker pearl reactive | Provides control when lanes break down |
| Spare Ball | Plastic | Straight for spares and corner pins |
Key Focus:
-
Learn to read transitions and switch equipment strategically
-
Experiment with surface adjustments (sanding, polishing)
-
Develop control over ball speed and axis rotation
? Completing the Arsenal:
When a league bowler has options for heavy, medium, and dry lanes — plus a reliable spare ball — their arsenal is complete for most conditions.
? 3. Elite Bowler (Advanced or Professional Player)
Profile:
Highly skilled competitor with advanced understanding of layouts, coverstocks, and lane transitions.
Competes in sport or professional patterns where conditions change quickly.
Goal:
Build a comprehensive, specialized arsenal that offers multiple ball motion shapes for every oil pattern and transition.
Suggested Arsenal:
| Purpose | Ball Type | Description |
|---|---|---|
| Heavy Oil Ball | Strong asymmetrical solid reactive | Creates early traction and control on long patterns |
| Benchmark Ball | Symmetrical hybrid/solid | Balanced motion for reading pattern shape |
| Transition Ball | Pearl reactive | Clean through the fronts with a sharp backend |
| Control Ball | Urethane or smooth symmetrical | For short or dry patterns and precision |
| Spare Ball | Plastic | Straight, dependable for all spare shots |
| Specialty Options | Duplicates with different surfaces/layouts | Fine-tuned to match specific conditions |
Key Focus:
-
Match surfaces and layouts to pattern demands
-
Anticipate lane transition and adjust quickly
-
Use data, rev rate, and angle management to stay consistent
? Completing the Arsenal:
When an elite bowler has multiple reaction shapes (early roll, benchmark, clean/strong, smooth/control, spare) and can match them to any condition, their arsenal is truly complete.
⚖️ Comparison Summary
| Category | Novice Bowler | Typical League Bowler | Elite Bowler |
|---|---|---|---|
| Skill Focus | Fundamentals & control | Versatility & adjustments | Precision & adaptability |
| Number of Balls | 2–3 | 4–5 | 6–8 (or more) |
| Knowledge of Ball Motion | Basic | Intermediate | Advanced |
| Condition Readiness | Basic house shot | Multiple house & short sport patterns | Full range of oil patterns |
| Arsenal Goal | Build consistency | Add versatility | Maximize performance & control |
? Final Summary
A Novice completes their arsenal with simplicity and control.
A Typical League Bowler completes theirs with variety and versatility.
An Elite Bowler completes theirs with precision and adaptability for every lane condition.
Ratio of Angles
? The “Ratio of Angles”
The ratio between the drilling angle and the VAL angle gives insight into how sharp or smooth the ball’s motion will be.
Ratio = Drilling Angle : VAL Angle
? Higher Ratio (e.g., 70° : 30°)
-
More length in the front part of the lane
-
Sharper backend reaction
-
Best for high-rev players or when lanes are dry
? Lower Ratio (e.g., 40° : 70°)
-
Earlier, smoother roll
-
More control on heavier oil or sport conditions
-
Best for speed-dominant or lower-rev players
? Example Layouts
| Bowler Type | Example Layout | Ratio | Reaction Shape |
|---|---|---|---|
| Speed-Dominant | 40° × 4" × 70° | 1:1.75 | Earlier, smoother reaction |
| Balanced (Tweener) | 55° × 4½" × 40° | 1.4:1 | Benchmark shape |
| Rev-Dominant | 70° × 5" × 30° | 2.3:1 | Length with sharp backend |
? Summary
| Term | Controls | Lower Value | Higher Value |
|---|---|---|---|
| Drilling Angle | Skid phase | Earlier roll | Later roll |
| VAL Angle | Backend motion | Sharper | Smoother |
| Ratio of Angles | Overall shape | Smooth/control | Angular/strong |
? In Short:
The ratio of angles defines how fast or slow your ball transitions from skid → hook → roll.
Higher ratio = more angular shape
Lower ratio = smoother, more controlled shape