Drilling
Preparation for drilling
Process
There are 3 separate processes that have to be achieved in order to drill a ball for a bowler.
First, we need the measurements for the bowler’s hand, whether that is copying previous measurements, or taking new ones (see chapter – Fitting).
Second, we need to know where on the ball surface we are going to drill the holes (Yes, it does matter). Determining the location of the holes (see chapter – Layouts).
Third, is the process of physically drilling the holes in the ball. We will cover that step by step in this chapter, and we will assume that you already have the measurements and that it has already been determined where you want to drill the holes.
Prepare necessary equipment and tools
Milling machine / Drill press - Make sure it's clean when you start the job and that the pitches have been calibrated.
Drill bits - Make sure they have been sharpened recently.
Ruler - Span ruler that is accurate to at least 1/16" - Having a post to secure it can be handy.
Bevel sander - We recommend putting on a new sanding disc for every ball you drill for consistency.
Grease pencils / pinpoint scriber - For drawing the reference lines on the ball. If you want to use a scriber, make sure it's ok with the customer.
Instant cure glue - For installing finger inserts, thumb inserts, thumb slugs and interchangeable thumbs.
In the shop
-Here are the important things to keep in mind in order to drill your bowling ball !!!
. Must-have tool
. Understanding the movement of the drill press
. Finishing the hole
. How to properly glue grips
. How to center a slug and make a round hole
. Tools that will make your life easier
Drilling Options
Step by step instructions on how to drill the holes in a bowling ball
Option #1 – Drilling the finger holes first
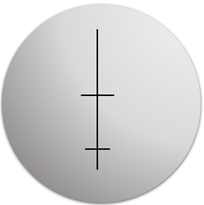
1) Draw centre line and midline of grip
2) Dividing the span of the middle finger in half, draw the span line for the middle finger and ring fingers
3) Draw bridge lines
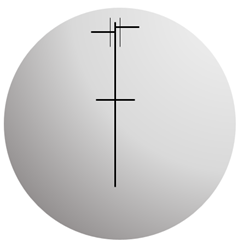
4) Select the correct drill bit for the middle finger and set the correct pitches
5) Align the drill bit so that the cutting edges are lined up to just touch the bridge line and span line
6) Drill middle finger hole
7) Repeat steps 4 – 6 for the ring finger
8) If the specs (measurements) call for finger inserts, bevel the edges of the holes slightly and install them now
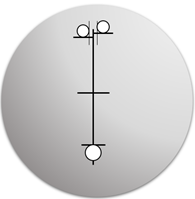
9) Using a ruler that is accurate to at least 1/16”, place it at the bottom centre of the middle finger hole
10) Refer to spec sheet for the middle finger span
11) Measure from the middle finger along the centre line and mark the exact span distance by drawing an arc
12) Repeat steps 10 & 11 for the ring finger
13) Select the correct drill bit for the thumb and set the correct pitches
14) Align the drill bit so that the centre of the drill bit is on the centre line and so the cutting edge of the bit will just touch the spot where the 2 arcs intersect
15) Drill the hole
Option #2 - Drilling the thumb hole first
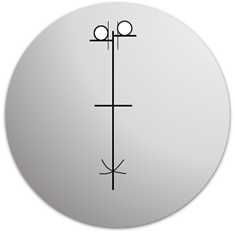
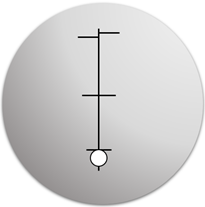
1 1) Draw center line and midline of grip
2) Dividing the span of the middle finger in half, draw the span line for the thumb hole
3) Select correct drill bit for the thumb hole
4) Set the correct pitches
5) Align the drill bit so that the tip of the bit is on the centerline and the front of the bit just touches the span line
6) Drill thumb hole
7) Using a span ruler accurate to 1/16”, place the clip on the front edge of the thumb hole
8) Refer to the spec sheet for span measurements
9) If installing finger inserts, measure the thickness of the front edge of the insert and subtract that amount from the total span (Example: the total span is 4 1/2” and the insert is 3/16” then the edge to edge or cut span is 4 5/16”)

10) Measure from the front edge of the thumb hole to a point 1/2” to the left and 1/2” to the right of the centerline, and mark the span lines
11) Draw bridge lines (1/4” for fingertip w/inserts, 3/8” for conventional)
12) Select the correct drill bit and set the pitches for the middle finger
13) Align drill bit so that the edge of the drill bit is set to just touch the span line and the bridge line.
14) Drill hole for middle finger. 1 1/2” deep for fingertip w/inserts and 2 1/4” deep for conventional
15) Repeat steps 12 – 14 for the ring finger hole
16) Bevel finger holes and install the inserts if necessary
Drilling oval holes
Many thumbs are not round, and drilling an oval hole can give those customers a more comfortable and more useful fit
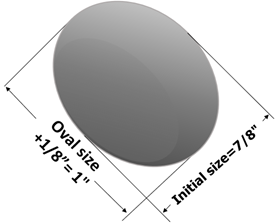
As an example, a customer’s thumb is 7/8” from front to back but is 1” from side to side
1) Set the correct pitches for the pilot hole (first cut) of the oval
2) Select the starting bit (should be the same as the front to back measurement of the thumb)
3) Drill the pilot hole
4) Move the table according to the calculations that Spectre has given you and make the next cut
5) Continue the procedure until you have made the final cut and confirm the correct side to side measurement with a calipers
6) Make sure to follow the movements calculated by Spectre to assure the smoothest oval with the least amount of finishing work
Finishing work
Beveling
Beveling is a procedure that is very important in making sure that every ball for the same bowler feels the same. Different amount of bevel can make the span feel either longer or shorter, therefore it is important to practice for consistency
It is recommended that you use a brand new sanding disk with every ball you do. This will make it easier to be more consistent
Finger Inserts
Finger inserts must be glued into the ball by rule so that they will not fall out and they are flush with the surface of the ball. Good technicians should be able to glue the grips in effectively with only 3 or 4 drops of super glue placed properly
Thumb slugs and Interchangeable thumb inserts
The majority of higher level bowlers will use either a slug or an interchangeable thumb insert to give them a more consistent feel from one ball to another. When using a slug or an interchangeable insert, double check your math to make sure that you end up with the correct span after it is installed