4.3.2 Entering span measurements, F, C, O, H
4.3.2 step-by-step
Span measurements define the distance between the thumb hole and each finger hole. Spectre Cloud supports four span types, and it's important to enter values under the correct one — the number only means what it's supposed to when it's paired with the right span type.
📐 The Four Span Types (Summary)
Spectre Cloud uses four span measurement types. Each is explained in full — including how it's measured and when to use it — in 4.1.2. In brief:
- ✅ Full Span (F) — the complete measured span, everything included, inserts and all.
- ✅ Cut to Cut (C) — Full Span minus the insert thickness; used when drilling thumb-first.
- ✅ Outer to Cut (O) — for interchangeable thumbs; inside of the female interchangeable to the cut of the finger OD hole.
- ✅ Hole to Hole (H) — biggest hole to biggest hole (what the PBA truck calls "Cut-to-Cut").
For the full detail on each type, see 4.1.2 — Span types. This page covers how to enter the values once you know which type you're working in.
🎳 The Span Fields on the Spec Sheet
The two span boxes sit at the center of the spec sheet, directly below the finger holes. For a right-handed bowler:
- ✅ The left box is the middle finger.
- ✅ The right box is the ring finger.
Enter each finger's span in its box. The values are almost always different from one another, so confirm you're entering each in the correct field.
Note: The middle and ring finger boxes flip when you change the bowler's dominant hand. Because handedness mirrors the layout, switching a bowler from right-handed to left-handed (or vice versa) swaps which box is the middle finger and which is the ring — so always confirm the bowler's hand is set correctly before reading or entering span values.
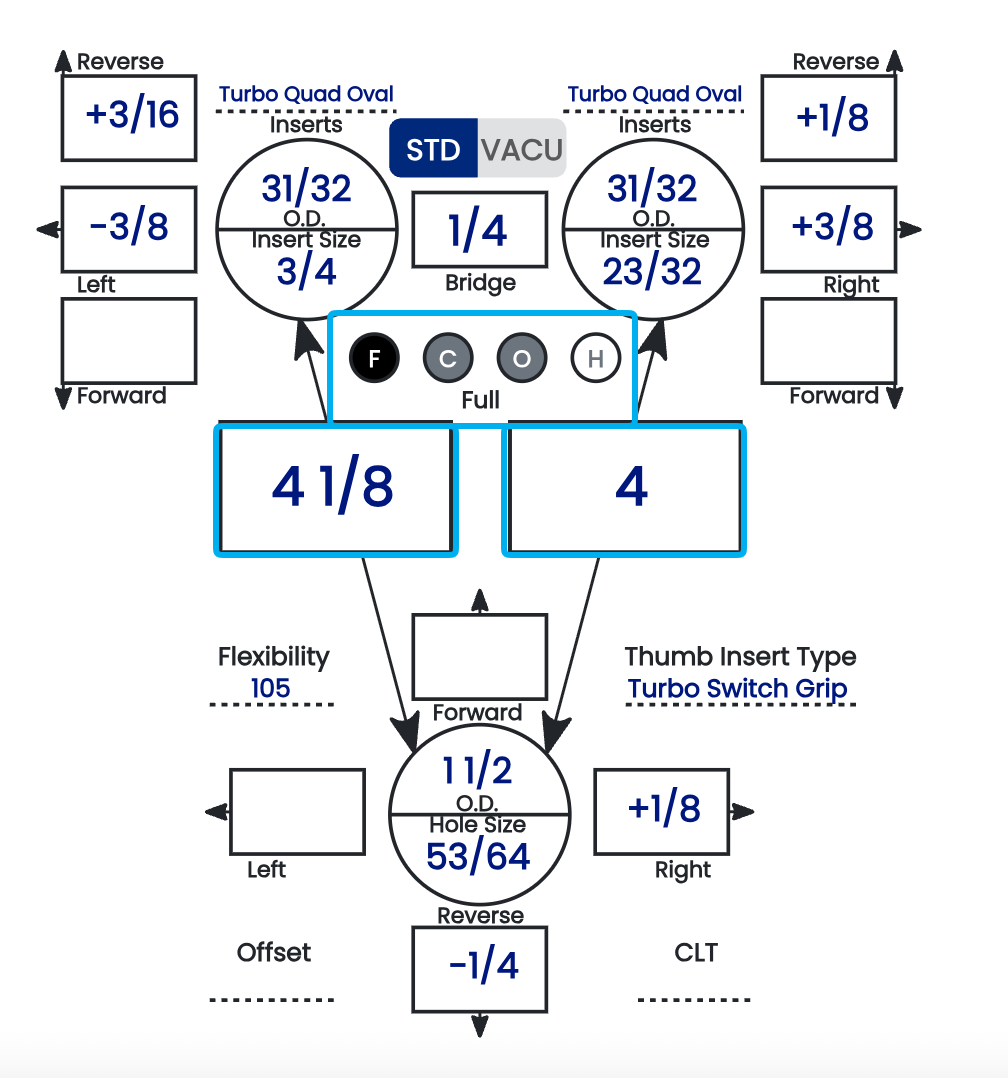
🔘 Reading the F / C / O / H Bubbles
Between the two span boxes is a row of four bubbles — F, C, O, H — one for each span type. Their shading tells you, at a glance, which span type is currently displayed and which ones already hold a value:

| Bubble state | Meaning |
|---|---|
| Black background | This is the span type currently being displayed in the span boxes. |
| Grey background | A value is present for this span type (but it's not the one currently displayed). |
| White background | Nothing is present — the value for this span type is blank or incomplete. |
The bubbles let you switch which span type is shown and immediately see which types are already filled in. A grey bubble means that span exists on the sheet; a white bubble means it doesn't yet.
⚙️ Only Cut to Cut Is Automated
This is the key thing to understand about span entry: Cut to Cut is the only span type with any automation behind it.
- ✅ Cut to Cut (C) has an automated toggle in the settings — Autofill Cut to Cut (2.6.9) — which derives the value from the Full Span and insert dimensions.
- ❌ Full Span, Outer to Cut, and Hole to Hole are manual entry only. There is no automation behind them — whatever you type is what's recorded.
- ❌ None of the span types have error validation. Spectre Cloud will not flag a value that's out of range, transposed, or entered under the wrong span type — the entry is taken exactly as given.
Because there's no validation catching mistakes, the responsibility for a correct value sits entirely with the person entering it. Confirm the span type and re-check the numbers before saving.
🔢 Adjusting Span Increments
The values available when entering a span come from a drop-down, and the increment of that drop-down is adjustable in the settings (see 2.2.7). If the default steps are finer or coarser than you like to work in, change the increment so the drop-down offers the values that match your shop's habits.
📋 Entering Span — Step by Step
- Confirm the bowler's dominant hand is set correctly — this determines which box is the middle finger and which is the ring.
- Confirm the span type is set correctly (see 4.2.3) — check that the intended bubble (F, C, O, or H) is the one with the black background.
- Enter the middle finger span in its box.
- Enter the ring finger span in its box.
- Double-check both values against your fitting source before moving on.
Related Sections
- 4.1.2 — Span types explained in detail: Full Span, Cut to Cut, Outer to Cut, Hole to Hole
- 2.2.7 — Adjusting span measurement increments
- 4.2.3 — Selecting span type (F, C, O, H)
- 4.2.4 — Identifying grip type from a measurement sheet
- 2.6.9 — Autofill Cut to Cut: the one automated span toggle
- 4.3.3 — Entering pitch values
Tip: Glance at the bubble row before you save. A black bubble tells you which span you're looking at, and the grey ones tell you which other spans are already on file — an easy way to confirm nothing you meant to enter was left white and blank.