# 04 Spec Sheets _origianl
Measurements · Drilling · Records
# 4.1 — Terminology & Concepts
# 4.1.1 Acronyms Used in Spectre Cloud
📐 Acronyms Used in Spectre Cloud
Beyond the three primary span type acronyms, Spectre Cloud uses a number of additional shorthand terms throughout its interface. The following reference covers the most commonly encountered.
Acronym
Full Name
Where Used
What It Refers To
**PAP**
Positive Axis Point
Bowler profile; layout fields
The point on the ball's surface at the end of the bowler's initial axis of rotation at release — the geometric anchor for all structured layout systems
**VAL**
Vertical Axis Line
Layout fields (VLS, Dual Angle)
The vertical line running through the bowler's PAP — used as a reference for pin and mass bias placement in VLS and Dual Angle layouts
**MB**
Mass Bias
Layout fields
The heaviest point of the ball's core — its placement relative to the grip center affects the ball's flare potential and backend motion
**VLS**
Versatile Layout System
Layout type selector; spec sheets
Storm Bowling's chart-based layout system for traditional thumb bowlers — see 2.5.1.1
**2LS**
Two-Layout System
Layout type selector; spec sheets
Storm Bowling's layout system designed for two-handed bowlers — see 2.5.1.2
**PAL**
Performance Axis Layout
Layout type selector; spec sheets
Three-input layout system (drilling angle, pin distance, VAL angle) — referred to as Dual Angle in Spectre Cloud's UI — see 2.5.1.3
**CLT**
Center Line Transformation
Bowler profile; Auto-CLT setting
A fitting measurement that defines how a bowler's finger centerline relates to the ball's grip center — used to derive lateral finger pitch — see 2.6.3
**OD**
Outside Diameter
Insert fields; spec sheets
The outer diameter of a finger insert — the drill bit must match this dimension for the insert to seat correctly — see 2.6.6
**RG**
Radius of Gyration
Arsenal Plus; ball detail fields
A measure of how the ball's mass is distributed relative to its axis — lower RG = earlier roll, higher RG = longer skid
**diff / differential**
Differential of RG
Arsenal Plus; ball detail fields
The difference between a ball's highest and lowest RG values — higher differential = more flare potential and stronger backend reaction
**V**
Vertical
Oval calculator; milling settings
The vertical axis of oval cut movement — see 2.3.5 and 2.3.6
**H**
Horizontal
Oval calculator; milling settings
The horizontal axis of oval cut movement — see 2.3.5 and 2.3.6
**RPM**
Revolutions Per Minute
Bowler profile (rev rate field)
The unit used to record a bowler's rev rate — how many times the ball rotates on its axis per minute during lane travel
**RH / LH**
Right-Handed / Left-Handed
Bowler profile; pitch settings; Auto-Invert
Shorthand for the bowler's dominant hand — affects pitch sign conventions, layout orientation, and Auto-Invert behaviour
**F**
Full Span
Spec Sheet Span
Measured span with all inserts included. Also known as the complete span
**C**
Cut-to-Cut
Spec Sheet Span
Full Span minus the thickness of the inserts. This is used primarely when drilling the thumb first and then having to find the measurement for the 31/32 hole for the inserts. Cut-to-Cut on the PBA tour (biggest hole to biggest hole) is known as H in Spectre.
**O**
Outer-to-Cut
Spec Sheet Span
Used with an interchangeable thumb insert. Typically when drilling a new ball for a bowler using an interchangeable, they won't need you to drill another thumb. This measurement makes it easy when drilling a new ball for this bowler, as they can simply show up to your shop, the holes are in the right spot, and they simply have to lock in their male inner sleeve.
**H**
Hole-to-Hole
Spec Sheet Span
Known as Cut-to-Cut on the PBA services truck, this is the biggest hole to the biggest hole.
### Related Sections
- 4.1.2 — Spec sheet overview: sections and layout *(if applicable)*
- 2.3.2 — Span type configuration: Full Span, Edge, Center
- 2.5.1 — Default layout type: VLS, 2LS, Dual Angle, None
- 2.6.3 — Auto-CLT: lateral pitch of fingers based on CLT chart
- 2.6.6 — Autofill Insert OD: auto drill bit size per insert type and grip
- 5.x — Oval Calculator: overview
- 9.x — Tips and Troubleshooting: glossary of bowling fitting terms
**Tip:** Print this page and keep a copy at the drill press during onboarding of new staff. Acronym familiarity is one of the first barriers a new team member faces when reading a spec sheet under time pressure — having a quick reference to hand removes that barrier in the first few sessions and builds confidence faster than repeated explanation alone.
# 4.1.2 Span types explained: F, C, O, H
4.1.2concept
The **span type** setting on a Spectre Cloud spec sheet defines the measurement convention used to record the distance between the finger holes and the thumb hole. Choosing the right span type — and understanding what each one measures — ensures spec sheet values are interpreted and drilled correctly every time. This page explains how each of the four span types works, how they differ, and how to choose between them for a given bowler or workflow.
**Note:** This page explains the span types conceptually. For the acronyms used to represent them on spec sheets (F, C, O, H), see **4.1.1**. For oval *hole* measurement — a separate concept from span type — see the **Oval Calculator** (Book 05).
## 📐 What Is a Span Measurement?
A span measurement records the distance between a bowler's finger holes and their thumb hole on a drilled bowling ball. It is the primary dimension that determines how far the thumb must reach — and how comfortable and consistent the grip feels through the swing and release. All four span types describe this same fundamental distance, but they differ in **where the measurement begins and ends** and whether the inserts are included.
- ✅ Span is one of the most important measurements on a spec sheet — an incorrect span produces a grip that is either too stretched or too cramped, directly affecting ball control and release consistency.
- ✅ The same bowler measured in two different span types will produce **different numeric values** — the numbers are not interchangeable without conversion.
- ✅ Spectre Cloud stores the span type alongside the measurement value on every spec sheet, so a value is never interpreted without its corresponding convention.
## 📐 Full Span (F)
Full Span is the **complete measured span, everything included — inserts and all**. It is taken with the bowler's grips/inserts in place, capturing the full distance the thumb must reach from the seated finger position to the thumb hole. It is also referred to as the complete span.
### When to Use Full Span
- ✅ The most widely used convention and a sensible default for most shops — it describes the bowler's actual reach with their grips installed.
- ✅ Intuitive to explain to a bowler, since it reflects the grip exactly as they feel it.
- ✅ Required input for the Cut to Cut auto-suggestion — Full Span must be entered on **both fingers** for that calculation to run (see below).
## 📐 Cut to Cut (C)
Cut to Cut is the **Full Span minus the thickness of the insert** — the span measured to the actual drilled cut of the finger hole, before the inserts are accounted for. It is most useful when you drill the ball **thumb-first**: rather than mentally subtracting the grip thickness to find where the finger holes go, you work directly from the Cut to Cut value.
### When to Use Cut to Cut
- ✅ Ideal for a thumb-first drilling workflow — the number already accounts for the insert thickness, so there's no mental math at the press.
- ✅ References the physical cut on the ball, making it reproducible across fitters.
- ✅ Supported by a built-in auto-suggestion in Spectre Cloud (see **Autofill Cut to Cut**, 2.6.9).
- ❌ Less intuitive for the bowler, since it describes the drilled hole rather than the felt grip.
**Autofill requirements:** The Cut to Cut auto-suggestion doesn't measure anything on its own — it derives the value. For it to run, the spec sheet needs a **Full Span measurement on both fingers**, plus the **insert type and insert size** for each. From the insert type and size, Spectre Cloud calculates the insert wall thickness and subtracts it from the Full Span to produce the Cut to Cut value. If any of those inputs is missing, the autofill can't calculate.
**Watch the terminology:** Spectre's **Cut to Cut (C)** is *not* the same thing the PBA services truck calls "Cut-to-Cut." The PBA truck's "Cut-to-Cut" (biggest hole to biggest hole) is Spectre's **Hole to Hole (H)** — see below.
## 📐 Outer to Cut (O)
Outer to Cut is used for **interchangeable thumbs**. It is measured from the **inside of the female portion of the interchangeable** to the cut of the finger's outer-diameter hole. It has nothing to do with oval holes — the "O" stands for *Outer to Cut*, not Oval.
Its purpose is repeat-drilling convenience. When a bowler with an interchangeable thumb comes in for a new ball, you don't need to drill a fresh thumb hole for them. Using the Outer to Cut measurement, the holes land in exactly the right spot, and the bowler simply locks in their own **male inner sleeve**.
### When to Use Outer to Cut
- ✅ Any bowler who uses an interchangeable thumb system.
- ✅ Repeat customers — they can show up, and the ball is ready for their existing sleeve without re-fitting the thumb.
- ✅ Keeps a consistent reference across every ball in that bowler's arsenal.
- ❌ Only relevant to interchangeable setups — not applicable to bowlers drilling a fixed thumb hole.
## 📐 Hole to Hole (H)
Hole to Hole is measured **biggest hole to biggest hole** — for example, from a `1 1/2"` thumb hole to a `31/32"` finger hole. It is a purely physical, edge-to-edge measurement of the largest openings on the ball.
This is the measurement the **PBA services truck refers to as "Cut-to-Cut."** Because Spectre already uses "Cut to Cut" for a different measurement (C, above), that PBA convention lives under the name **Hole to Hole** in Spectre to avoid confusion.
### When to Use Hole to Hole
- ✅ Quick physical reference straight off the ball, independent of inserts or grips.
- ✅ Familiar to anyone coming from a PBA-truck background, where this is called "Cut-to-Cut."
- ✅ Useful for verifying a drilled ball against spec, since it references fixed points on the ball.
- ❌ Does not describe the bowler's felt reach — it's a hole-geometry measurement, not a grip measurement.
## 📊 Span Types Compared
Full Span (F)
Cut to Cut (C)
Outer to Cut (O)
Hole to Hole (H)
**What it measures**
Complete span, inserts and all
Full Span minus insert thickness
Inside of the female interchangeable to the cut of the finger OD hole
Biggest hole to biggest hole (e.g., 1½" to 31/32")
**Inserts included?**
Yes — everything included
No — insert thickness removed
Interchangeable system (female/male sleeve)
N/A — hole edge to hole edge
**Primary use**
General fitting; the default/complete reference
Thumb-first drilling; deriving finger-hole position
Bowlers with interchangeable thumbs; repeat drilling
Quick physical reference; PBA-truck workflows
**PBA truck term**
—
Not the truck's "Cut-to-Cut"
—
This is the truck's "Cut-to-Cut"
**Auto-suggestion**
—
Yes — needs Full Span (both fingers) + insert type & size (2.6.9)
—
—
## 🔄 Span Type and Spectre Cloud's Auto-Suggestions
Spectre Cloud's auto-suggestion features are aware of the span type selected on the current spec sheet and apply their calculations within that convention. The primary one tied to span type is **Autofill Cut to Cut**, which derives the Cut to Cut value from the Full Span rather than requiring you to measure it separately.
For Autofill Cut to Cut to run, the spec sheet must contain:
1. A **Full Span measurement on both fingers** (middle and ring).
2. The **insert type** for each finger.
3. The **insert size** for each finger.
From the insert type and size, Spectre Cloud determines the insert wall thickness, then subtracts it from the Full Span to produce the Cut to Cut value. If any of these inputs is missing, the calculation can't complete.
- ✅ Auto-Calculate Ring Span (2.6.8) operates within the selected span type's convention.
- ⚠️ **Verify with your Spectre team:** confirm which (if any) auto-suggestions are active for Outer to Cut (O) and Hole to Hole (H), as these behaviours may differ from Full Span and Cut to Cut.
### Related Sections
- 4.1.1 — Understanding acronyms: F, C, O, H and other Spectre Cloud shorthand
- 2.6.8 — Auto-Calculate Ring Span
- 2.6.9 — Autofill Cut to Cut: based on Full Span, insert type, and insert size
- 05 — Oval Calculator: oval hole shape (a separate concept from span type O)
- 9.x — Tips & Troubleshooting: converting between span types
**Tip:** If your shop is setting a default span type, **Full Span** is the lowest-friction choice — it's the complete measurement most fitters already work in, it aligns with published fitting charts, and it's the input the Cut to Cut autofill depends on. Reach for **Cut to Cut** when you drill thumb-first, **Outer to Cut** for bowlers on interchangeable thumbs, and **Hole to Hole** when you want the biggest-hole-to-biggest-hole reference the PBA truck calls "Cut-to-Cut." Remember: none of these is "Oval" — that's a hole shape, not a span type.
# 4.1.3 Grip type definitions: Finger Tip vs. Conventional
4.1.3concept
A bowler's **grip type** defines how deeply their fingers are inserted into the ball — and it is one of the most consequential decisions in a pro shop fitting. Grip type determines the standard span, pitch, bridge, and insert values that apply to a bowler, and it is the first meaningful fitting choice for any new bowler purchasing their first personal ball. This page explains the two primary grip types — **Fingertip** and **Conventional** — how they differ physically and in terms of ball motion, and how the choice is reflected throughout Spectre Cloud.
**Note:** Spectre Cloud also supports a **Semi-Fingertip** grip type, which falls between Fingertip and Conventional in insertion depth. Semi-Fingertip is covered briefly at the end of this page. The primary focus here is on Fingertip and Conventional, which together account for the overwhelming majority of fittings in most pro shops.
## 🎳 Fingertip Grip
In a **fingertip grip**, the middle and ring fingers are inserted into the ball **to the first knuckle only** — the fingertip. This is a shallower insertion than conventional, leaving the bulk of the finger outside the ball and relying on the fingertip's contact with the hole edge (or insert) to hold and release the ball.
### Physical Characteristics
- ✅ Fingers inserted to the **first knuckle** — approximately to the first crease of the finger from the tip.
- ✅ Produces a longer lever arm from the wrist to the finger contact point — this increases the torque available at the moment of release.
- ✅ The thumb exits the ball before the fingers, allowing the fingers to impart lift and rotation — the primary source of revolutions and hook for most competitive bowlers.
- ✅ Almost universally used with **finger inserts** — the shallower insertion depth means the fingertip bears significant load, and inserts cushion this contact point and provide a consistent grip surface.
### Ball Motion Characteristics
- ✅ Higher rev rate potential than conventional — the longer lever arm allows more rotation to be imparted at release.
- ✅ Greater hook potential — more axis rotation and tilt are achievable with a fingertip grip.
- ✅ More sensitive to release technique — small changes in finger lift angle produce noticeable changes in ball path.
- ✅ Preferred by the majority of league and competitive bowlers for its performance potential.
### Fitting Standards — Fingertip
- ✅ **Standard bridge:** `1/4"` — the narrower bridge suits the shallower insertion depth and the extended finger position.
- ✅ **Inserts:** strongly recommended — most fingertip bowlers use inserts on both middle and ring fingers.
- ✅ **Span:** longer than an equivalent conventional span for the same hand — the shallower insertion places the fingertip further from the thumb hole.
## 🎳 Conventional Grip
In a **conventional grip**, the middle and ring fingers are inserted into the ball **to the second knuckle** — past the first crease, with a deeper portion of the finger inside the hole.
### Physical Characteristics
- ✅ Fingers inserted to the **second knuckle** — approximately to the second crease from the tip.
- ✅ Produces a shorter lever arm than fingertip — the deeper insertion places the contact point closer to the palm.
- ✅ The ball is held more securely in the hand — less reliance on finger strength to maintain the grip through the swing.
- ✅ Used **without inserts** — the deeper insertion provides sufficient grip surface from the ball hole itself. Holes will have alot of outer bevel to ensure the comfort of the bowler.
- ❌ Inserts are not suggested.
### Ball Motion Characteristics
- ✅ Lower rev rate than fingertip — the shorter lever arm limits the rotation imparted at release.
- ✅ Straighter ball path — less hook potential makes conventional grip better suited to targeting-based play styles.
- ✅ More forgiving of release inconsistency — the deeper, more secure grip reduces the sensitivity to finger angle variations at release.
- ✅ Preferred by beginners, youth bowlers, senior bowlers, or anyone who has a hard time holding onto the ball with a finger-tip grip.
### Fitting Standards — Conventional
- ✅ **Standard bridge:** `3/8"` — the wider bridge accommodates the deeper insertion depth and the more upright finger position.
- **❌ Inserts:** not recommended.
- ✅ **Span:** shorter than an equivalent fingertip span for the same hand.
## 📊 Fingertip vs. Conventional — Side-by-Side
Fingertip
Conventional
**Insertion depth**
To first knuckle
To second knuckle
**Lever arm**
Longer — more torque at release
Shorter — more secure hold
**Rev rate potential**
Higher
Lower
**Hook potential**
Higher
Lower
**Release sensitivity**
Higher — technique-dependent
Lower — more forgiving
**Standard bridge**
`1/4"`
`3/8"`
**Inserts**
Strongly recommended
Not recommended
**Typical bowler profile**
League, competitive, performance-oriented
Beginner, youth, senior, recreational
**Autofill Bridge in Spectre Cloud**
`1/4"` (2.6.5)
`3/8"` (2.6.5)
## 🔄 Grip Type in Spectre Cloud
Grip type is recorded on the bowler's profile (see 3.1.2) and is used throughout Spectre Cloud to drive autofill defaults and IBPSIA-standard suggestions. Selecting the correct grip type at profile creation ensures every subsequent spec sheet starts with the right baseline values.
- ✅ **Autofill Bridge (2.6.5)** — applies `1/4"` for fingertip, `3/8"` for conventional.
- ✅ **Autofill Insert OD (2.6.6)** — insert OD lookup is grip-sensitive; fingertip and conventional grips may use different insert seating approaches for the same insert model.
- ✅ **Pitch Suggestion (2.6.2)** — forward pitch norms differ between grip types; the suggestion engine applies grip-appropriate starting values.
- ✅ **Span suggestions** — IBPSIA span starting points differ by grip type; selecting the correct type ensures span autofill applies the correct baseline.
- ✅ Grip type can be updated on the bowler's profile at any time — see 3.2.2 for editing guidance.
### Related Sections
- 4.1.2 — Span types explained: Full Span vs. Cut to Cut vs. Oval Span
- 4.1.1 — Understanding acronyms: F, C, O and other Spectre Cloud shorthand
- 3.1.2 — Required fields: name, hand, grip type
- 2.6.5 — Autofill Bridge: auto standard bridge (1/4" fingertip, 3/8" conventional)
- 2.6.6 — Autofill Insert OD: auto drill bit size per insert type and grip
- 2.6.2 — Pitch suggestion: auto forward pitch based on hand flexibility
- 4.1.4 — Creating a new spec sheet *(if applicable)*
# 4.1.4 Pitch terminology
4.1.4concept
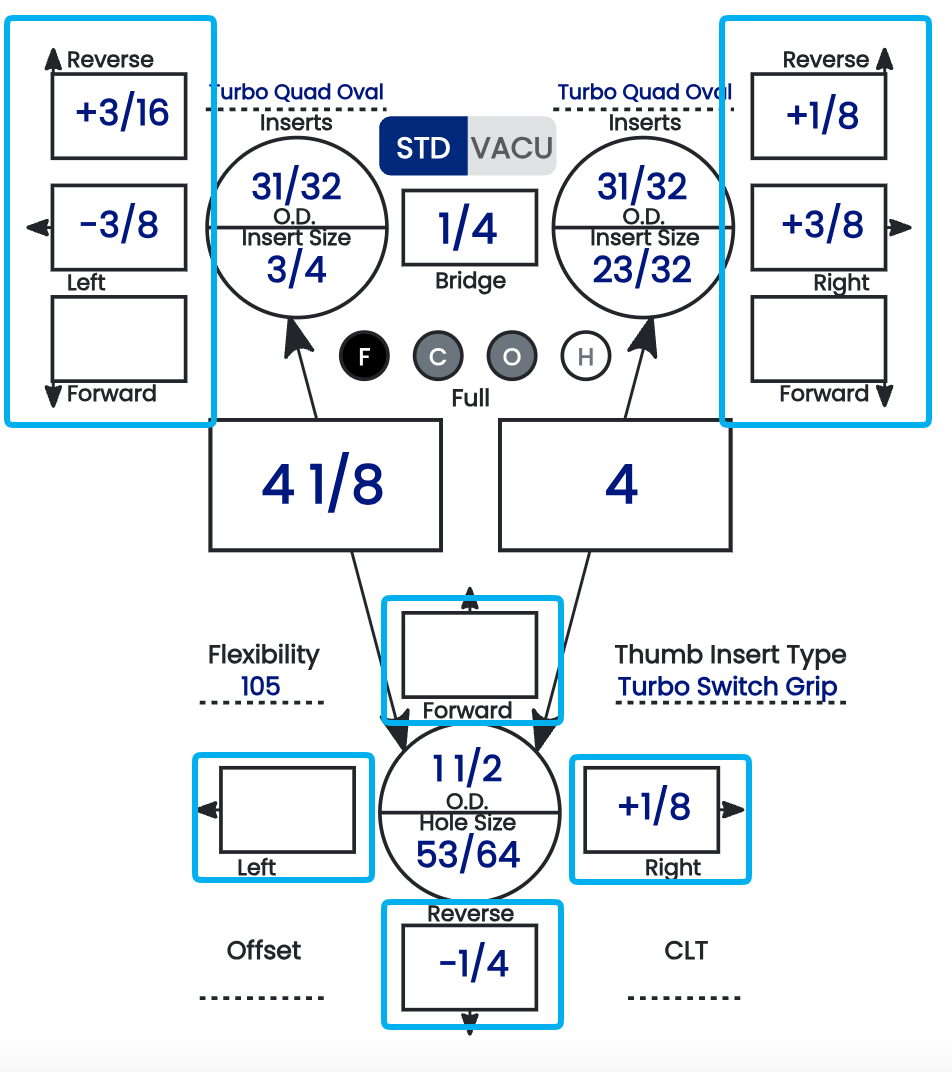
**Pitch** is the angle at which a finger or thumb hole is drilled relative to the ball's center. It affects grip comfort, how securely the ball is held through the swing, and how cleanly it releases. In Spectre Cloud, you set pitch for each hole using the **pitch tiles** on the spec sheet — the boxes framed by directional arrows around each hole. This page explains how those tiles work and defines the four pitch terms: **Forward**, **Reverse**, **Lateral**, and **Zero**.
**Note:** For the display and sign settings referenced here, see chapter 2.4. For the auto-suggestions that propose pitch values, see 2.6.2 and 2.6.3.
## 🛠️ Setting Pitch with the Pitch Tiles
On a Spectre Cloud spec sheet, each hole — thumb, middle finger, and ring finger — has its own **pitch tile**. Each tile is surrounded by arrows that represent the two pitch axes:
- ✅ **Forward / Reverse** — the arrows pointing toward and away from the ball's center. Forward tilts the hole toward the center of the ball; reverse tilts it toward the outside.
- ✅ **Lateral** — the sideways arrows, tilting the hole toward or away from the adjacent hole.
You enter the pitch amount in the tile in the chosen direction. Forward/reverse and lateral are independent, so a single hole can carry both at once (for example, a small forward pitch and a small lateral pitch together).
[](https://wiki.spectrebowling.com/uploads/images/gallery/2026-07/scr-20260728-segq.png)
## 🔢 Fractions or Thousandths of an Inch
Pitch values in the tiles can be displayed two ways, controlled by a Spectre Cloud setting:
- ✅ **Fractions** — e.g. `1/4"`, `1/8"`, `3/16"`.
- ✅ **Thousandths of an inch** — the same values shown in decimal, e.g. `1/4"` as `.250"` and `1/8"` as `.125"`.
The value is identical either way — only the notation changes. Choose whichever matches how your drill press readout and your shop's habits express pitch, so there's no conversion in your head at the press.
⚠️ **Verify with your Spectre team:** confirm the exact name and location of the fractions-vs-thousandths display setting so it can be linked precisely from this page.
## ➕➖ Pitch Polarity (+/-)
By default the arrows around each tile carry the direction. You can also turn on **polarity** so a `+` or `−` sign appears in the pitch tiles, giving you the direction as a sign in addition to the arrows. This is set in chapter 2.4 and is worth aligning to your specific machine:
- ✅ Whether **right lateral pitch** reads as positive or negative — 2.4.1.
- ✅ Whether **forward thumb pitch** reads as positive or negative — 2.4.2.
- ✅ Whether the **+/- signs display** in the pitch tiles at all — 2.4.3.
Matching these to how your drill press signs its pitch is the single best way to avoid drilling a hole in the wrong direction.
## 📐 The Four Pitch Terms
**Forward pitch** angles the hole **toward the center of the ball**. It draws the thumb or finger deeper in, increasing grip security and slowing the exit slightly. Common for less flexible thumbs, conventional grips, or a ball that feels loose. Typical range: 0 to 1/2" forward; `1/4"` is the common IBPSIA starting point.
**Reverse pitch** angles the hole **toward the outside of the ball**, away from center. It assists the thumb's exit for a faster, cleaner release, but reduces grip security if overapplied. Common for higher rev-rate bowlers, very flexible thumbs, or a thumb that hangs. Typical range: 1/16" to 1/4" reverse.
**Lateral pitch** tilts the hole **sideways**, toward or away from the adjacent hole, to relieve side pinching and align with the bowler's hand geometry. Direction is described relative to the ring-finger side and flips for left-handed bowlers:
Direction
Right-Handed
Left-Handed
Toward ring finger
Tilts opening to the right
Tilts opening to the left
Away from ring finger
Tilts opening to the left
Tilts opening to the right
Typical range: 0 to 3/8"; `1/8"` toward the ring finger is among the most common.
**Zero pitch** — also called manufacturer's or no added pitch — drills the hole straight toward the ball's center with no added tilt on either axis. It's a valid, complete spec (not a placeholder) and a common starting point for a first fitting.
**Note:** Because lateral direction is physically opposite for RH and LH bowlers, dominant hand is a required field on the bowler profile. The Auto-Invert setting (2.6.4) flips lateral pitch automatically when cloning or templating across handedness.
## 📊 Pitch Summary Table
Pitch Type
Direction
Primary Effect
Forward
Toward center of ball
Increases grip security; slows exit
Reverse
Toward outside of ball
Faster, cleaner thumb exit
Lateral
Toward/away from ring finger
Relieves side pinch; aligns to hand geometry
Zero
Straight toward center
Neutral; no added adjustment
### Related Sections
- 4.1.3 — Grip type definitions: Fingertip vs. Conventional
- 4.1.2 — Span types: Full Span, Cut to Cut, Outer to Cut, Hole to Hole
- 2.4.1 — Does your machine display right pitch as positive? Y/N
- 2.4.2 — Does your machine display forward thumb pitch as positive? Y/N
- 2.4.3 — Display +/- in pitch tiles: showing direction to avoid errors
- 2.6.2 — Pitch suggestion: auto forward pitch based on hand flexibility
- 2.6.3 — Auto-CLT: lateral pitch of fingers based on CLT chart
- 2.6.4 — Auto-invert standard lateral pitches when changing RH to LH
**Tip:** Before you drill, make sure your fractions-vs-thousandths and +/- polarity settings match how your drill press readout expresses pitch. When the spec sheet and the press speak the same language, you read the tile and drill it directly — no mental conversion, no risk of reversing a direction.
# 4.1.5 Bridge: standard bridge sizes and their purpose
4.1.5concept
The **bridge** is the distance between the near edges of the middle and ring finger holes on a drilled ball — the strip of material, or land area, that holds the two finger holes apart. It's one of the smallest measurements on a spec sheet, but it's a fixed industry standard, and Spectre Cloud defaults it for you.
## 📏 The 1/4" Industry Standard
The bridge is a constant. The industry standard is `1/4"`, and that is the value Spectre Cloud suggests by default for fingertip fitting.
The reason is the warranty. Ball manufacturers **will not warrant a ball that cracks if the bridge was drilled narrower than 1/4"** — below that width, the land area between the finger holes is too thin to reliably survive repeated impact. Drilling to the 1/4" standard keeps the ball within warranty and protects both you and the bowler.
- ✅ `1/4"` is the industry-standard bridge and Spectre Cloud's default suggestion.
- ✅ Staying at or above 1/4" keeps the manufacturer's crack warranty intact.
- ❌ A bridge narrower than 1/4" risks cracking the land area — and voids the warranty if it does.
## 🛠️ Autofill Bridge in Spectre Cloud
When **Autofill Bridge (2.6.5)** is enabled, Spectre Cloud pre-populates the bridge field with the standard `1/4"` value automatically — you don't need to enter it on a routine drill. The fitter only intervenes when a specific, deliberate reason calls for a different value.
## 🖥️ Bridge on the Spec Sheet
The bridge field sits in the insert and finger hole section of the spec sheet.
- ✅ It's shown in whatever unit and format your account uses — fractional or decimal, per your display settings.
- ✅ The autofilled value can be overridden by typing a different measurement directly.
- ✅ A manually entered bridge is saved to the sheet's history and is visible when the sheet is reviewed or cloned.
- ✅ When cloning a spec sheet, the bridge carries forward — confirm it's still appropriate for the new ball before saving.
### Related Sections
- 4.1.4 — Pitch terminology: Forward, Reverse, Lateral, Zero
- 4.1.3 — Grip type definitions: Fingertip vs. Conventional
- 4.1.2 — Span types: Full Span, Cut to Cut, Outer to Cut, Hole to Hole
- 2.6.5 — Autofill Bridge: applies the standard 1/4" bridge
- 9.x — Tips & Troubleshooting: narrow bridge and land area considerations
**Tip:** Treat 1/4" as the floor, not just the default. It's the value Spectre suggests, the value the widest range of balls and bowlers work with, and the line manufacturers draw for their crack warranty. Only go narrower for a specific, documented fitting reason — and know you're giving up the warranty if you do.
# 4.1.6 Insert OD: drill bit sizing for STD and VACU grips
4.1.6concept
When drilling finger holes for bowlers who use inserts, the drill bit must match the insert's **Outside Diameter (OD)** — the outer dimension that sets the hole size. Spectre Cloud sizes these holes for you through **Autofill Insert OD (2.6.6)**. This page explains what OD is, how it differs from insert size, and how the two insert systems — **STD** and **VACU** — are drilled and recorded on the spec sheet.
## 🎳 Insert OD vs. Insert Size
Two dimensions matter for an insert, and it's important not to confuse them:
- ✅ **OD (Outside Diameter)** — the outer dimension of the insert, published by the manufacturer. This is the **drill bit size**. You match the bit to the OD, never to the bowler's finger.
- ✅ **Insert size** — the inner diameter (ID), sized to fit the bowler's finger. In Spectre Cloud, the **insert size field is the ID** — Spectre does not track ID as a separate value.
- ✅ Spectre derives the OD (drill bit size) from the **insert type and insert size** you record — so entering both correctly is what makes Autofill Insert OD accurate.
## 📐 STD (Standard) Inserts
Standard inserts are **press-fit**: the hole is drilled to the insert's OD and the insert is pressed in, held by friction against the ball's coverstock.
- ✅ Drill bit size equals the insert's published OD — a direct, one-to-one match, at full depth.
- ✅ A correct STD fit presses in with firm hand pressure or a seating tool — it should not drop in freely or require excessive force.
- ✅ If the insert spins after seating, the hole was drilled slightly too large — re-drilling to size is preferable on a new ball.
## 📐 VACU (Vacuum) Inserts
VACU inserts are drilled in **two diameters** so the insert has room to expand. The hole is stepped: an oversized pocket at the top, then the insert's true OD deeper down.
1. Drill the **top portion** of the hole at the size shown on the spec sheet.
2. Drill that top portion **`1"` deep**.
3. Continue to the full depth of the insert using the insert's **regular, actual OD**.
The oversized top creates a **pocket** — a void where the insert does not touch the surrounding ball wall. That void gives the insert room to expand.
- ✅ The spec-sheet OD value for a VACU insert is the **top-portion (pocket) size**, not the insert's body OD.
- ✅ The deeper portion is drilled at the insert's actual OD, exactly as a STD hole would be.
- ❌ Drilling the whole hole at the actual OD removes the pocket entirely — the insert loses its room to expand, defeating the purpose of a VACU fit.
## 📊 STD vs. VACU — Key Differences
STD (Standard)
VACU (Vacuum)
**Drilling method**
Single diameter at the insert's OD, full depth
Two diameters — oversized top ~1" deep, then the actual OD to full depth
**What the spec-sheet OD means**
The drill bit size for the whole hole
The top-portion (pocket) drill size
**Why it's sized this way**
Friction press-fit secures the insert
The oversized top leaves a void so the insert can expand
**Common use case**
General fingertip / insert fitting
Bowlers whose fingers need room to expand
## ⚙️ How Spectre Cloud Handles STD vs. VACU
Autofill Insert OD (2.6.6) populates the drill bit size on the spec sheet from the insert type and insert size recorded for the bowler. Recording the insert **type** correctly is what tells Spectre which sizing to apply.
- ✅ When the insert type is **STD**, the autofilled OD is the drill bit size for the full hole.
- ✅ When the insert type is **VACU**, the autofilled OD is the top-portion (pocket) size — drill that ~1" deep, then switch to the insert's actual OD for the rest.
The drill bit size is saved to the spec sheet and carries forward when the sheet is cloned. Confirm the insert type and OD are still correct for the new ball before saving, and if a bowler switches systems (STD to VACU or vice versa), create a new spec sheet so the history reflects what was actually drilled on each ball.
### Related Sections
- 4.1.5 — Bridge: the standard 1/4" bridge
- 4.1.4 — Pitch terminology: Forward, Reverse, Lateral, Zero
- 4.1.3 — Grip type definitions: Fingertip vs. Conventional
- 2.6.6 — Autofill Insert OD: auto drill bit size per insert type and size
- 2.6.7 — Auto-Repeat Insert Size: mirror size from ring to middle finger
- 9.x — Tips & Troubleshooting: insert seating issues and OD mismatches
**Tip:** The most common VACU error is drilling the whole hole at one size. Remember it's two cuts: the spec-sheet size for the first inch to form the pocket, then the insert's actual OD to depth. If your shop is adding VACU for the first time, walk every driller through that two-diameter step at the press before the first VACU ball — it's the one detail that's easy to miss and easy to get right once seen.
# 4.2 — Creating a Spec Sheet
# 4.2.1 Creating a blank spec sheet for a bowler
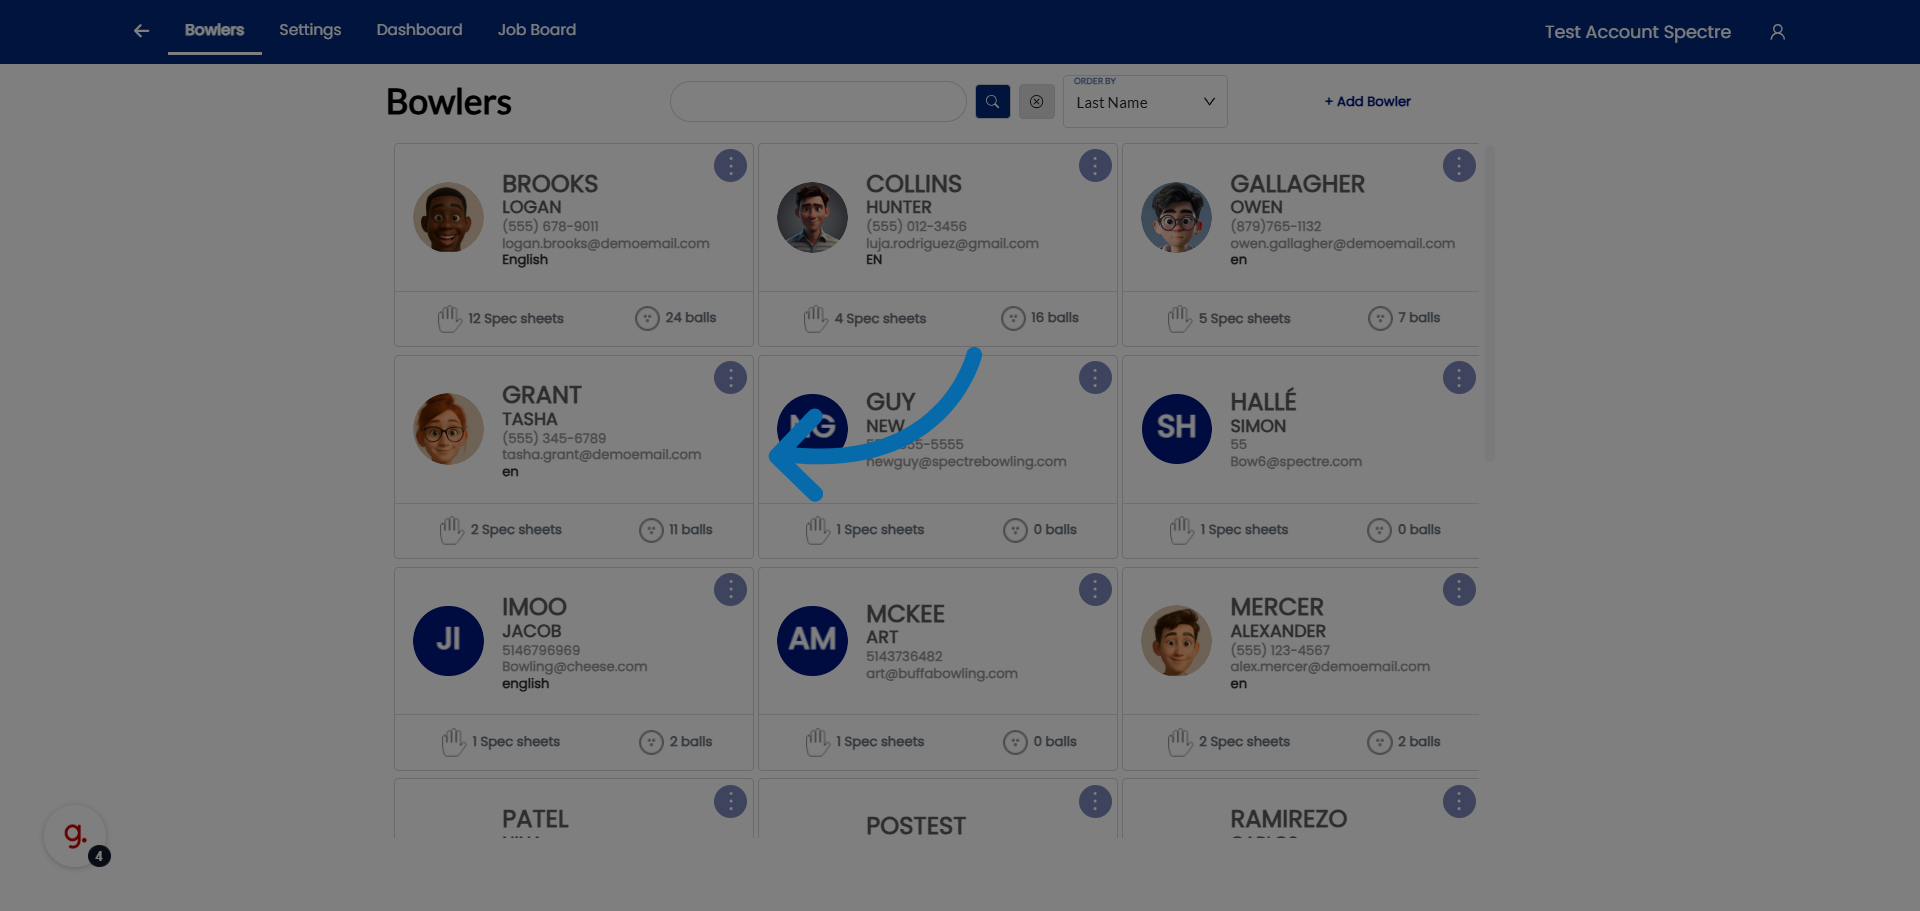
### 1. Access Bowler Profiles
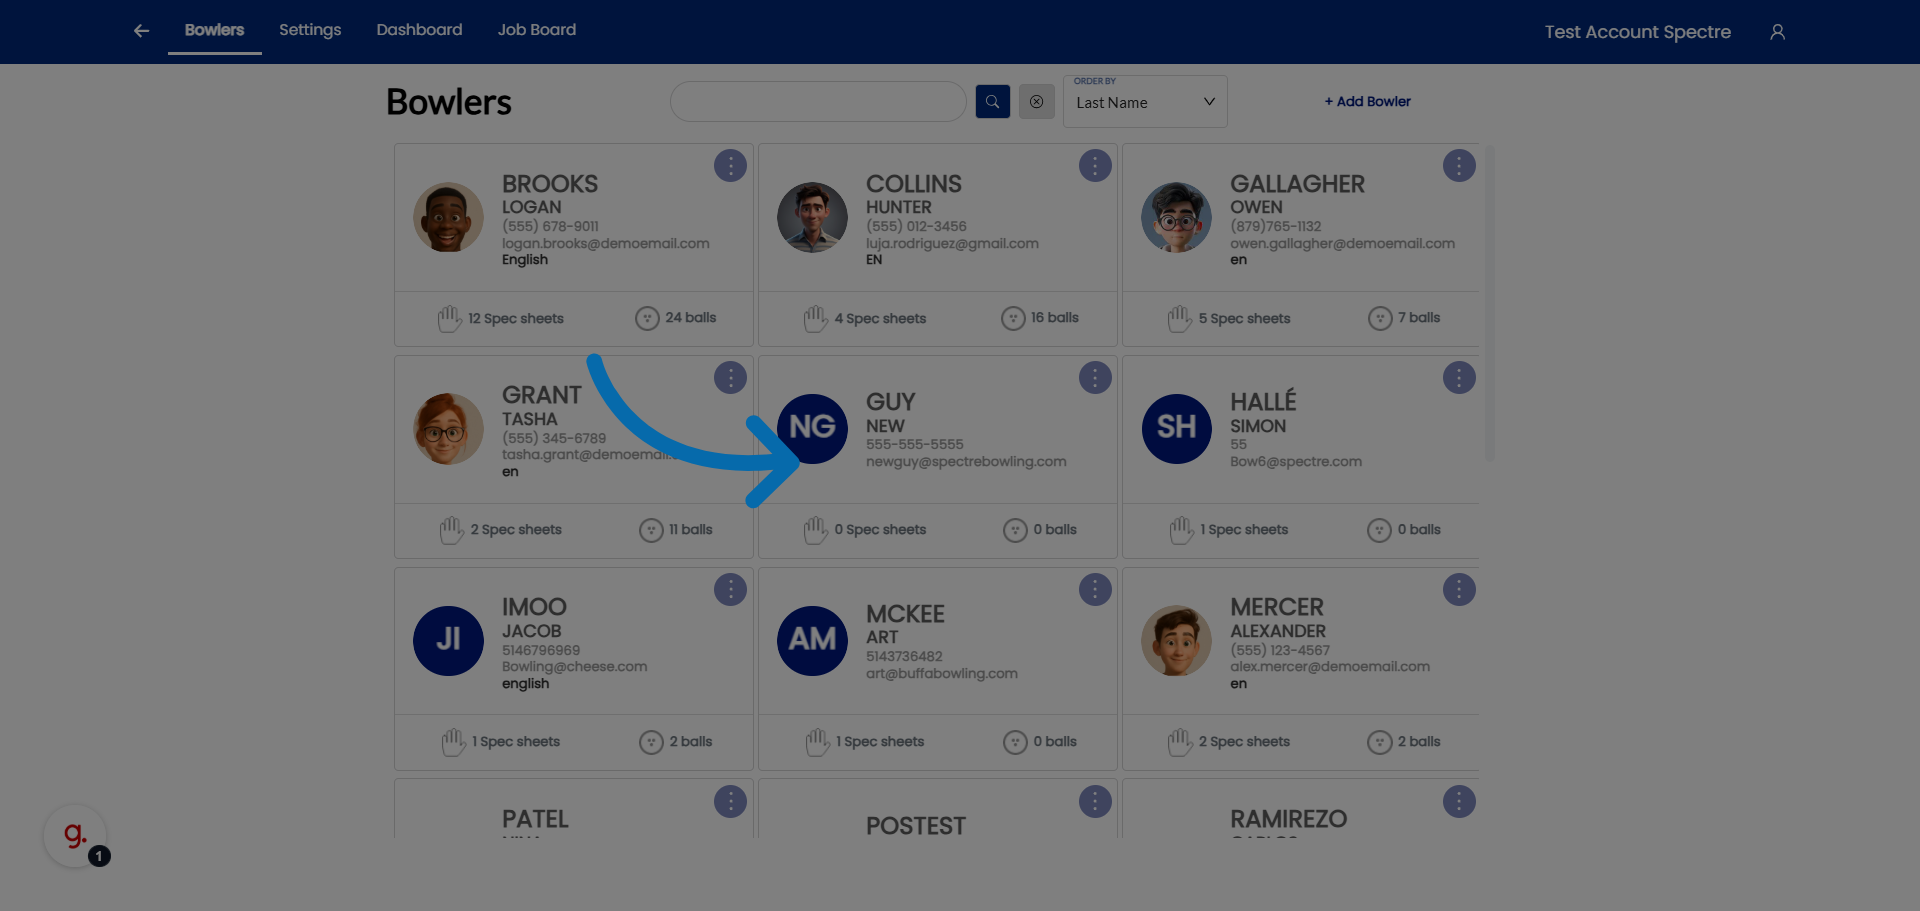
Click "Bowlers" to open the list of bowler profiles in Spectre Proshop .
Select the bowler to view the specific bowler's profile details.
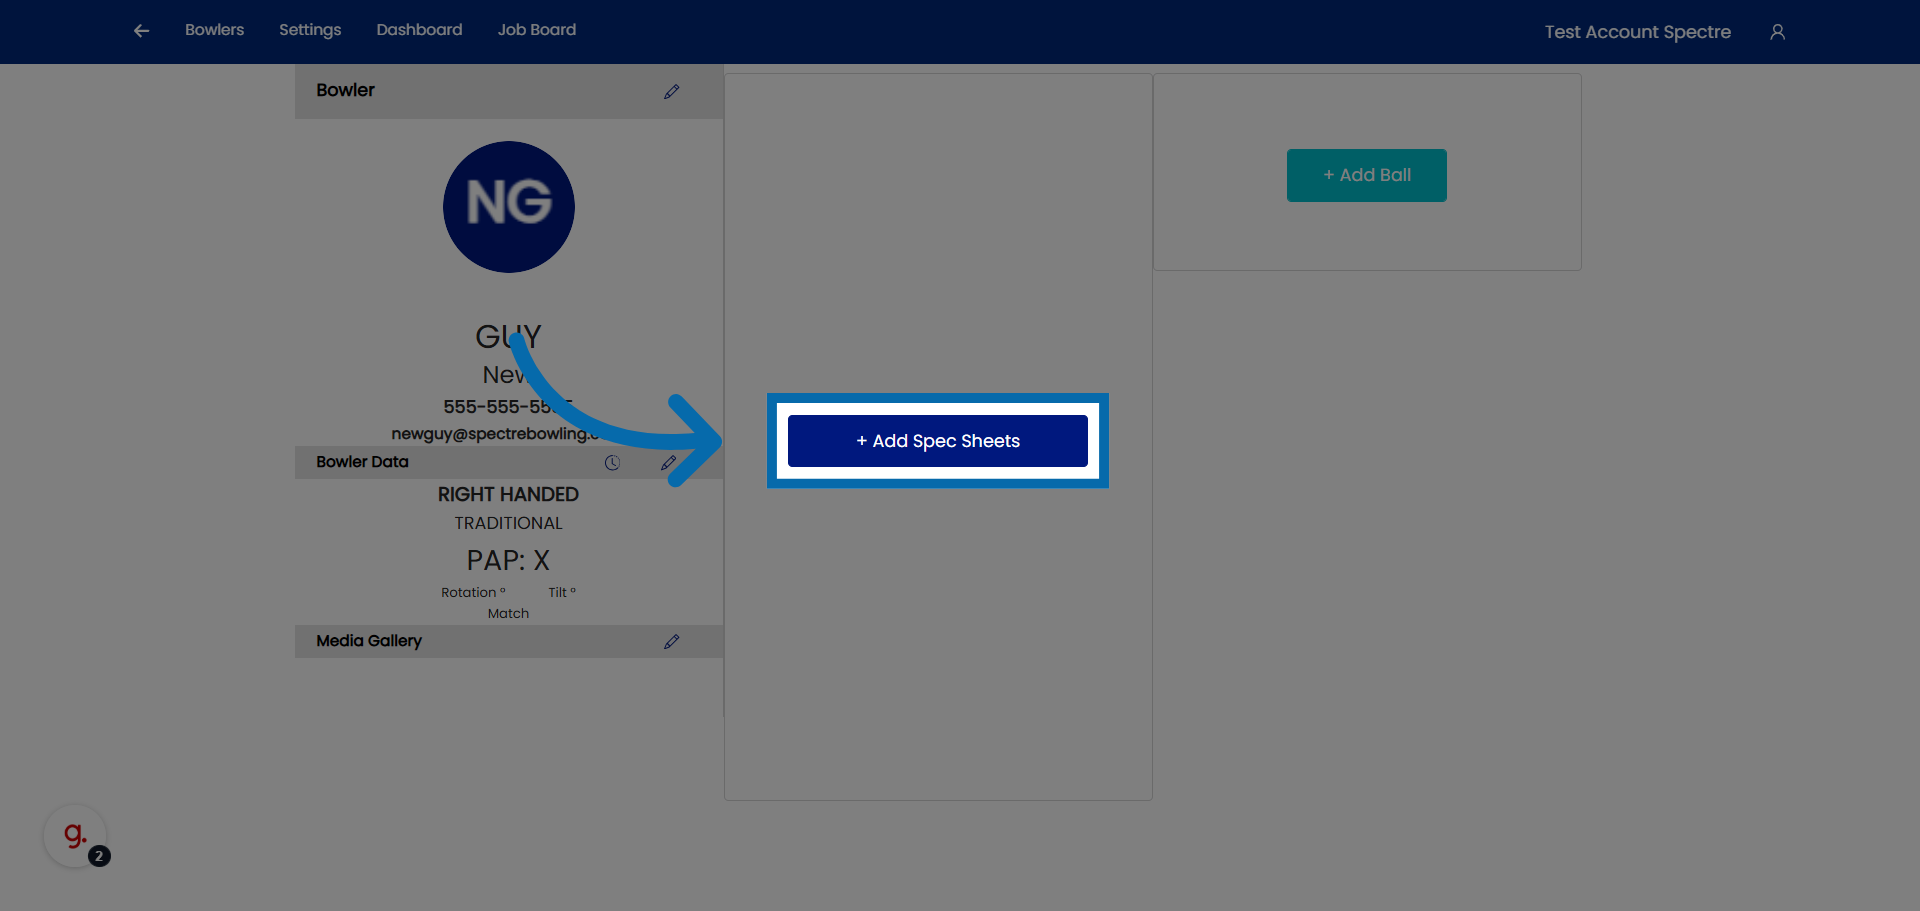
### 3. Open Spec Sheets Addition
Click "Add Spec Sheets" to begin adding a new spec sheets for the selected bowler.
### 4. Lets create a new spec sheet for an already existing profile.
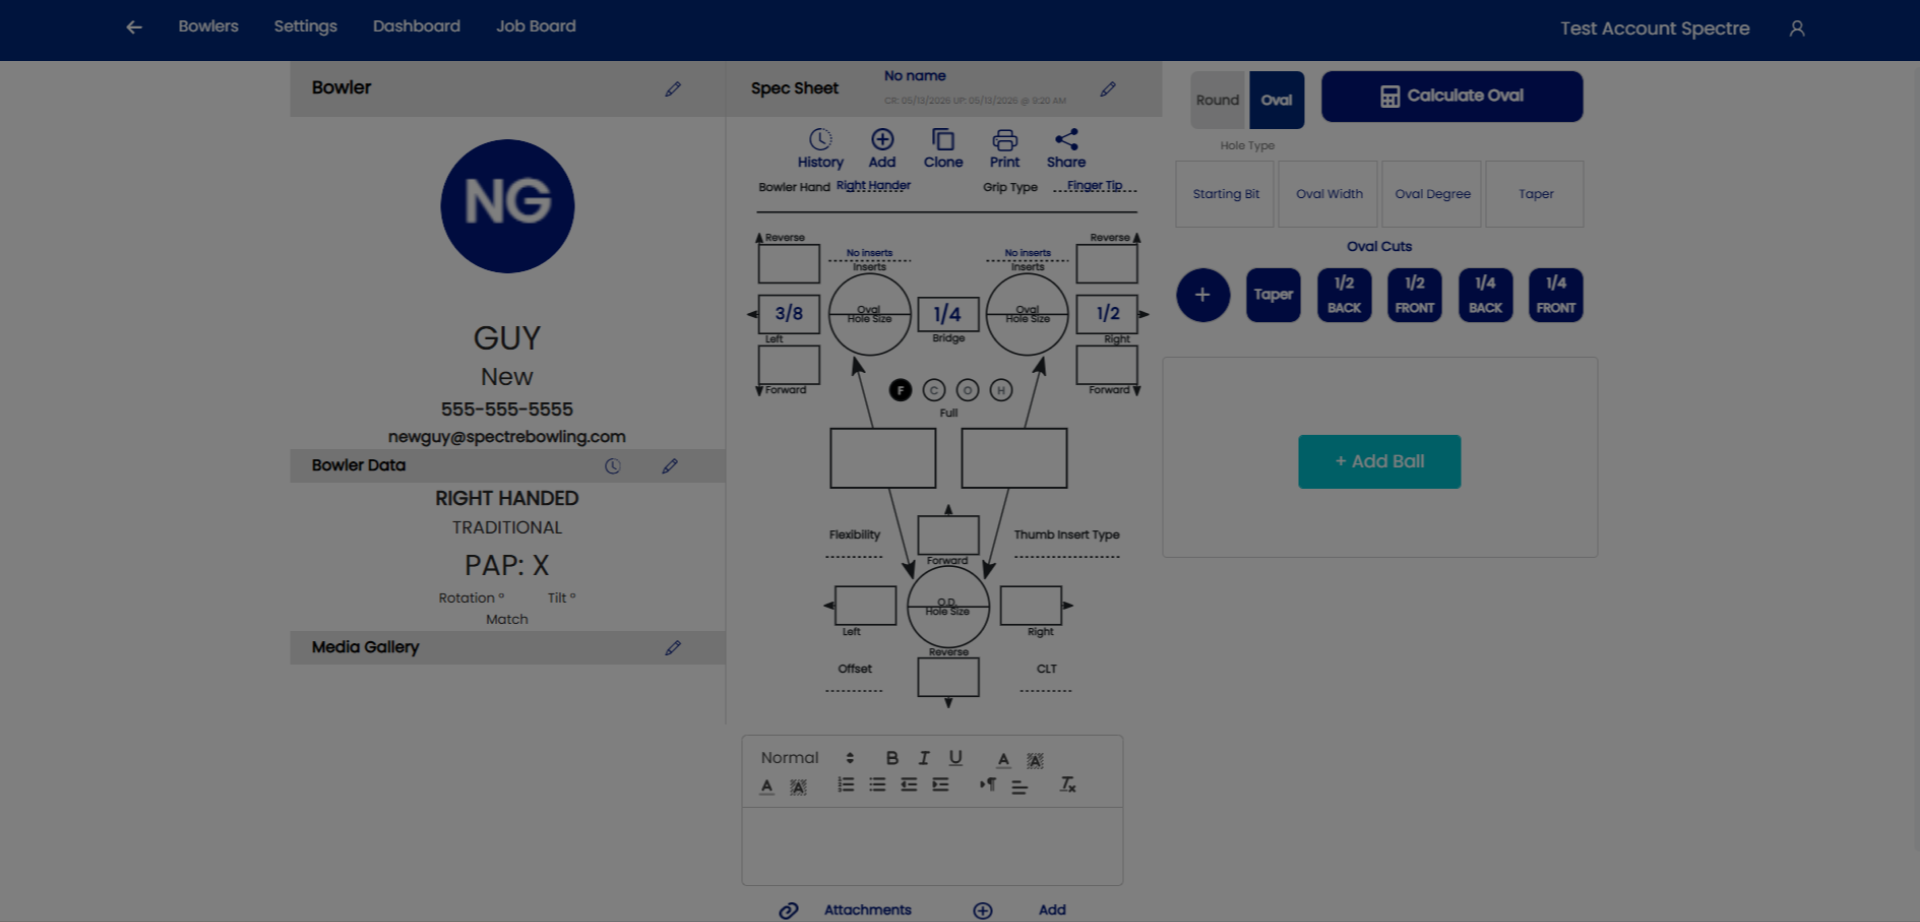
### 5. Select a bowler
Select your already existing bowlers profile.
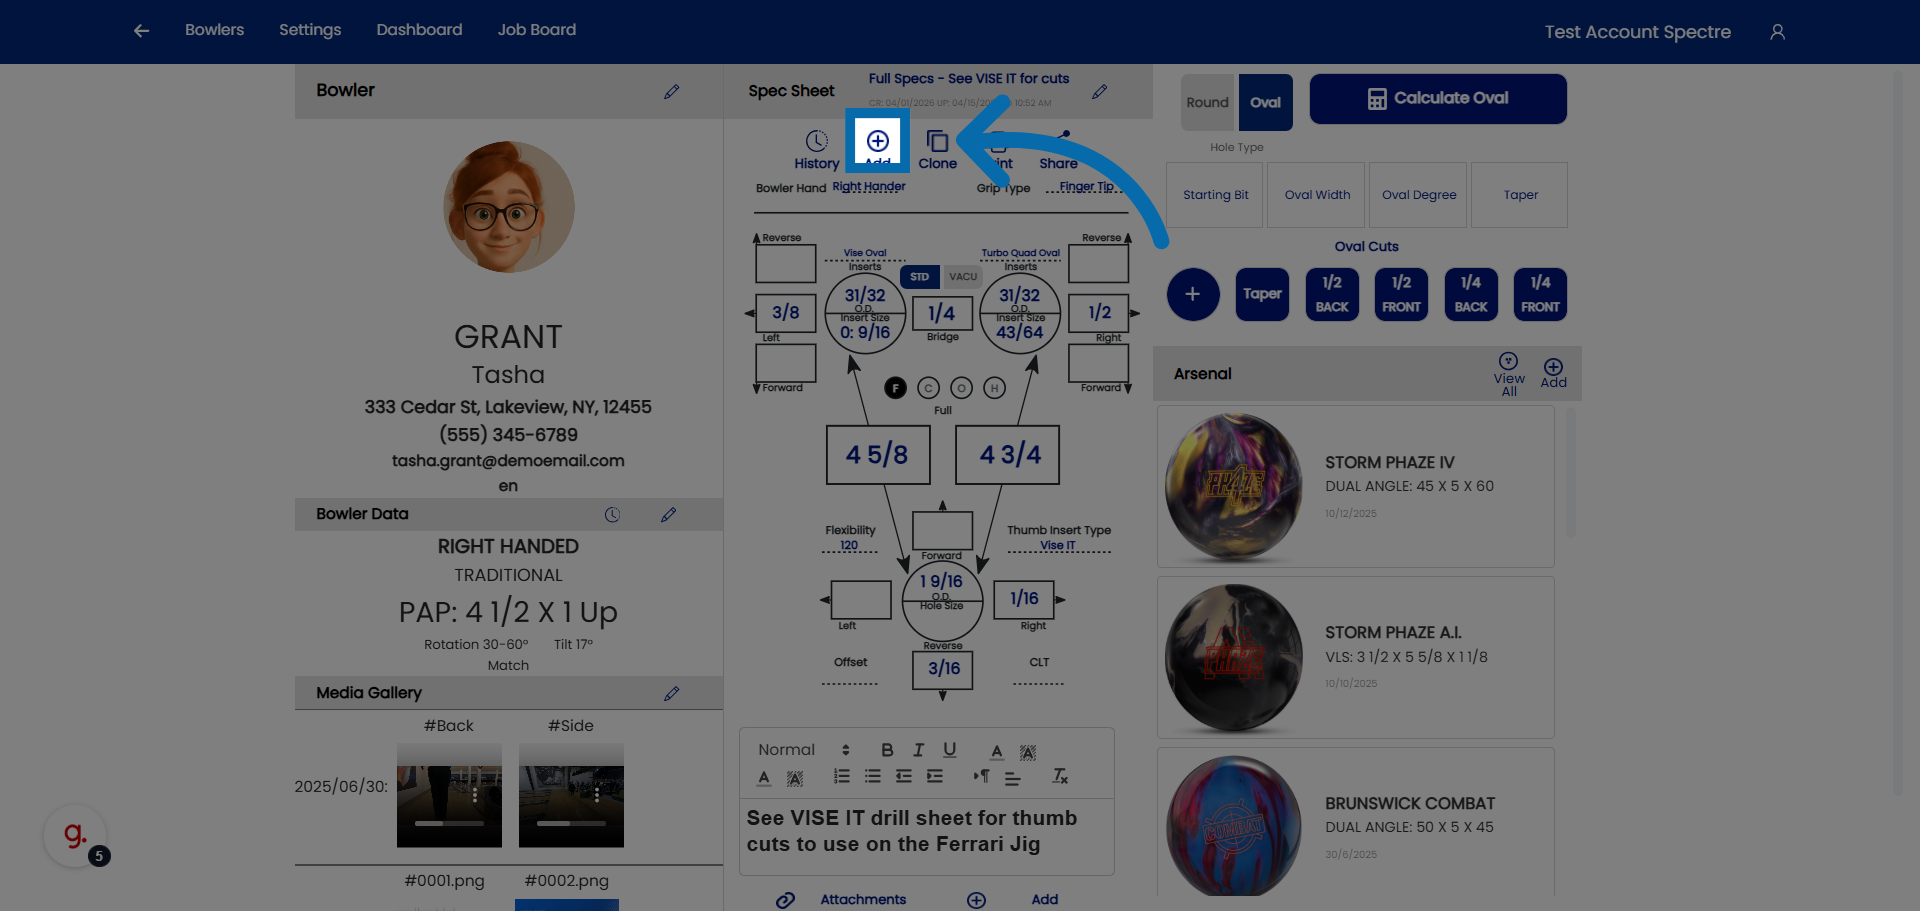
### 6. Open Additional Options
Click here to add a new spec sheet to the bowler.
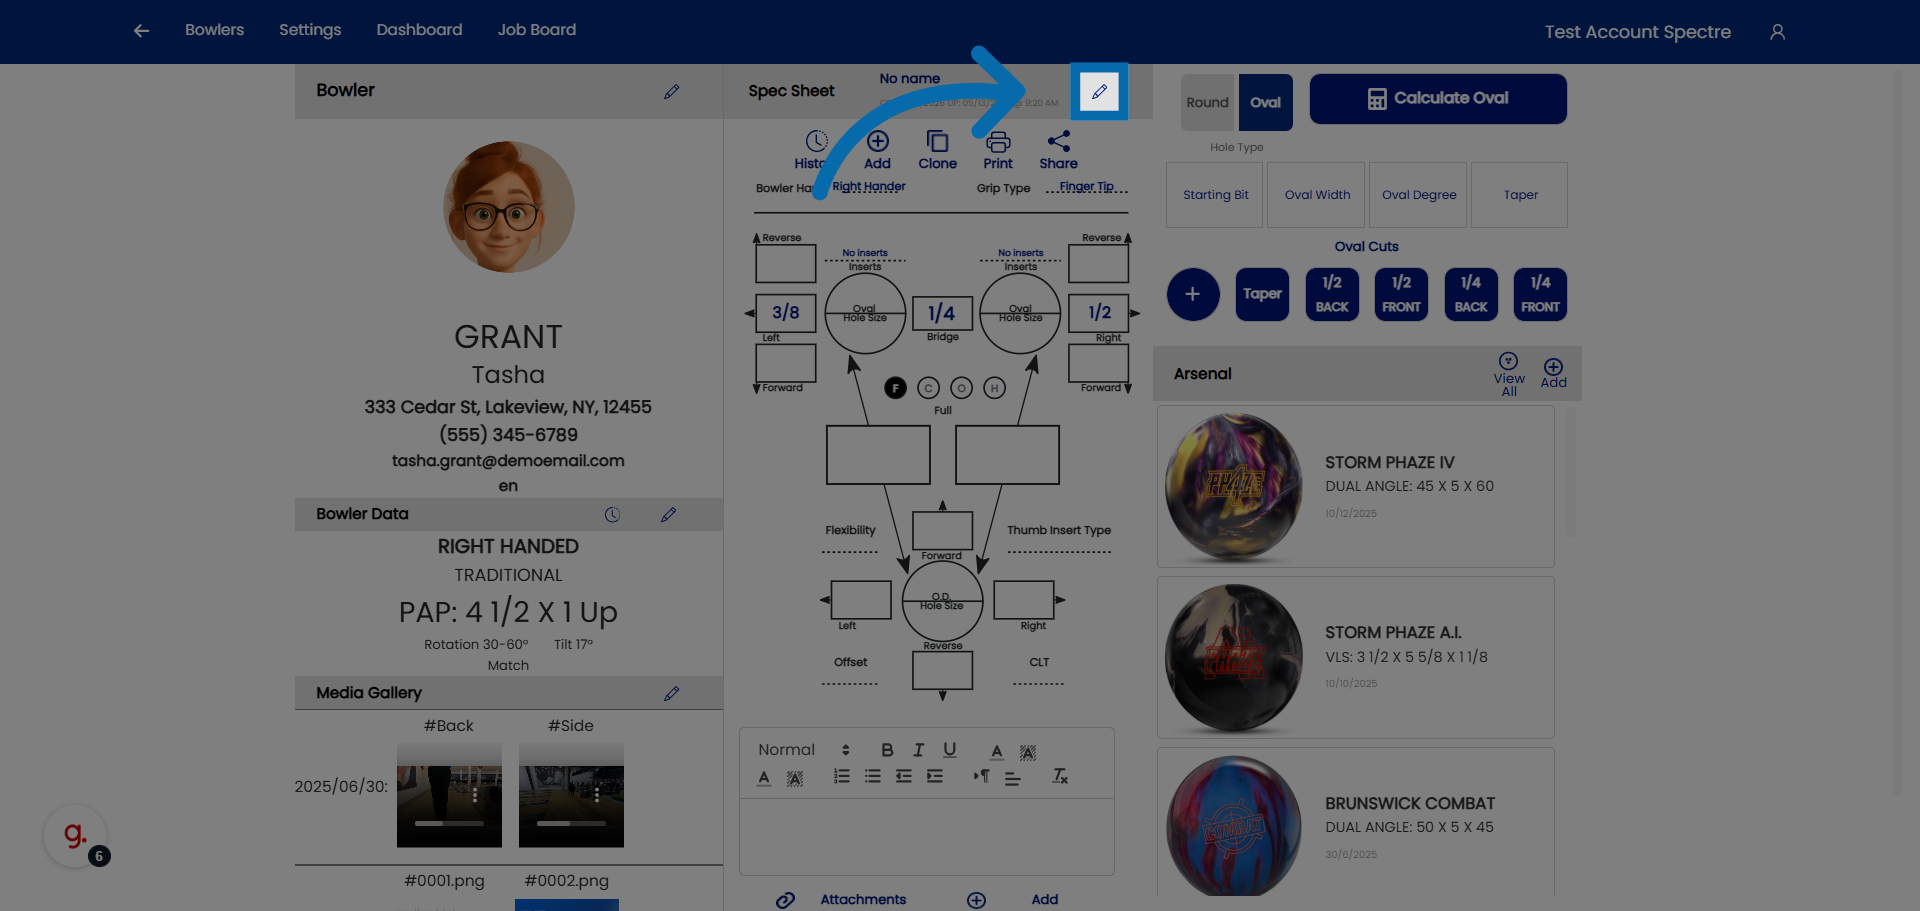
### 7. Access Further Spec Sheet Settings
Click here to modify the name of the spec sheet
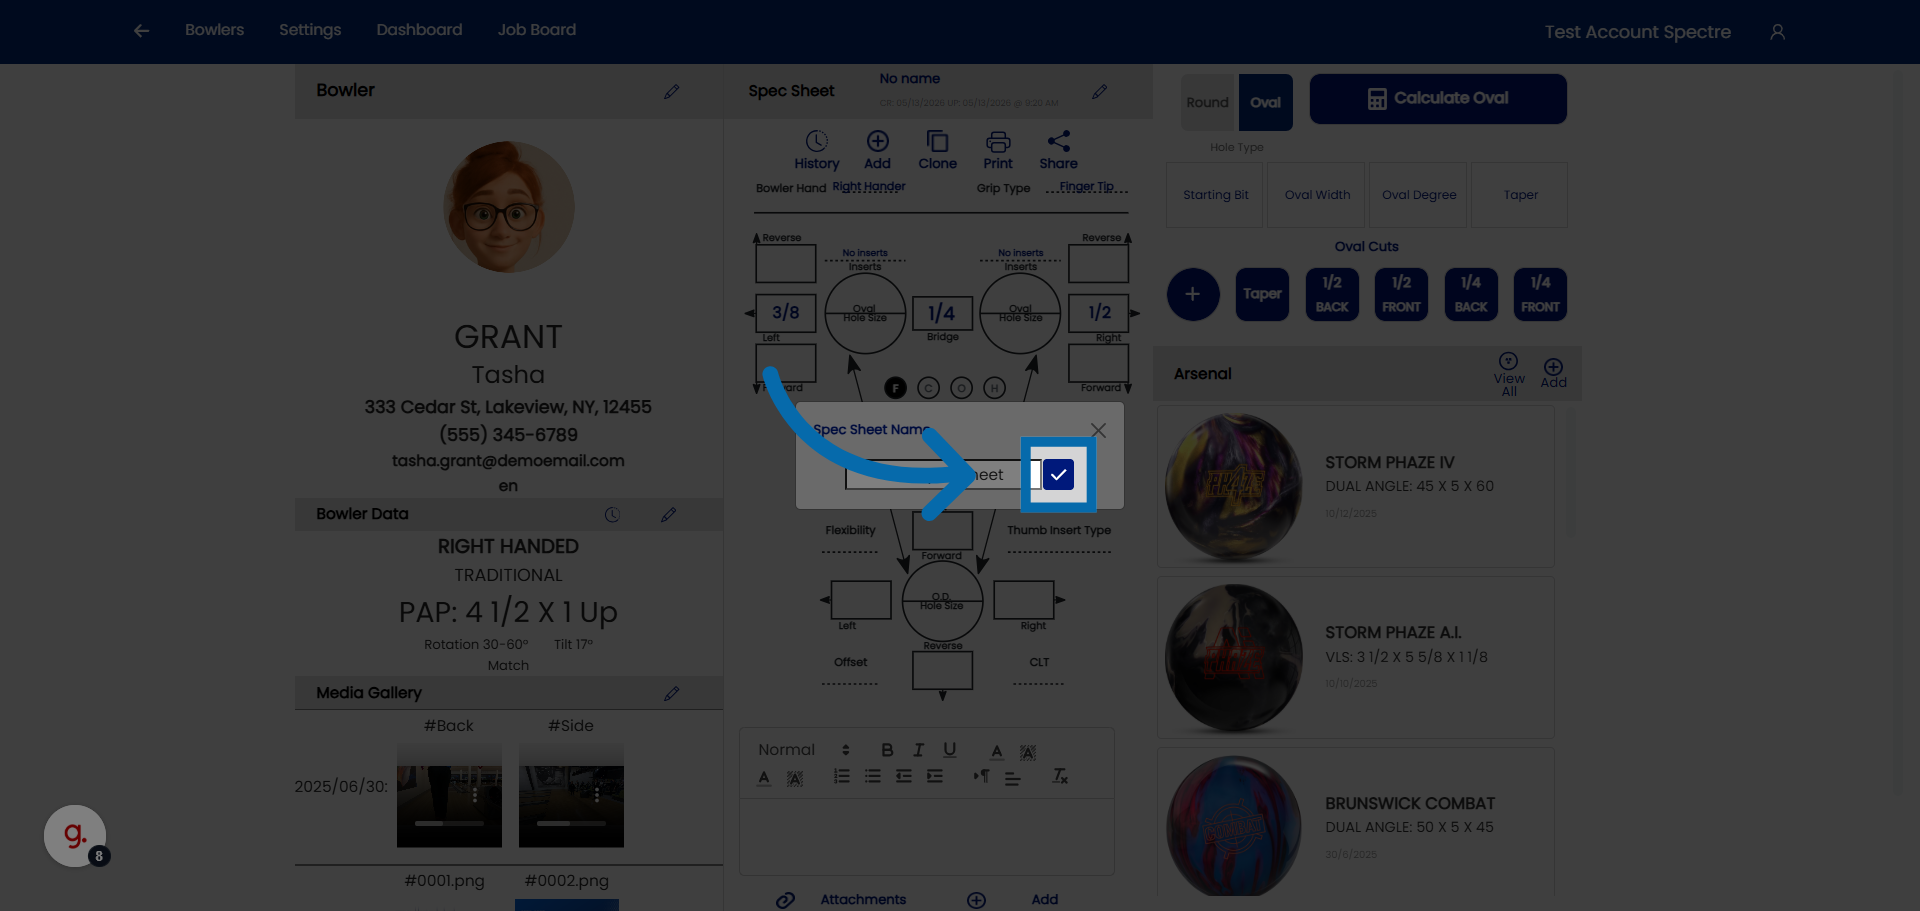
### 8. Select Spec Sheet Name Field
Click "Spec Sheet Name" to edit the name of the spec sheet.
Click here to finalize and save the new spec sheet.
# 4.2.2 Naming a spec sheet
4.2.2step-by-step
When you create a new spec sheet, Spectre Cloud lets you give it a **plain-English name** at the top of the sheet. This name is how you identify the sheet later — a far more useful label than relying on the created and modified dates alone.
## 🎳 Naming the Spec Sheet
The name field sits at the top of the spec sheet when it's created. Use it to describe, in your own words, what the sheet is for — so anyone opening the bowler's history can tell at a glance what each sheet represents.
- ✅ Give the sheet a name that describes what was done or why — for example, `Refit pain ring finger 2026`.
- ✅ A descriptive name makes a sheet easy to find without hunting through dates.
- ✅ Be consistent so other staff can immediately understand which sheet is which.
- ❌ Avoid relying on the created/modified dates alone to tell sheets apart — they don't tell you what changed or why.
## 🔄 Naming When You Clone a Sheet
Spectre Cloud's **Clone** feature creates a copy of an existing spec sheet in the bowler's history. It's the right way to make a small change and log it properly — the original stays intact, and the copy records the new work.
When you clone a sheet, Spectre Cloud **prompts you to rename it before the copy loads**. This is your chance to describe the change you're about to make.
- ✅ Rename the clone to reflect what's different about it — for example, the reason for the refit or the adjustment being made.
- ✅ A clear name on each clone turns the bowler's history into a readable record of what was done and when.
- ❌ Keeping the default or duplicate name defeats the purpose — you lose the ability to tell one sheet from the next.
**Note:** Naming is the key to a useful drilling history. A good name identifies what was done on that sheet — without it, a list of near-identical sheets and dates is hard to interpret later.
### Related Sections
- 4.2.1 — Creating a new spec sheet
- 4.2.3 — Selecting span type (F, C, O, H)
- 4.3 — Cloning a spec sheet
- 7.1 — Arsenal overview (linking balls to spec sheets)
**Tip:** Think of the sheet name as a one-line summary of the work. `Refit pain ring finger 2026` tells you everything at a glance; "Spec Sheet 3" tells you nothing. When you clone to make a change, take the extra few seconds at the rename prompt — future you, reviewing the history, will be glad you did.
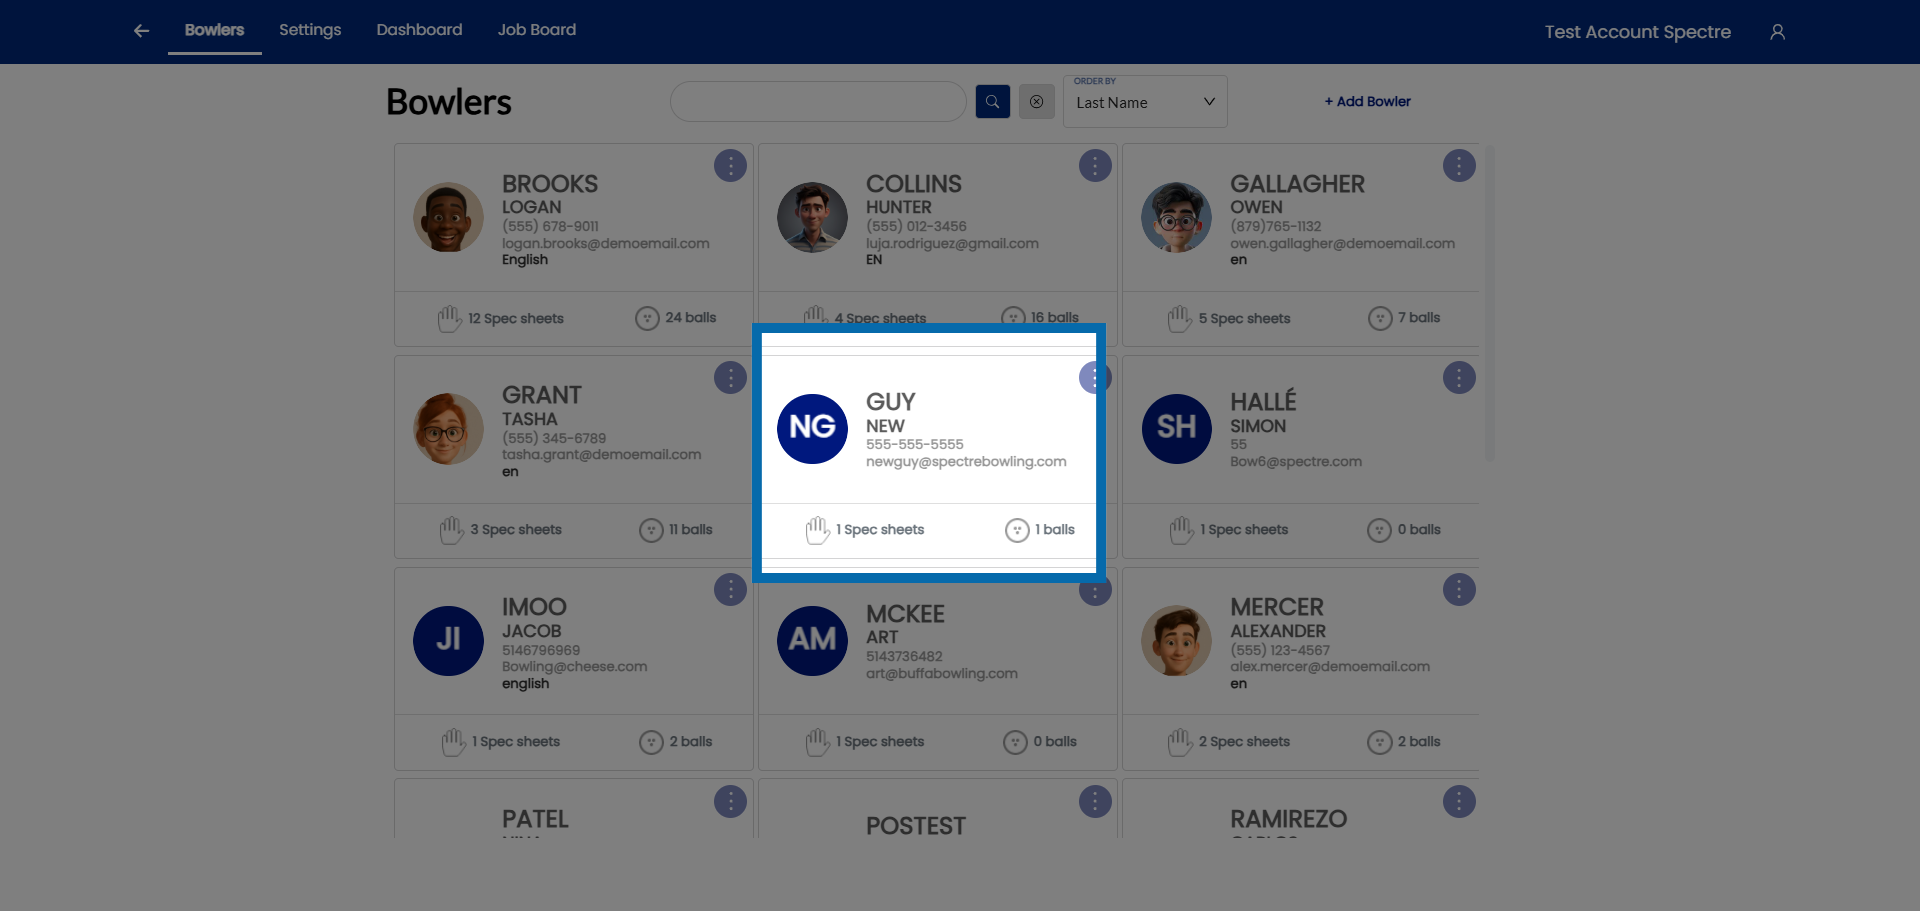
# 4.2.3 Selecting grip type on the spec sheet
### 1. Access Bowler Section
Click "Bowlers" to open the bowler management section in Spectre Proshop Management.
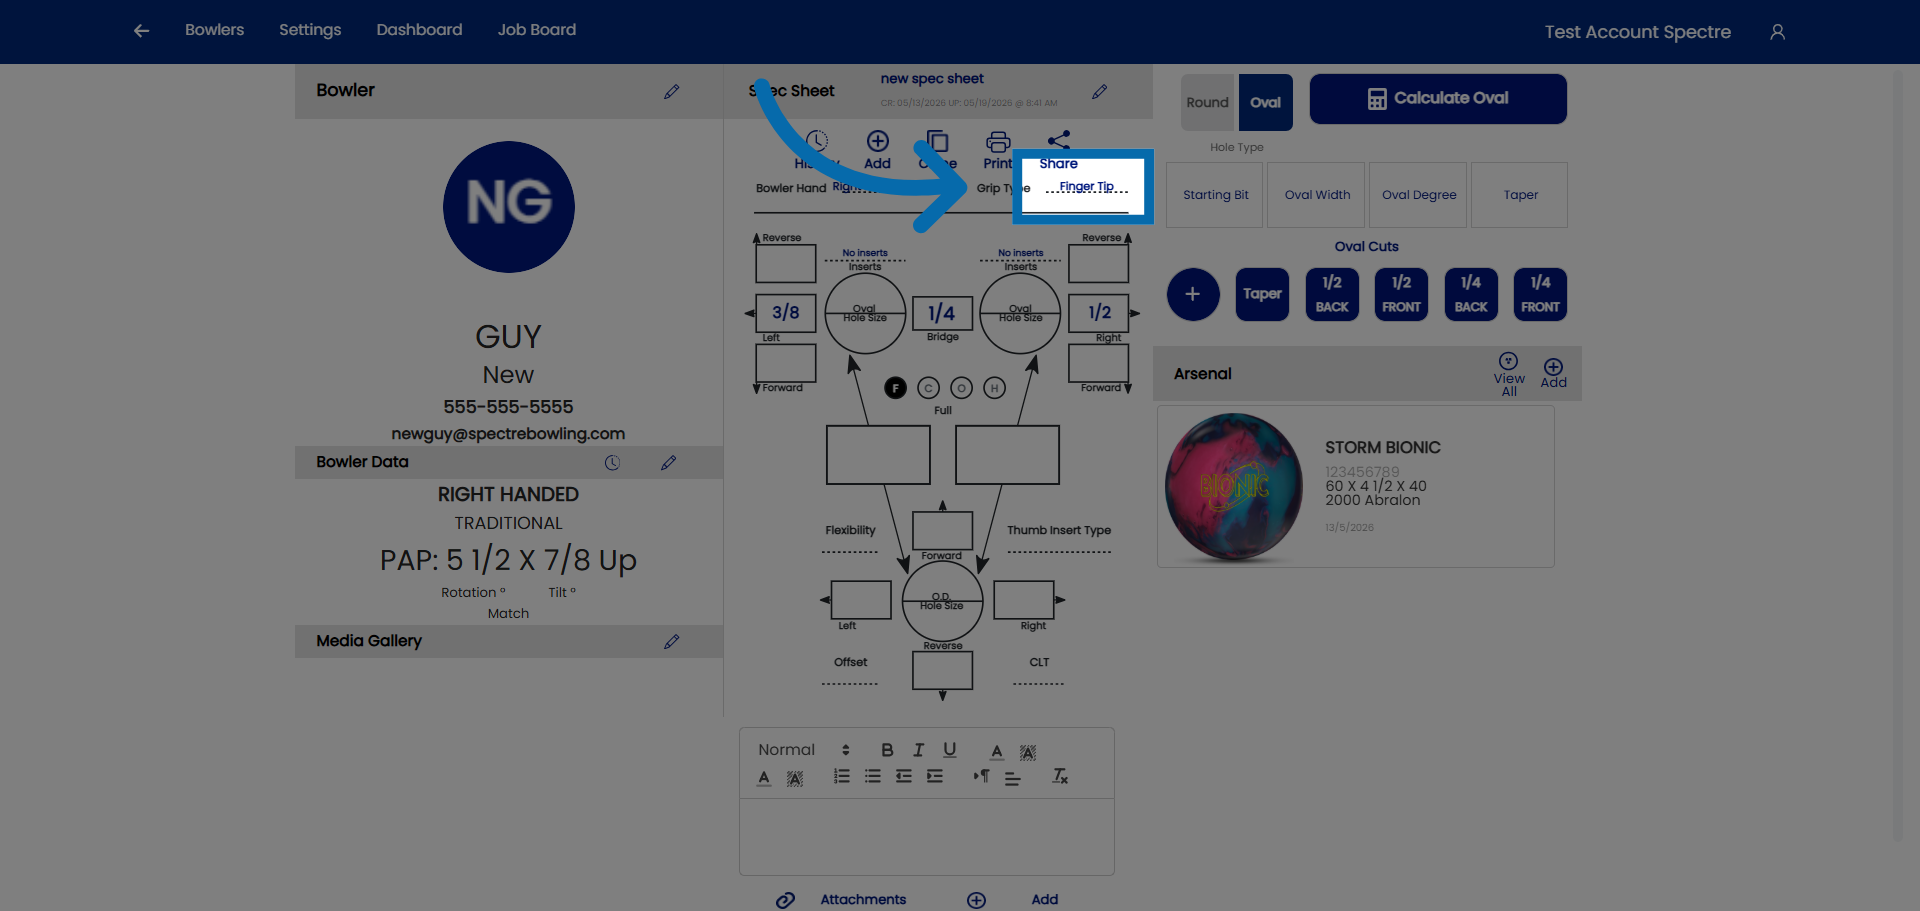
### 3. Click on grip type
Click here to access the grip type.
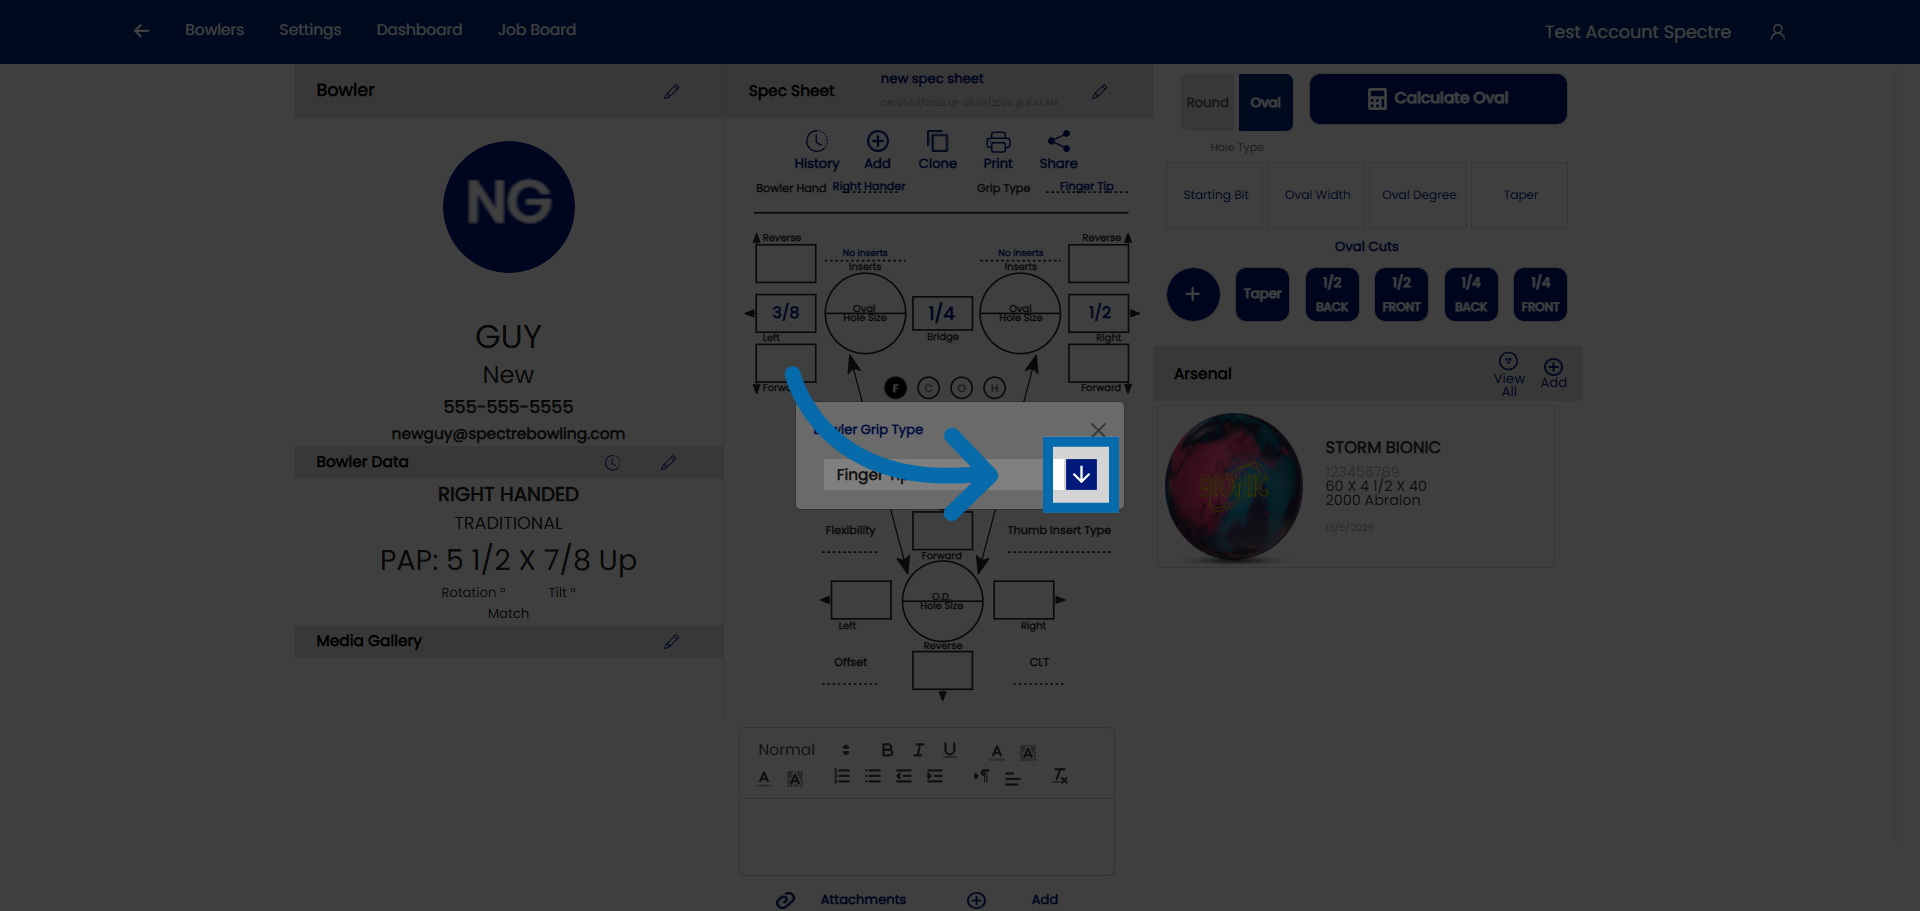
### 4. Click on the drop down
Click here to access the drop down.
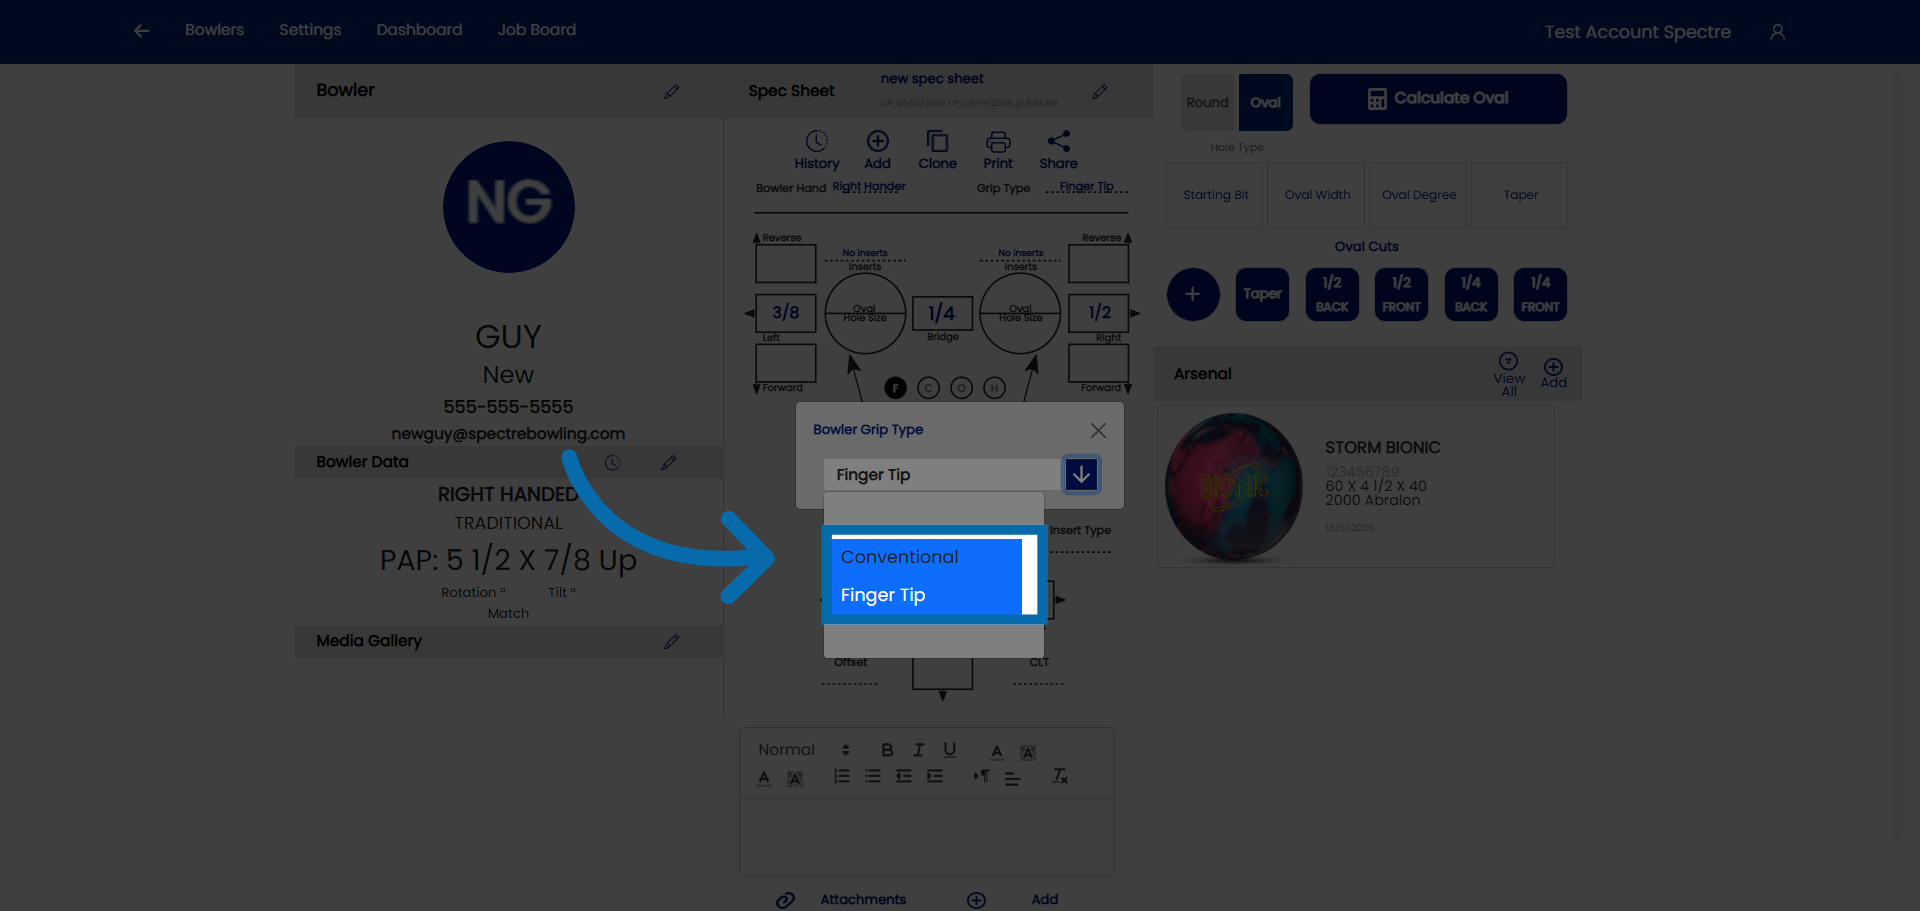
### 5. Select grip type
Select the grip type you would like.
# 4.2.4 How to identify the type of grip from measurement sheet
4.2.4step-by-step
Before entering span and pitch measurements, you need to identify which grip type the bowler uses. The grip type determines how the fingers sit in the ball and which measurements are relevant. Most fitting sheets — handwritten, printed, or from a previous system — record grip type either explicitly or implicitly through the measurements themselves.
## 🎳 The Two Grip Types
Spectre Cloud supports the two IBPSIA-standard grip types. Understanding how each is defined helps you read any fitting sheet accurately.
Grip Type
Finger insertion depth
Typical bowler profile
**Conventional**
Fingers inserted to the second knuckle (middle joint)
Beginners, recreational bowlers, seniors, youth
**Fingertip**
Fingers inserted to the first knuckle (tip joint only)
Most competitive and league bowlers; the most common adult grip
**Note:** The overwhelming majority of adult league and competitive bowlers use a fingertip grip. If a fitting sheet doesn't state a grip type, fingertip is the most likely default for an adult bowler — but always confirm with the bowler directly.
## 🛠️ Selecting Grip Type in Spectre Cloud
1. Open the spec sheet you're creating or editing.
2. Locate the **Grip Type** selector in the spec sheet header or measurement section.
3. Choose **Conventional** or **Fingertip** based on your reading of the fitting sheet.
4. Spectre Cloud adjusts the available span fields and IBPSIA auto-suggestion logic to match the selected grip type.
**Important:** Selecting the wrong grip type will cause span fields to mismatch the bowler's actual measurements and may produce incorrect IBPSIA auto-suggestions. If you're unsure, choose Fingertip as the default for adults and confirm with the bowler at their next visit.
### Related Sections
- 4.2.3 — Selecting span type (F, C, O, H)
- 4.2.5 — Entering span measurements
- 4.2.6 — Entering pitch values
- 4.5 — IBPSIA auto-suggestions
**Tip:** Not sure which grip a new walk-in bowler uses? Fingertip bowlers often have calluses or grooving at the first knuckle from years of fingertip use — a quick look at the hand usually tells you.
# 4.2.5 Cloning a spec sheet
4.2.5TIPstep-by-step
When you need to make an adjustment to an existing fit, and you want to document the change in the spec sheet history, cloning a spec sheet saves time and prevents transcription errors. Instead of re-entering every measurement from scratch, you duplicate an existing sheet and change only what's different for the new fit. The original spec sheet is never altered.
## 🔄 What Cloning Does
- ✅ Creates a complete copy of the selected spec sheet — span, pitch, grip type, layout, and notes.
- ✅ **Prompts you to rename the sheet before the copy loads** — so you can describe the new drilling right away (e.g., `Refit pain ring finger 2026`).
- ✅ Saves the clone as a separate, independent record — changes to the clone never affect the original.
- ❌ Does not automatically link the clone to an arsenal ball — that's done separately.
## 🛠️ How to Clone a Spec Sheet
1. Open the bowler's profile from the **Bowlers** list.
2. Go to the **Spec Sheets** tab for that bowler.
3. Find the sheet you want to clone — use the name and date to confirm you have the right record.
4. Open the sheet and select the **Clone** option.
5. When prompted, **give the clone a new name** that reflects the new ball or the change you're making.
6. Spectre Cloud opens the renamed copy for editing.
7. Edit any measurements, pitches, or layout details that differ from the original.
8. Save the cloned spec sheet.
### Related Sections
- 4.2.2 — Naming a spec sheet
- 4.2.1 — Creating a new spec sheet
- 4.4 — Viewing spec sheet history for a bowler
- 7.1 — Arsenal overview (linking cloned spec sheets to arsenal balls)
**Tip:** The rename prompt at clone time is the moment your history earns its value. A quick, descriptive name on every clone turns a bowler's spec sheet list into a readable record of their equipment evolution — and makes future ball conversations much easier.
# 4.2.6 Printing a spec sheet
4.2.6TIPstep-by-step
Once a spec sheet is complete, you can print it directly from Spectre Cloud to use at the drill press, hand to a colleague, or file for your records. Spectre Cloud generates a clean, formatted printout that includes all measurements, layout details, and notes for the selected spec sheet.
## 🖥️ How to Print a Spec Sheet
1. Open the bowler's profile and navigate to their **Spec Sheets** tab.
2. Open the spec sheet you want to print.
3. Select the **Print** option — look for the print icon or button in the spec sheet action menu.
4. Spectre Cloud opens a print-ready view of the spec sheet in your browser.
5. Your browser's standard print dialog will open. Select your printer, adjust page size if needed, and confirm.
### Related Sections
- 4.2.2 — Naming a spec sheet (ball name, date, notes)
- 4.2.5 — Cloning a spec sheet to preserve old measurements
- 4.4 — Viewing spec sheet history for a bowler
- 8.1 — Profile settings (pro shop name and logo)
- Book 07 — Job Board plugin
**Tip:** Saving spec sheets as PDFs and storing them in a shared folder (Google Drive, Dropbox, or a network drive) gives your whole team instant access to drilling records even when Spectre Cloud is not open in front of them.
```
# 4.2.7 Cloning an existing spec sheet
4.2.7TIPstep-by-step
###
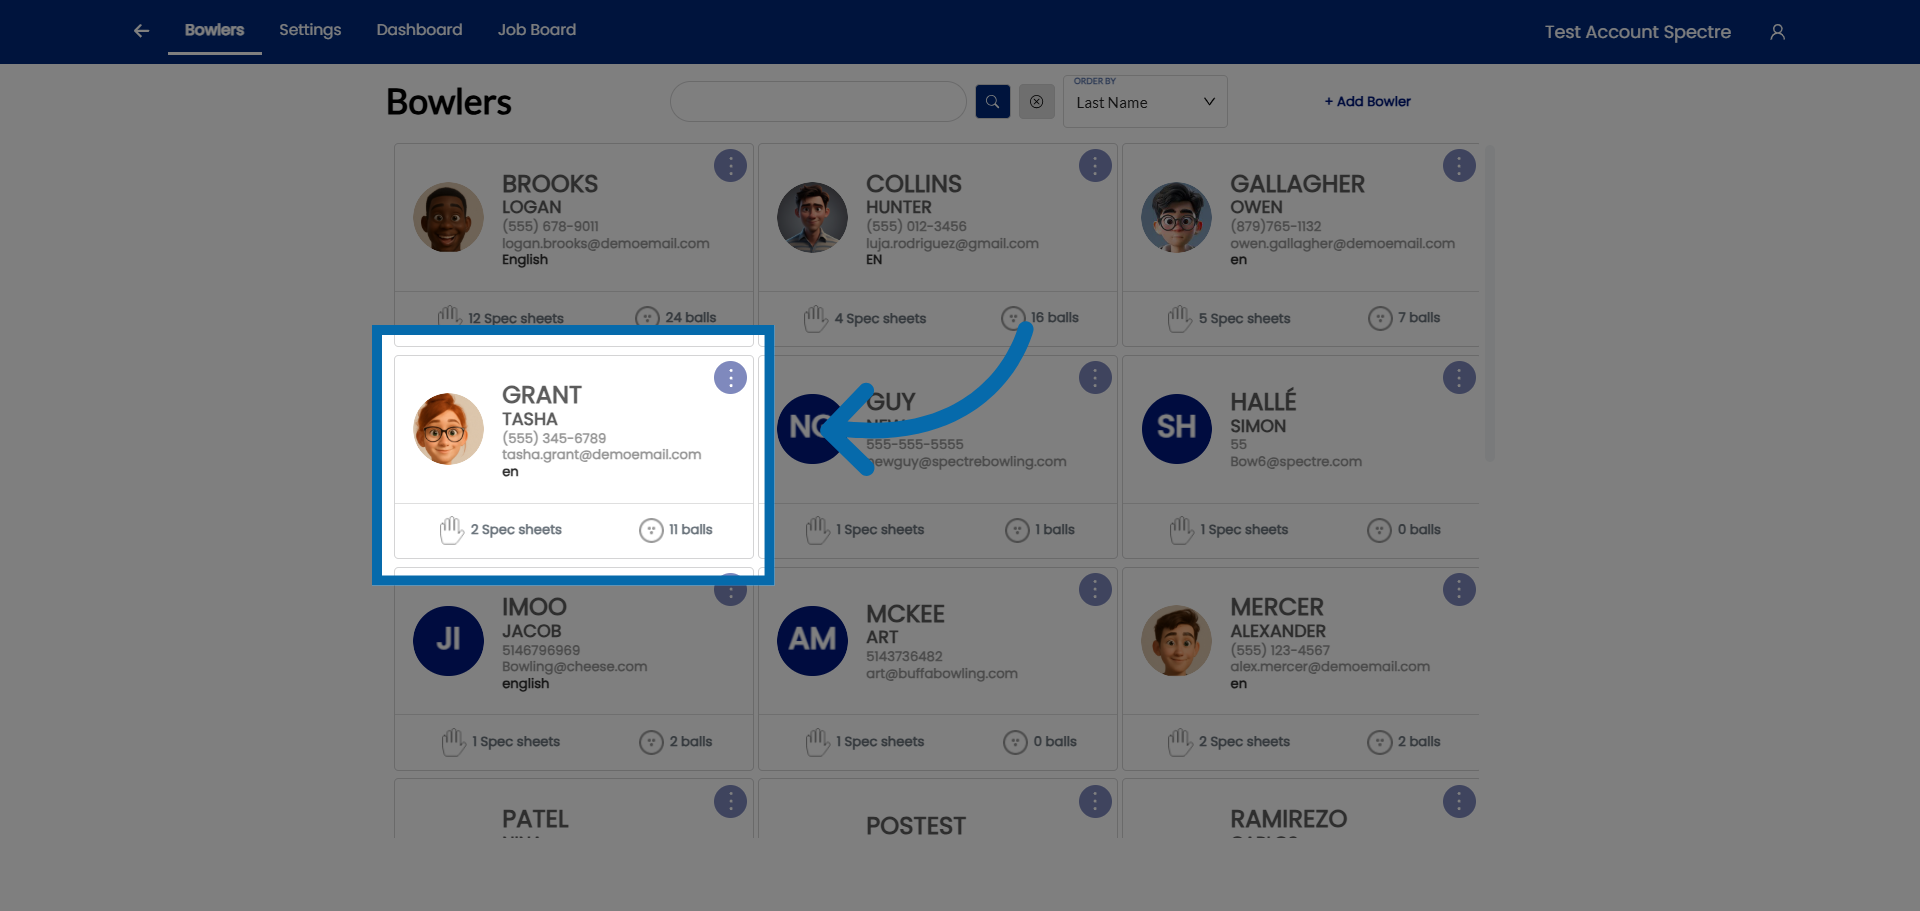
### 1. Open Bowler Profile
Select a bowler you would like to clone their spec sheet
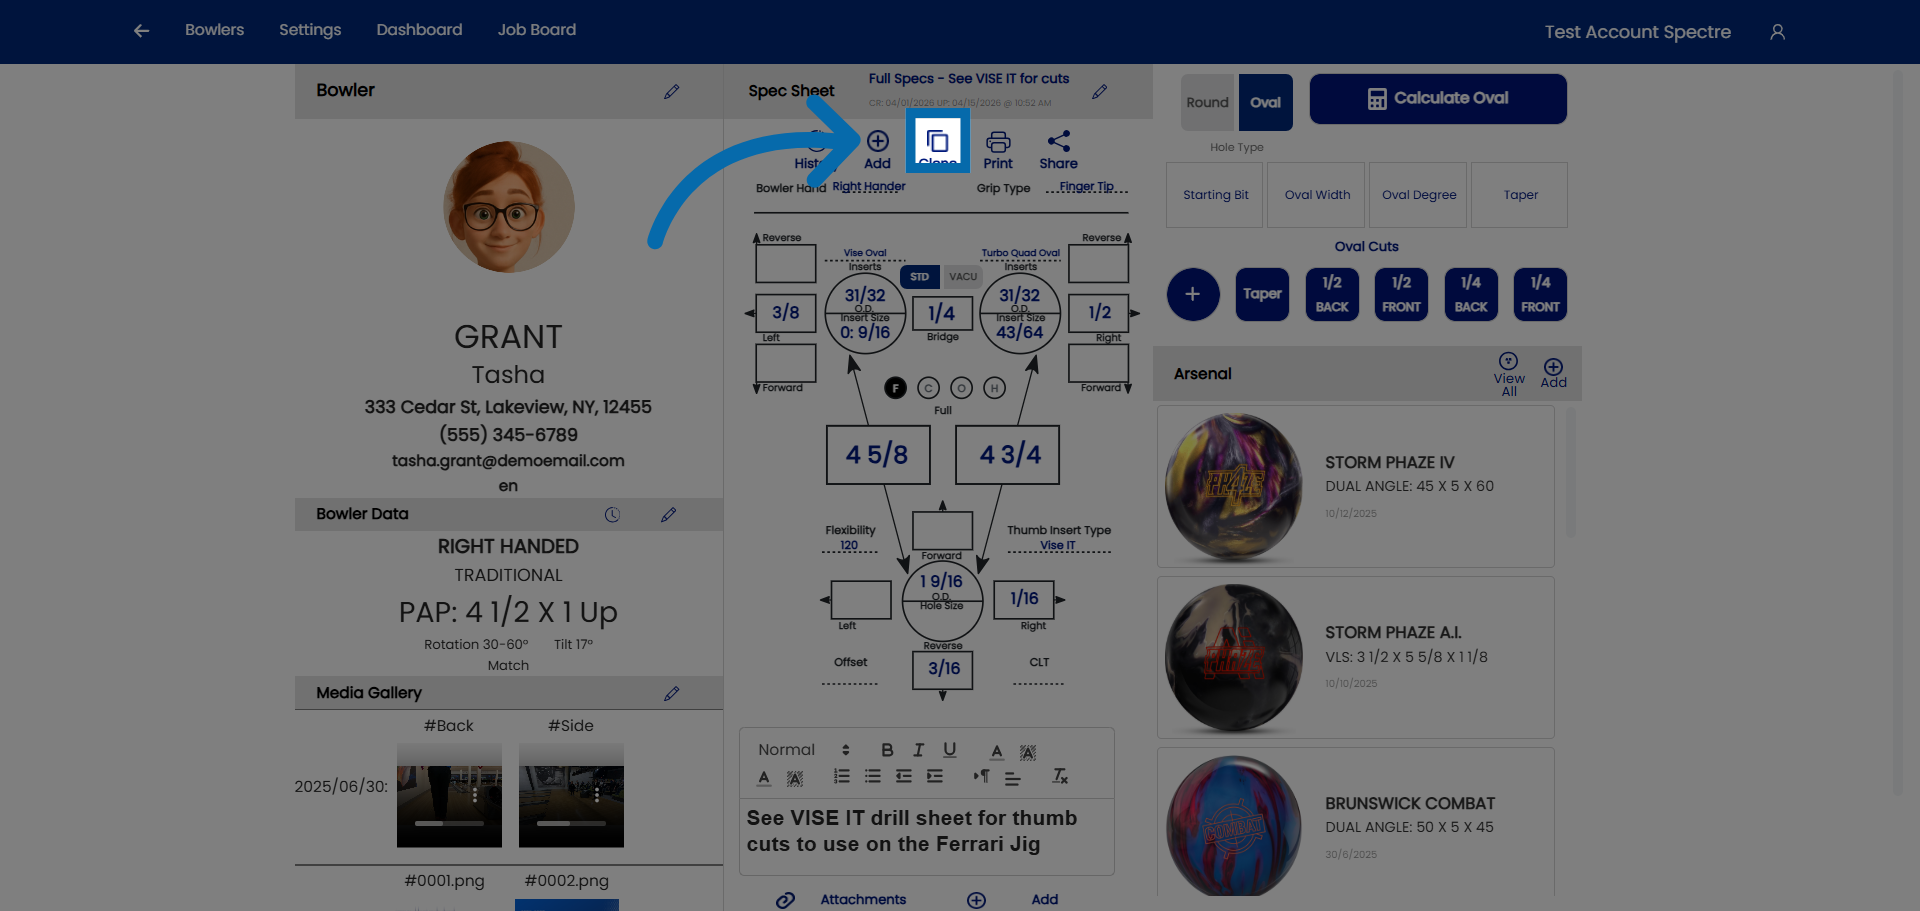
### 2. Hit the CLONE button
Click here to create a clone of the default spec sheet.
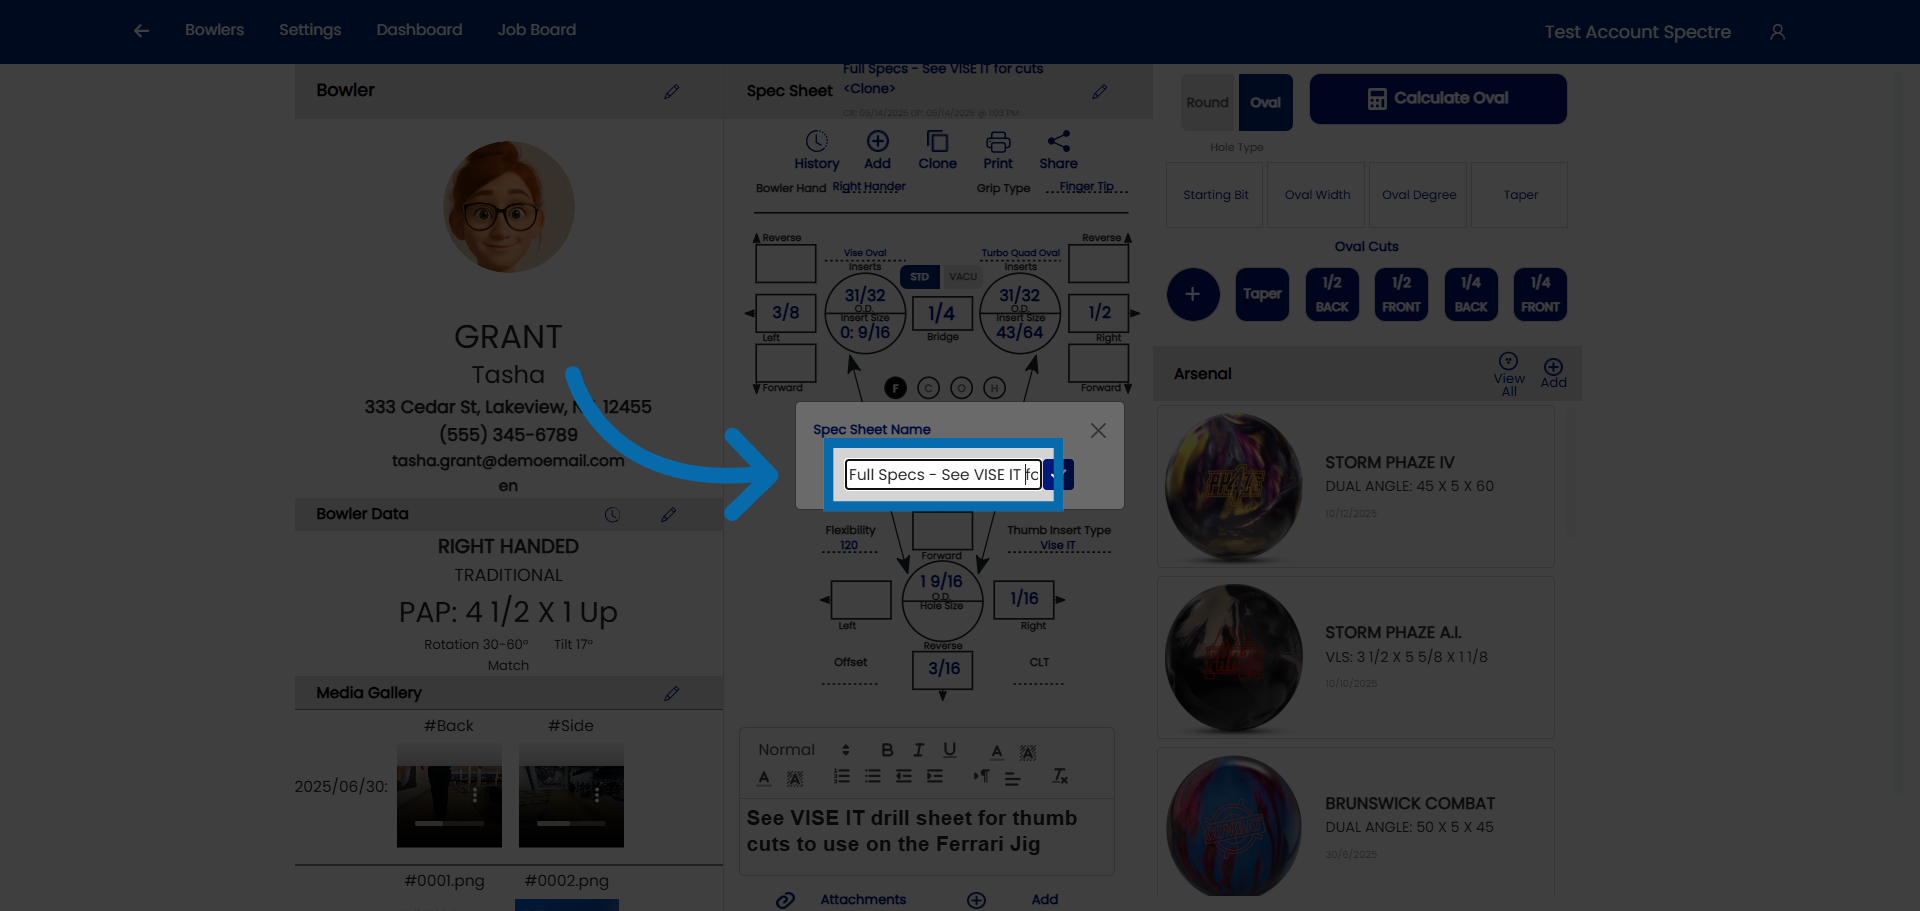
### 3. Give the cloned sheet a specific name
Click "Spec Sheet Name" to name the clone of the spec sheet.
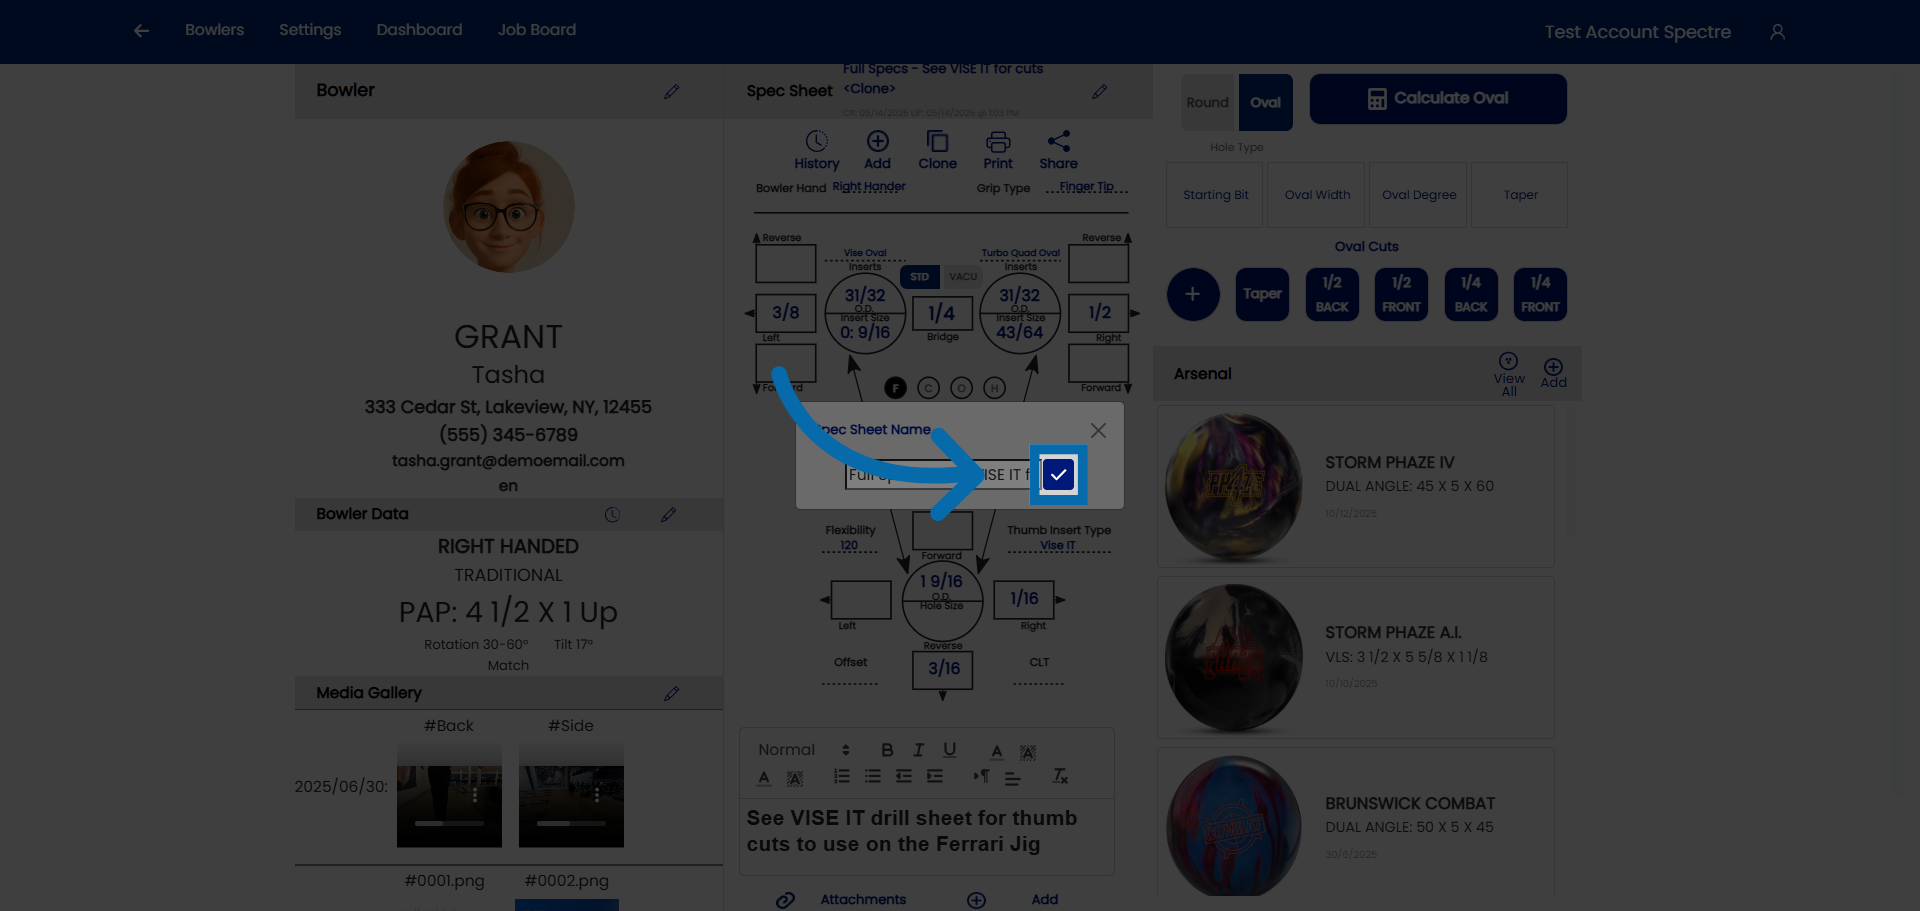
### 4. Confirm name
Once you have renamed the spec sheet, click here to confirm.
### 4. Modify the necessary fields
You can now proceed to make modifications to the bowler's specs.
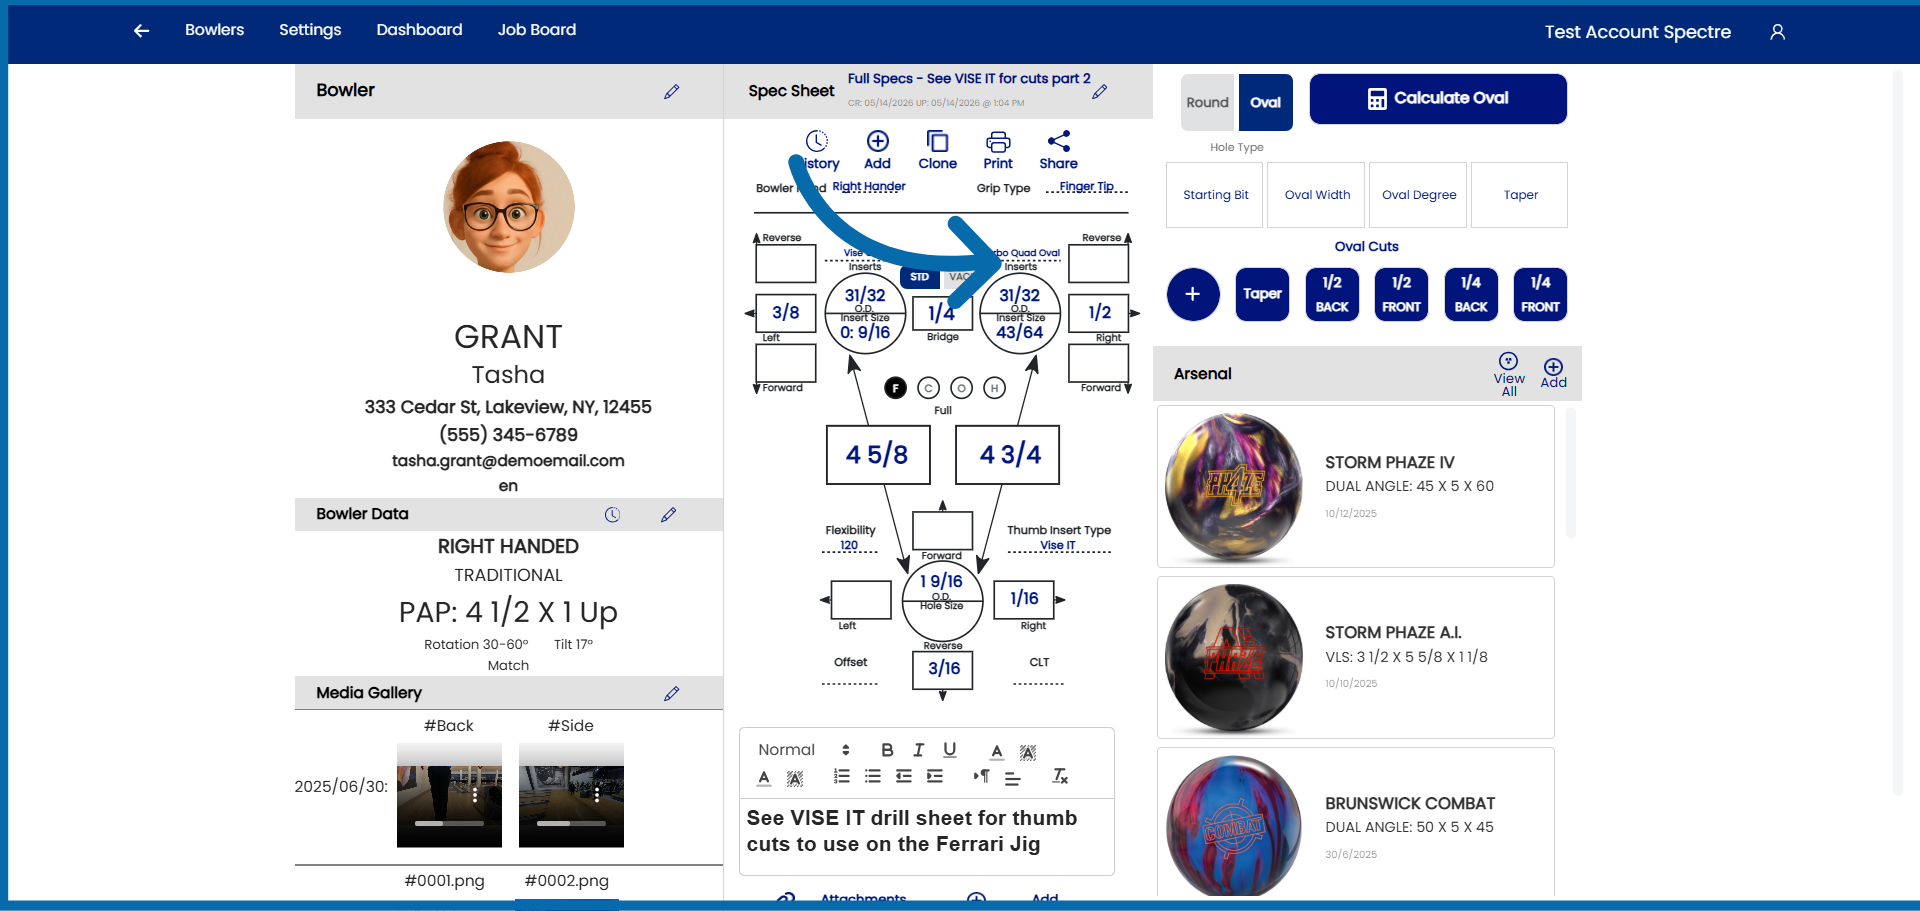
You have successfully created a clone spec sheet for an already existing bowler
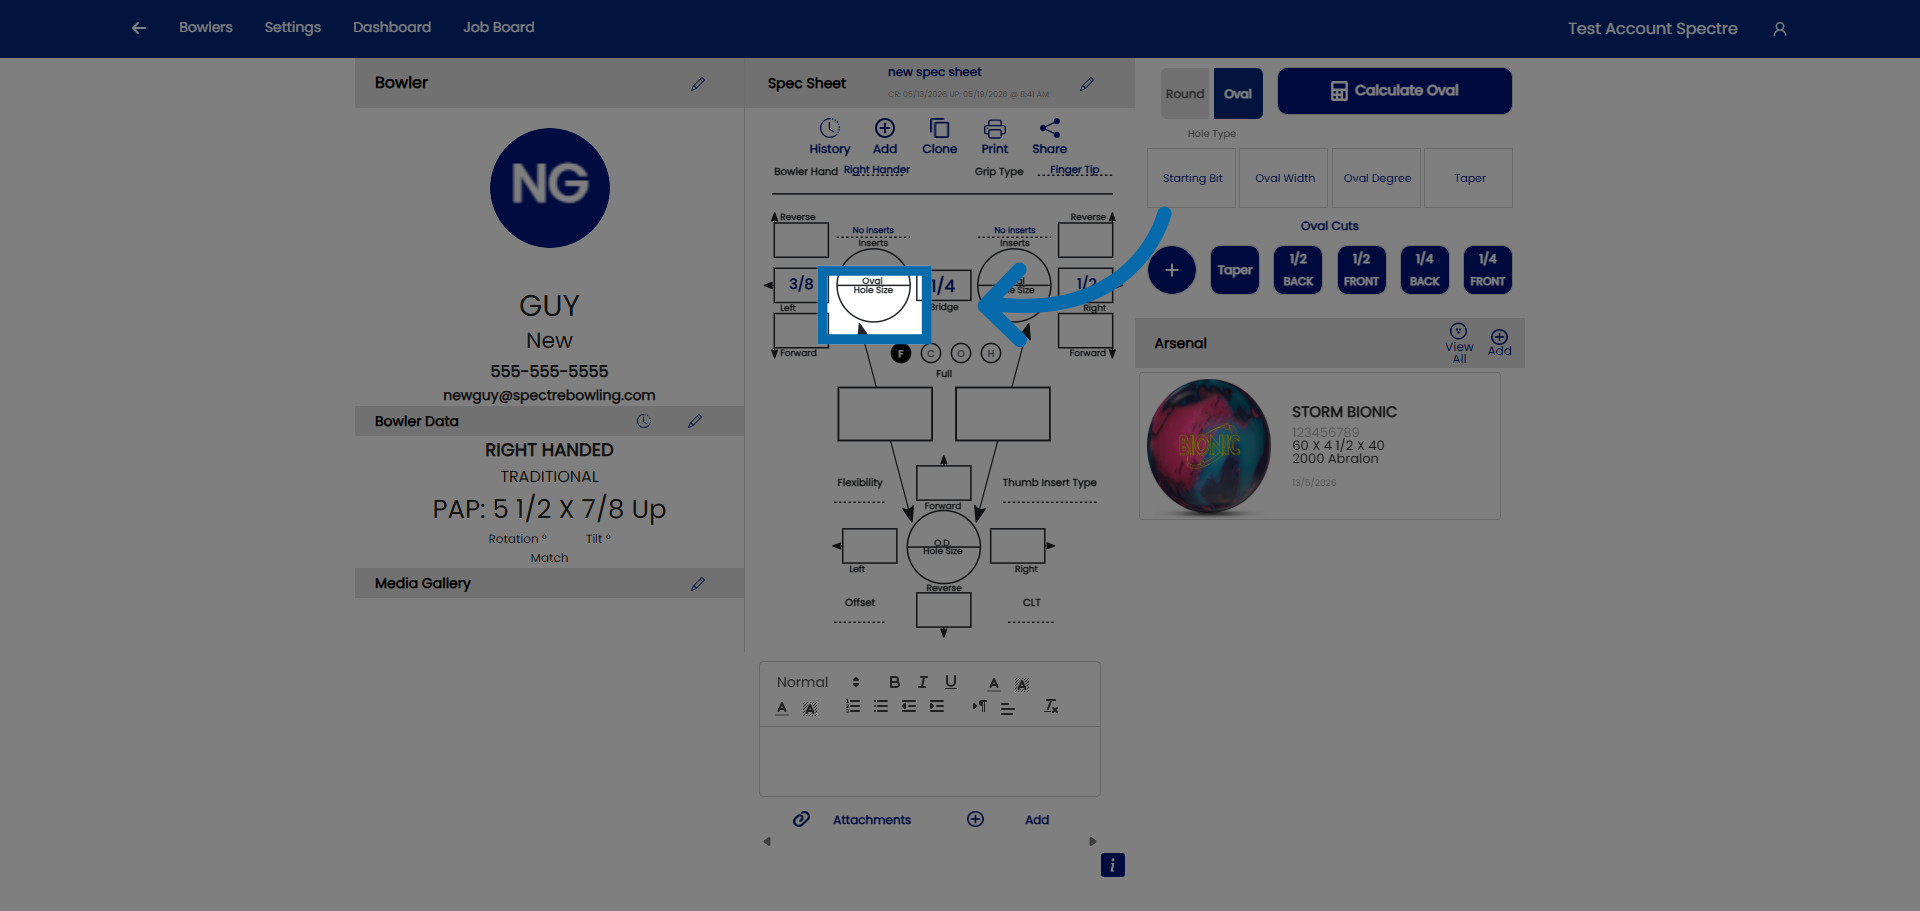
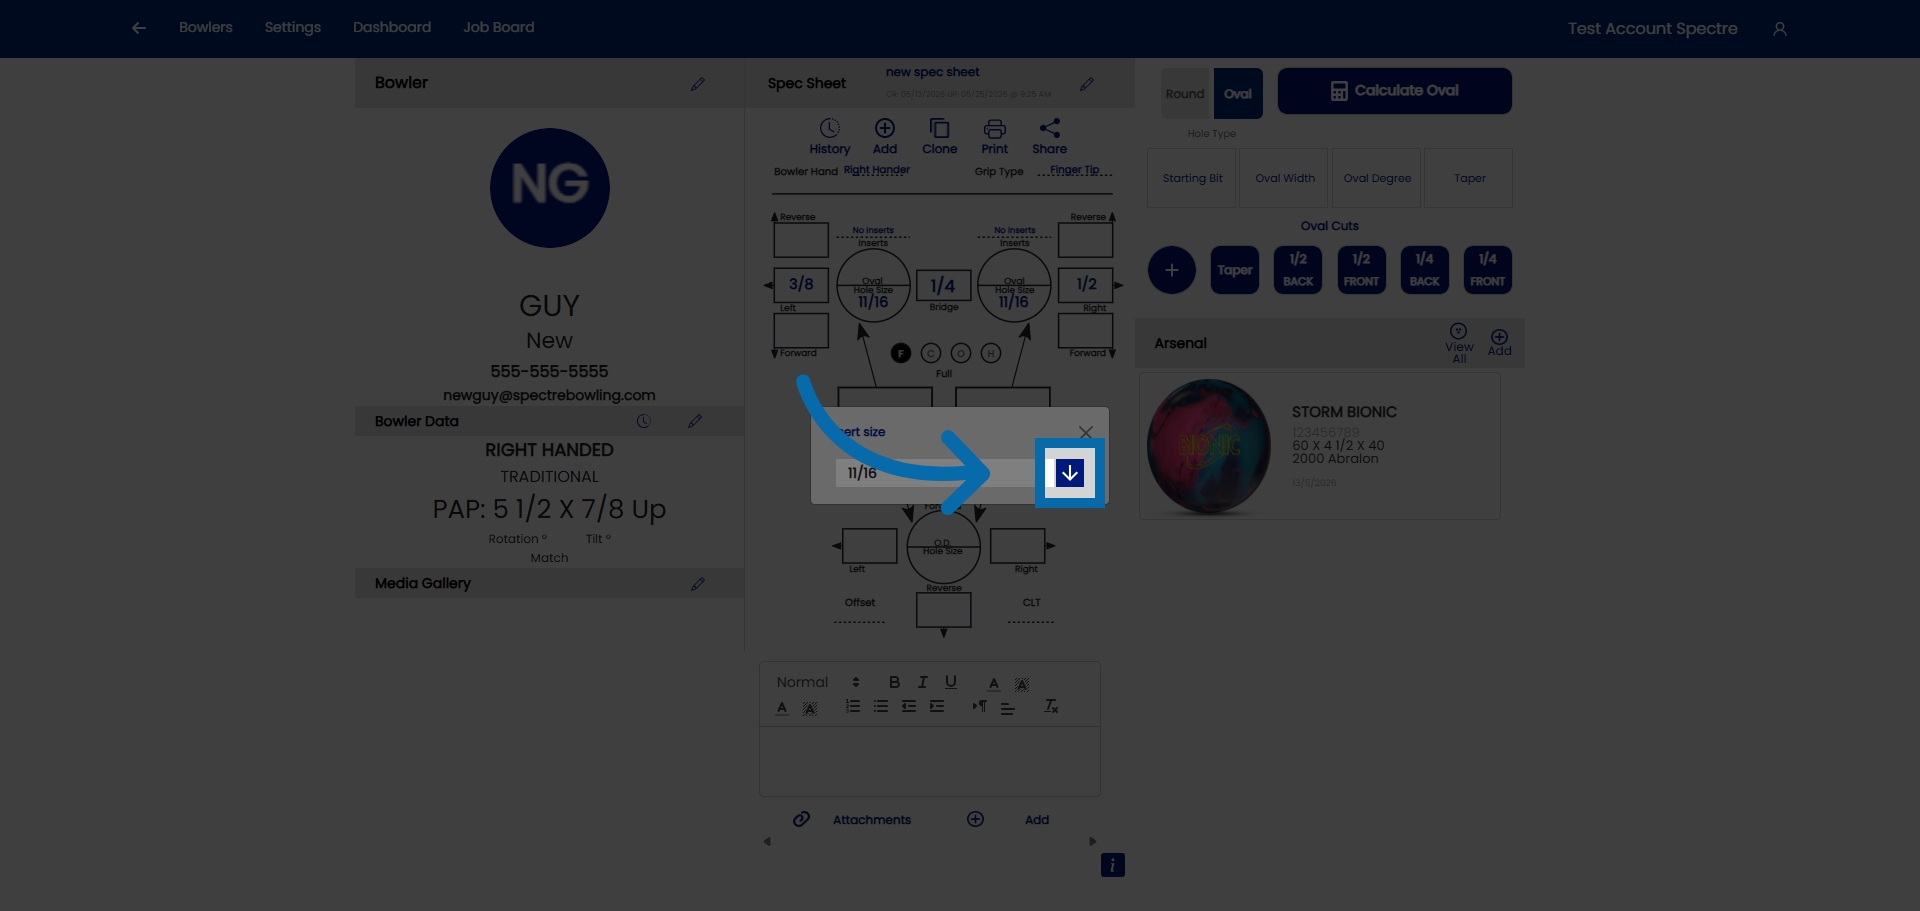
### 3. Open drop down
Click here to open the drop down.
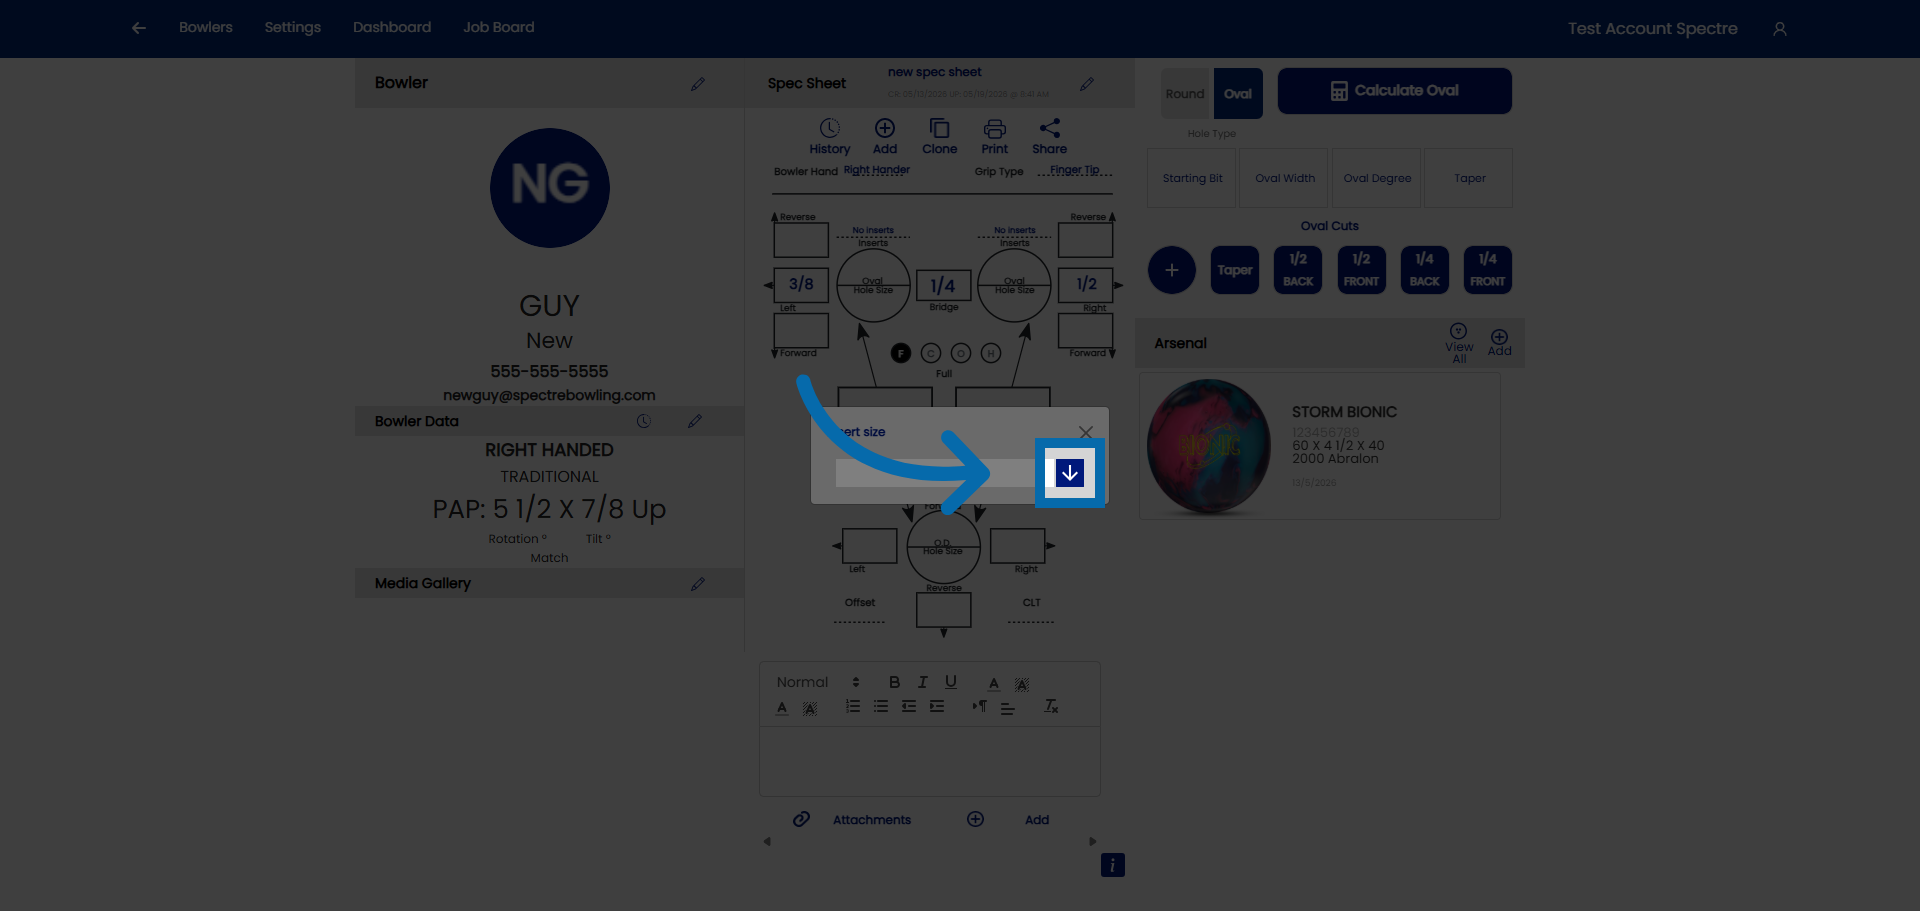
### 4. Select the size
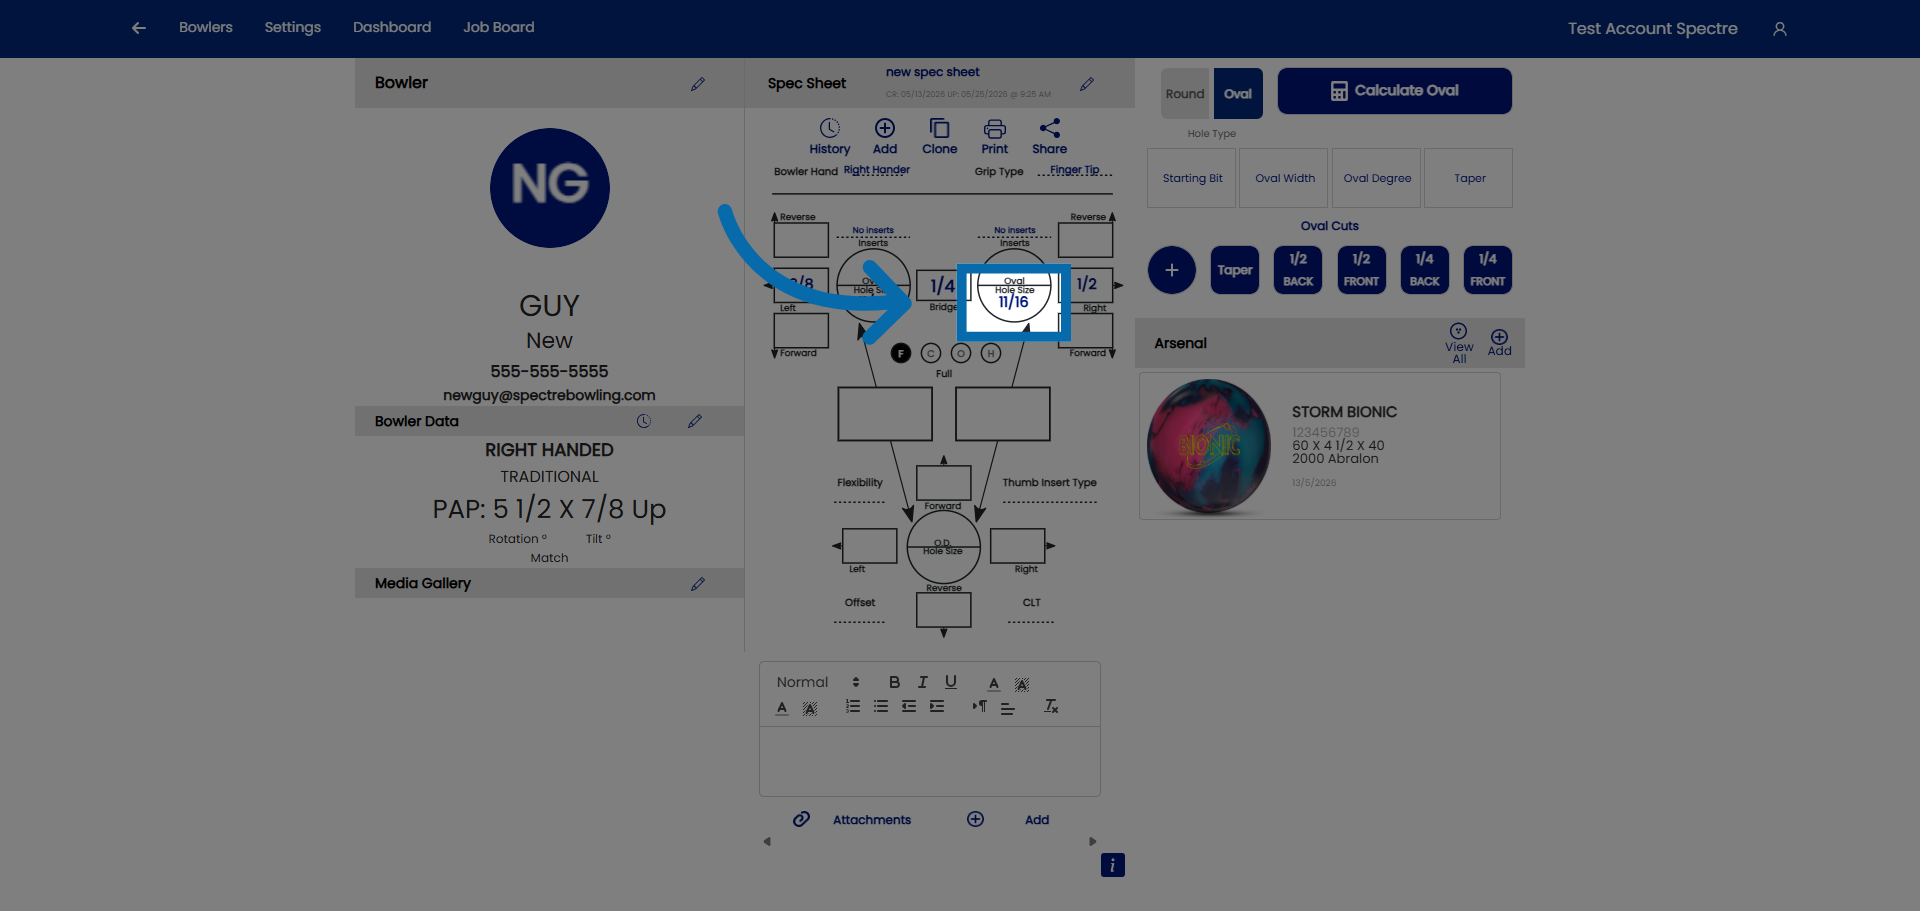
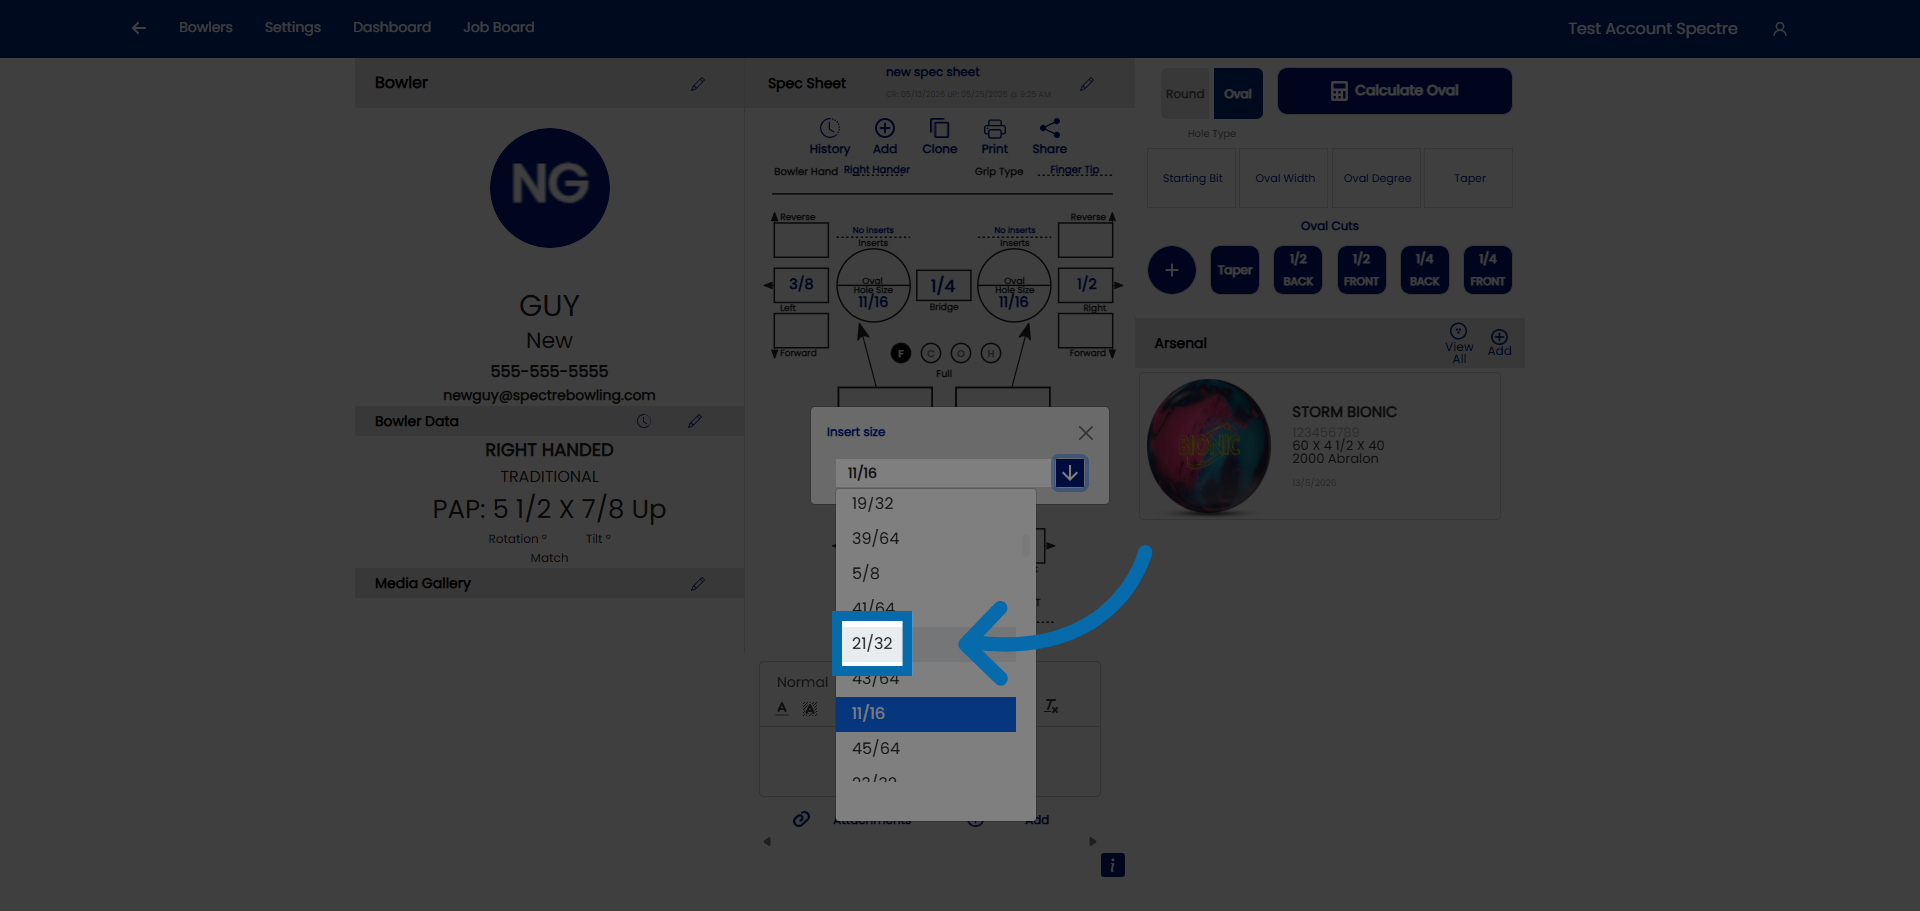
### 6. Open drop down
Open the drop down
### 7. Select the size
Select the size
# 4.3.2 Entering span measurements, F, C, O, H
4.3.2step-by-step
Span measurements define the distance between the thumb hole and each finger hole. Spectre Cloud supports **four span types**, and it's important to enter values under the correct one — the number only means what it's supposed to when it's paired with the right span type.
## 📐 The Four Span Types (Summary)
Spectre Cloud uses four span measurement types. Each is explained in full — including how it's measured and when to use it — in **4.1.2**. In brief:
- ✅ **Full Span (F)** — the complete measured span, everything included, inserts and all.
- ✅ **Cut to Cut (C)** — Full Span minus the insert thickness; used when drilling thumb-first.
- ✅ **Outer to Cut (O)** — for interchangeable thumbs; inside of the female interchangeable to the cut of the finger OD hole.
- ✅ **Hole to Hole (H)** — biggest hole to biggest hole (what the PBA truck calls "Cut-to-Cut").
**For the full detail on each type, see 4.1.2 — Span types.** This page covers how to *enter* the values once you know which type you're working in.
## 🎳 The Span Fields on the Spec Sheet
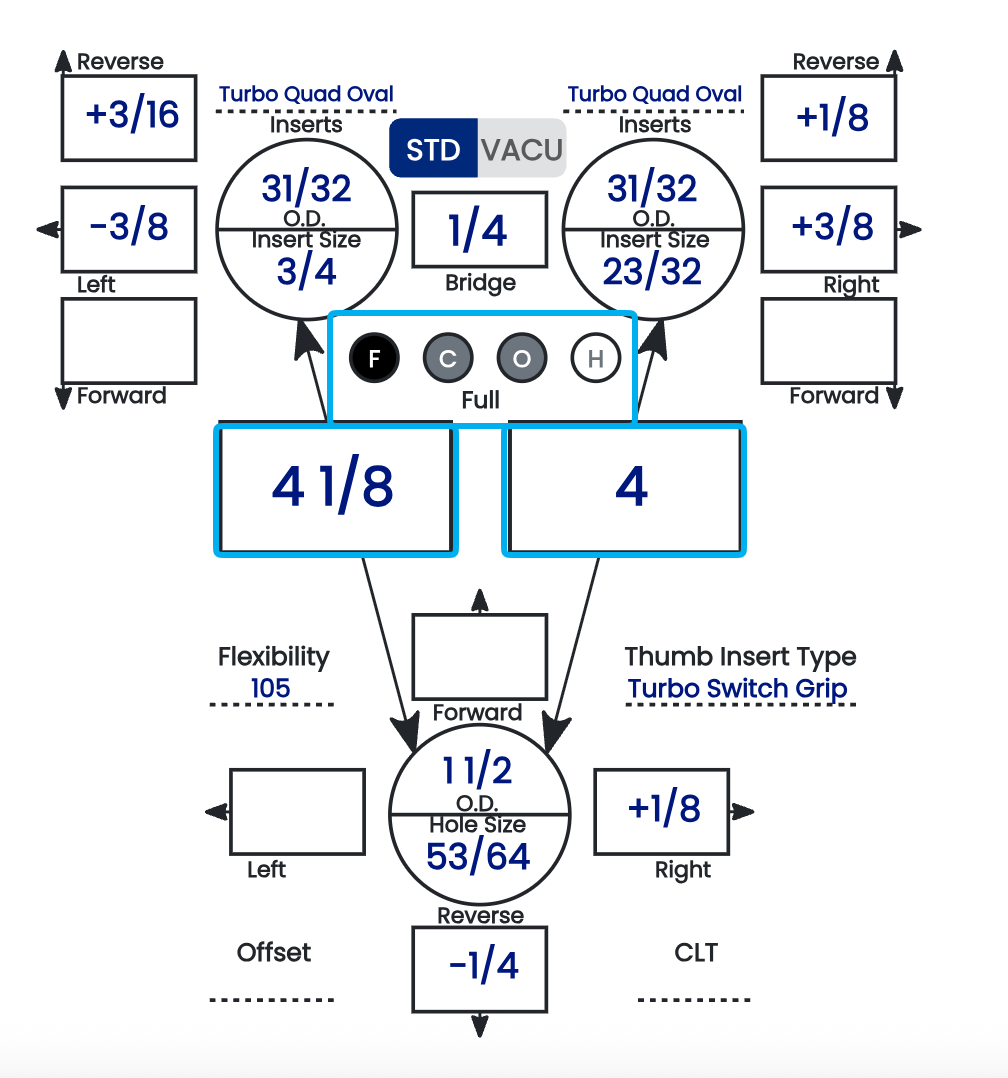
The two span boxes sit at the center of the spec sheet, directly below the finger holes. For a right-handed bowler:
- ✅ The **left box is the middle finger**.
- ✅ The **right box is the ring finger**.
Enter each finger's span in its box. The values are almost always different from one another, so confirm you're entering each in the correct field.
**Note:** The middle and ring finger boxes **flip when you change the bowler's dominant hand**. Because handedness mirrors the layout, switching a bowler from right-handed to left-handed (or vice versa) swaps which box is the middle finger and which is the ring — so always confirm the bowler's hand is set correctly before reading or entering span values.
[](https://wiki.spectrebowling.com/uploads/images/gallery/2026-07/scr-20260728-toqk.png)
## 🔘 Reading the F / C / O / H Bubbles
Between the two span boxes is a row of four bubbles — **F**, **C**, **O**, **H** — one for each span type. Their shading tells you, at a glance, which span type is currently displayed and which ones already hold a value:
[](https://wiki.spectrebowling.com/uploads/images/gallery/2026-07/image.png)
Bubble state
Meaning
**Black background**
This is the span type **currently being displayed** in the span boxes.
**Grey background**
A value is **present** for this span type (but it's not the one currently displayed).
**White background**
**Nothing is present** — the value for this span type is blank or incomplete.
The bubbles let you switch which span type is shown and immediately see which types are already filled in. A grey bubble means that span exists on the sheet; a white bubble means it doesn't yet.
## ⚙️ Only Cut to Cut Is Automated
This is the key thing to understand about span entry: **Cut to Cut is the only span type with any automation behind it.**
- ✅ **Cut to Cut (C)** has an automated toggle in the settings — **Autofill Cut to Cut (2.6.9)** — which derives the value from the Full Span and insert dimensions.
- ❌ **Full Span, Outer to Cut, and Hole to Hole are manual entry only.** There is no automation behind them — whatever you type is what's recorded.
- ❌ **None of the span types have error validation.** Spectre Cloud will not flag a value that's out of range, transposed, or entered under the wrong span type — the entry is taken exactly as given.
Because there's no validation catching mistakes, the responsibility for a correct value sits entirely with the person entering it. Confirm the span type and re-check the numbers before saving.
## 🔢 Adjusting Span Increments
The values available when entering a span come from a drop-down, and the **increment of that drop-down is adjustable in the settings** (see **2.2.7**). If the default steps are finer or coarser than you like to work in, change the increment so the drop-down offers the values that match your shop's habits.
## 📋 Entering Span — Step by Step
1. Confirm the bowler's **dominant hand** is set correctly — this determines which box is the middle finger and which is the ring.
2. Confirm the **span type** is set correctly (see 4.2.3) — check that the intended bubble (F, C, O, or H) is the one with the black background.
3. Enter the **middle finger** span in its box.
4. Enter the **ring finger** span in its box.
5. Double-check both values against your fitting source before moving on.
### Related Sections
- 4.1.2 — Span types explained in detail: Full Span, Cut to Cut, Outer to Cut, Hole to Hole
- 2.2.7 — Adjusting span measurement increments
- 4.2.3 — Selecting span type (F, C, O, H)
- 4.2.4 — Identifying grip type from a measurement sheet
- 2.6.9 — Autofill Cut to Cut: the one automated span toggle
- 4.3.3 — Entering pitch values
**Tip:** Glance at the bubble row before you save. A black bubble tells you which span you're looking at, and the grey ones tell you which other spans are already on file — an easy way to confirm nothing you meant to enter was left white and blank.
# 4.3.3 Inputing Vertical and Lateral pitch for fingers
4.3.3measurement
Finger pitch is entered directly into the pitch tiles surrounding each finger hole on the spec sheet. There's no direction to "select" — the tile you put the value in *is* the direction. This page covers how to read and enter those tiles for the middle and ring fingers.
## 🛠️ How the Pitch Tiles Work
Each finger hole is framed by pitch tiles, and the tile's position on the sheet determines the direction of the pitch:
- ✅ **Forward** — always points toward the **middle of the sheet**. Enter your forward pitch in the forward tile.
- ✅ **Reverse** — always points toward the **outer side of the sheet**. Enter your reverse pitch in the reverse tile.
- ✅ **Lateral** — the **Left** and **Right** tiles, self-explanatory by position.
You don't set a direction from a dropdown — you enter the value in the tile that corresponds to the direction you want. Forward/reverse and lateral are separate tiles, so a finger can carry both at once.
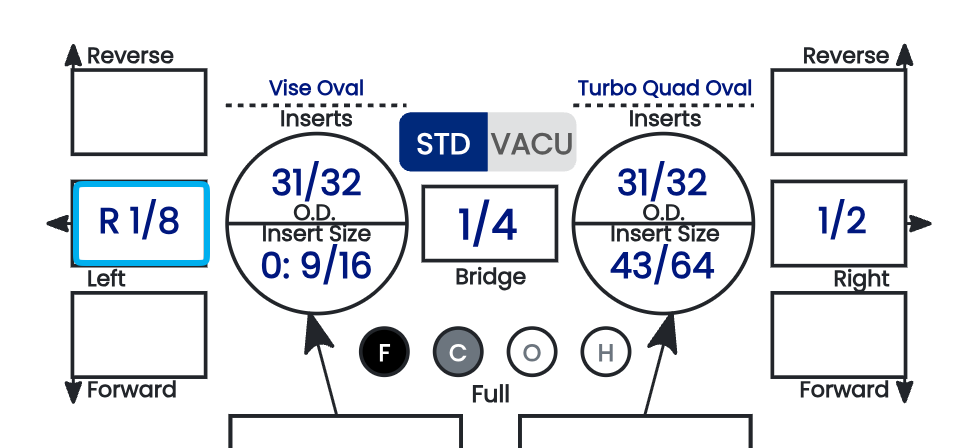
**Note:** To apply a pitch *against* a tile's default direction — for example, **Right** pitch on the **left** finger — scroll to the absolute bottom of that tile's drop-down. There you'll find values listed as `Rx`, where `x` is the desired pitch. These cross-direction entries live at the very end of the list, below the standard values.
**Note:** On fingertip fits, it is quite rare to see forward pitches on the fingers — most fingertip finger pitch is zero or reverse. Treat a forward finger pitch on a fingertip sheet as something worth double-checking against your source.
## ⚙️ Finger Pitch Is Fully Manual
There is **no automation for finger pitch**. Every finger pitch value — forward, reverse, and lateral, on both fingers — is manual data entry. Spectre Cloud records exactly what you type, with no auto-suggestion and no error validation behind these fields, so accuracy is entirely on the person entering it.
## 📋 Entering Finger Pitch — Step by Step
1. Locate the pitch tiles around the **middle finger** and **ring finger** holes.
2. For each finger, enter the **forward or reverse** value in the correct tile — forward points toward the middle of the sheet, reverse toward the outer side.
3. Enter the **lateral** value in the **Left** or **Right** tile as needed.
4. Repeat for both fingers.
5. Review all the finger pitch entries before moving on to thumb pitch.
**
6. For a cross-direction pitch (e.g. Right on the left finger), use the `Rx` values at the bottom of the drop-down.
[](https://wiki.spectrebowling.com/uploads/images/gallery/2026-07/NoVimage.png)
### Related Sections
- 4.3.2 — Entering span measurements
- 4.3.4 — Inputting thumb pitch
- 4.1.4 — Pitch terminology: Forward, Reverse, Lateral, Zero
- 4.2.4 — Identifying grip type from a measurement sheet
- 4.5 — IBPSIA auto-suggestions
**Tip:** Because forward points to the middle of the sheet and reverse to the outer side, the sheet's own layout tells you the direction — you don't have to remember a sign convention. Enter each value in the tile that matches the direction you measured, and read the finger pitches back before saving, since nothing here is validated for you.
# 4.3.4 CLT (Corrected lateral tilt) angle and its effect on lateral pitch
# CLT (Corrected lateral tilt) angle and its effect on lateral pitch
When a bowler places their hand on a ball during a fitting, the natural resting angle of the fingers is rarely perfectly vertical. **Corrected Lateral Tilt (CLT)** is a measurement — taken in degrees — that captures how far the bowler's fingers deviate from vertical when seated in the grip. Spectre Cloud uses this value to automatically apply a correction to the lateral pitch, ensuring that what gets drilled matches the bowler's actual hand angle rather than an idealized flat-hand measurement.
CLT is entered by the operator as a direct measurement taken during the fitting process. Spectre Cloud handles the correction calculation internally — you do not need to do the math yourself.
## 📐 What CLT Measures
When a bowler grips a ball, gravity, hand anatomy, and finger flexibility all cause the fingers to tilt slightly to one side. A lateral pitch value entered without accounting for this tilt may feel correct on paper but produce a grip that pulls or torques the fingers during the release.
CLT quantifies this tilt by measuring the angle — in degrees — between the bowler's finger axis and true vertical, taken while the bowler's hand is actually in the ball during the fitting.
- ✅ A CLT of `0°` means the bowler's fingers sit perfectly vertical — no correction is needed.
- ✅ A positive CLT value means the fingers tilt in one direction; a negative value means they tilt the other way. *Verify with Spectre team: confirm the sign convention — which direction is positive and which is negative, and how this maps to toward-thumb vs. away-from-thumb tilt.*
- ✅ Most bowlers will show a small but measurable CLT — a reading of `0°` is the exception rather than the rule.
## 🛠️ How to Measure CLT During a Fitting
1. Have the bowler place their hand in the ball in their natural grip position — fingers and thumb seated, hand relaxed, not forced.
2. Observe the angle of the middle and ring fingers relative to vertical. Use a protractor, fitting gauge, or tilt measurement tool to capture the angle.
3. Record the measurement in degrees. Note the direction of tilt.
4. Enter the value into the **CLT field** in the Spectre Cloud spec sheet.
*Verify with Spectre team: confirm the recommended measurement tool or technique for taking the CLT reading — whether a specific gauge, a phone-based level app, or a visual estimation method is standard practice, and whether middle and ring finger CLT are measured and entered separately or as a single shared value.*
## ⚙️ How CLT Affects Lateral Pitch
Once a CLT value is entered, Spectre Cloud applies a correction formula to the raw lateral pitch value. The corrected lateral pitch — not the raw value — is what is used for the actual drilling.
- ✅ The correction is applied **automatically** — you enter the raw lateral pitch and the CLT measurement independently, and Spectre Cloud computes the adjusted drilling value.
- ✅ The greater the CLT angle, the more the effective lateral pitch deviates from the raw entered value.
- ✅ For bowlers with a CLT close to `0°`, the correction is negligible — the drilled result will be very close to the raw lateral pitch entry.
- ❌ Do not manually pre-adjust your lateral pitch entry to try to compensate for CLT yourself — entering both a manually adjusted pitch *and* a CLT value will result in double correction and an inaccurate drilling.
*Verify with Spectre team: confirm and document the exact formula Spectre Cloud uses to derive corrected lateral pitch from the raw lateral pitch and CLT values, for operators who want to understand the underlying calculation.*
## 📋 CLT in Practice — What to Expect
CLT reading
What it indicates
Effect on lateral pitch
`0°`
Fingers sit perfectly vertical in grip
No correction applied — drilled lateral pitch equals entered value
Small angle (e.g. `2°–5°`)
Slight natural tilt — very common
Minor correction; noticeable on precise fittings
Moderate angle (e.g. `6°–10°`)
Pronounced tilt — often seen in bowlers with larger hands or strong release habits
Meaningful correction; skipping CLT entry would produce a noticeably off lateral pitch
Large angle (`>10°`)
Significant tilt — worth double-checking the measurement before proceeding
Substantial correction; verify the reading is genuine and not a measurement error
*Verify with Spectre team: confirm the realistic expected range of CLT values seen in practice, and whether Spectre Cloud flags or warns on unusually large CLT entries.*
## ✨ Tips for Accurate CLT Entry
- ✅ Always measure CLT with the bowler's hand in a **relaxed, natural grip** — a forced or exaggerated position will produce a CLT value that does not reflect real drilling conditions.
- ✅ If a bowler reports that a previously drilled ball pulls their fingers sideways during the release, check whether CLT was measured and entered on that spec sheet. A missing or incorrect CLT entry is a common cause of lateral discomfort.
- ✅ For returning bowlers with a known CLT, clone their existing spec sheet — the CLT value carries over with all other measurements, saving time and ensuring consistency across balls.
- ❌ Do not skip CLT for bowlers who seem to have a "normal" grip. A small but consistent tilt left uncorrected compounds across multiple balls and can contribute to long-term finger strain.
- ❌ Do not enter CLT in a lateral pitch field by mistake — they are separate inputs and serve different purposes in the spec sheet.
### Related Sections
- 4.3.3 — Inputting vertical and lateral pitch for fingers
- 4.3.5 — Inputting thumb pitch
- 4.3.2 — Entering span measurements (Full Span and Cut to Cut)
- 4.5 — IBPSIA auto-suggestions
- 4.2.5 — Cloning a spec sheet to preserve old measurements
**Tip:** CLT is one of the measurements that separates a precise professional fitting from a basic one. Taking the extra minute to measure and record it — especially for competitive bowlers who care about consistency across their arsenal — is a tangible demonstration of the quality of service your shop provides.
```
# 4.3.5 How to input a finger oval measurement (no inserts)
# How to input a finger oval measurement (no inserts)
For bowlers who do not use finger inserts, the oval measurement captures the natural shape of each finger hole needed to achieve a comfortable, secure fit. Because fingers are not perfectly round in cross-section, drilling a round hole to a round measurement often produces a grip that feels loose or allows unwanted rotation. The oval measurement corrects for this by recording the finger's true cross-sectional dimensions — its **width** and **depth** — so the hole can be drilled to match.
This page covers how to enter oval measurements directly in the spec sheet. For the full oval calculation workflow, including how to derive oval dimensions from hand measurements, see *Book 05 — Oval Calculator*.
## 📐 What an Oval Measurement Consists Of
An oval measurement for a finger hole has two components:
- ✅ **Width** — the measurement across the finger in the lateral direction (side to side, across the knuckle).
- ✅ **Depth** — the measurement through the finger in the vertical direction (front to back, from the pad to the back of the finger).
Together, width and depth define the elliptical shape of the hole. When width and depth are equal, the hole is effectively round. When they differ, the hole is a true oval — wider than it is deep, or deeper than it is wide, depending on the bowler's finger geometry.
**Note:** Oval measurements are recorded separately for the **middle finger** and the **ring finger**. Do not assume both fingers share the same oval — most bowlers have measurable differences between the two. *Verify with Spectre team: confirm whether Spectre Cloud also records an oval for the thumb on this same form section, or whether thumb oval is handled separately.*
## 🛠️ How to Enter Oval Measurements in Spectre Cloud
1. In the spec sheet, locate the **Oval** section for the finger measurements. This is separate from the span and pitch fields.
2. Ensure the spec sheet span type is set to `O` (Oval) if oval measurements are being used as the primary span reference, or confirm with the Spectre team whether oval dimensions can be entered alongside an F or C span type. *Verify with Spectre team: clarify whether oval entry is only available when span type O is selected, or whether it is always accessible regardless of span type.*
3. Enter the **width** measurement for the middle finger.
4. Enter the **depth** measurement for the middle finger.
5. Repeat for the **ring finger** — enter its width and depth independently.
6. Review all four values before saving.
*Verify with Spectre team: confirm the exact field labels used in the UI for oval width and depth, and whether measurements are entered in inches (fractions or decimal) or millimeters.*
## 📏 How to Take Oval Measurements from the Bowler's Hand
Oval measurements are taken directly from the bowler's finger, typically using a dedicated oval gauge or digital calipers. For no-insert fittings, the goal is to measure the finger at the **point of insertion** — the first knuckle for fingertip grips, the second knuckle for conventional grips.
1. Ask the bowler to extend their finger naturally — relaxed, not tensed or fully straightened.
2. Position the measuring tool at the appropriate knuckle joint.
3. Measure the **width** — across the finger, parallel to the knuckle crease.
4. Measure the **depth** — through the finger, perpendicular to the knuckle crease.
5. Record both values for middle and ring fingers before moving to the ball.
**Tip:** Take oval measurements with the bowler's hand warm and relaxed. Cold or tense hands can cause fingers to appear narrower than their natural resting size, resulting in a hole that fits correctly in the shop but feels tight after a few frames once circulation increases.
## 📊 Oval vs. Round — When It Matters
Situation
Oval recommended?
Notes
Width and depth differ by `1/32"` or more
✅ Yes
Even a small oval difference produces a meaningfully better fit for most bowlers.
Width and depth are equal or within `1/64"`
Round hole is acceptable
A round hole will fit well — oval entry is still good practice for record accuracy.
Bowler reports finger rotation or looseness in a previously round-drilled ball
✅ Yes — measure and record
Switching to an oval hole is often the solution for a grip that feels sloppy without being oversized.
Youth bowler with rapidly changing hand size
Situational
Record oval for accuracy, but note in the spec sheet that re-measurement is expected at the next visit.
## ✨ Tips for No-Insert Oval Entry
- ✅ Record the oval even when width and depth are nearly equal — having both values on file gives you a complete history if the bowler's fingers change over time.
- ✅ If you are cloning a spec sheet for a new ball, verify the oval measurements are still current before drilling — finger dimensions can shift with age, weight change, or injury.
- ✅ Label your measurement notes clearly when taking readings in a busy shop — it is easy to transpose middle and ring values when moving quickly between a fitting and the keyboard.
- ❌ Do not use insert size as a proxy for oval on a no-insert fitting — insert sizes account for the insert wall thickness and are not equivalent to bare finger oval dimensions.
- ❌ Do not estimate oval by eye. Even experienced fitters can misjudge the depth dimension, which is harder to eyeball than width. Use a gauge.
### Related Sections
- 4.3.3 — Inputting vertical and lateral pitch for fingers
- 4.3.4 — CLT (Corrected Lateral Tilt) angle and its effect on lateral pitch
- 4.3.6 — Inputting finger insert measurements
- Book 05 — Oval Calculator (full oval derivation workflow)
- 4.2.3 — Selecting span type (F, C, O)
**Tip:** The Oval Calculator in Book 05 can derive recommended oval dimensions from a set of hand measurements if you do not have a dedicated oval gauge available. Use it as a starting point, then verify with a physical measurement where possible.
```
# 4.3.6 Ring Finger 5/16" rule — auto and manual calculation
# Ring Finger 5/16" rule — auto and manual calculation
When setting up a spec sheet, the ring finger span is rarely measured independently from scratch. Instead, it is derived from the middle finger span using the **5/16" Ring Finger Rule** — a fitting convention that accounts for the natural anatomical difference between the two fingers. Spectre Cloud can apply this calculation automatically, or you can enter the ring finger span manually if you prefer to measure directly.
## 🎳 The Anatomy Behind the Rule
With a bowler's hand laid flat on a bowling ball, the second joint lines of the middle and ring fingers — measured from the base of each finger — do not line up evenly. The ring finger's second joint sits closer to the palm than the middle finger's. This difference, referred to here as **d**, is the key variable in the calculation.
If the two joint lines were perfectly aligned (`d = 0"`), the ring finger span would need to be `5/16"` longer than the middle finger span to produce an equivalent fit. Because **d** is almost never zero, the actual ring finger span adjusts up or down from that baseline depending on each bowler's individual anatomy.
## 📐 The Formula
The ring finger span is calculated as follows:
**Ring Finger Span = Middle Finger Span + (5/16" − d)**
Where **d** is the observed difference between the second joint lines of the middle and ring fingers, measured while the bowler's hand is laid flat on the ball.
### Working through the formula
Scenario
d value
Adjustment (5/16" − d)
Effect on ring span
Ring joint sits exactly 5/16" closer to palm than middle joint
`5/16"`
`0"`
Ring span equals middle span — no adjustment needed
Ring joint sits closer to palm than average (large d)
`> 5/16"`
Negative
Ring span is **shorter** than middle span
Ring joint sits further from palm than average (small d)
`< 5/16"`
Positive
Ring span is **longer** than middle span
Ring and middle joint lines are level (d = 0)
`0"`
`+5/16"`
Ring span is 5/16" **longer** than middle span
**Note:** It is entirely normal for the ring finger span to come out longer than the middle finger span for bowlers whose joint lines are close together. Do not assume the ring span must always be shorter — the formula determines the correct value, not anatomical intuition.
## 🛠️ How to Measure d
1. Ask the bowler to place their hand flat and relaxed on the ball, fingers together in their natural resting position.
2. Observe the second joint line (the joint closest to the base of the finger, not the fingertip joint) of the middle finger and the ring finger.
3. Measure the distance between the two joint lines along the finger axis — from the middle finger's joint line to the ring finger's joint line.
4. Record this as **d**. Note which finger's joint line sits closer to the palm — this determines the sign of the adjustment in the formula.
**Tip:** A small span ruler or fitting gauge works well for measuring d. The measurement does not need to be taken to finer than `1/32"` precision for most fittings — but consistency matters more than extreme precision. Use the same technique each time.
## ⚙️ Auto Calculation in Spectre Cloud
When using the **auto calculation** mode for the ring finger span, Spectre Cloud applies the 5/16" rule on your behalf:
1. Enter the **middle finger span** as measured.
2. Enter the **d measurement** in the designated field.
3. Spectre Cloud calculates and displays the ring finger span automatically using the formula: `Ring Span = Middle Span + (5/16" − d)`.
4. Review the calculated ring span before saving — confirm it looks anatomically reasonable for the bowler in front of you.
*Verify with Spectre team: confirm the exact field label used for the d measurement input in the Spectre Cloud UI, and whether the calculated ring span is displayed as a read-only result or as an editable field the operator can still override.*
## ✏️ Manual Entry Override
If you prefer to measure the ring finger span directly — or if a bowler has an unusual hand geometry where the calculated value does not feel right — you can enter the ring finger span manually, bypassing the auto calculation entirely.
- ✅ Manual entry is appropriate when you have taken independent measurements of both fingers and want to record exactly what you measured.
- ✅ Manual entry is also useful when transferring records from a legacy fitting sheet that already contains explicit ring span values taken by another fitter.
- ✅ If the auto-calculated value and your direct measurement disagree by more than `1/16"`, remeasure both the middle span and d before deciding which to use.
- ❌ Do not use manual entry simply to avoid measuring d — skipping d and guessing the ring span is the most common source of ring finger fit complaints.
*Verify with Spectre team: confirm how the operator switches between auto and manual mode for ring span entry — whether it is a toggle, a checkbox, or simply leaving the d field blank to enable direct ring span input.*
## ✨ Tips for Consistent Results
- ✅ Measure d every time, even for returning bowlers — finger joint alignment can shift subtly with age, weight change, or injury, and the d value is quick to check.
- ✅ When cloning a spec sheet, the d value carries over with the other measurements. Verify it is still current before using the auto calculation for the new ball.
- ✅ Document the d measurement in the **Notes** field as a backup — if a question arises later about the ring span derivation, having d on record makes it easy to reconstruct the calculation.
- ❌ Do not conflate d with the ring finger span itself — d is an input to the formula, not a span measurement.
### Related Sections
- 4.3.2 — Entering span measurements (Full Span and Cut to Cut)
- 4.3.3 — Inputting vertical and lateral pitch for fingers
- 4.3.5 — How to input a finger oval measurement (no inserts)
- 4.5 — IBPSIA auto-suggestions
- Book 05 — Oval Calculator
**Tip:** The 5/16" rule produces a starting span — not an immutable prescription. If a bowler tries the ball and reports that the ring finger feels consistently tighter or looser than the middle finger despite a correct-looking spec sheet, the d measurement is the first thing to recheck. A remeasure in-shop takes under a minute and often reveals a small error that explains the fit complaint.
```
# 4.3.7 Insert type and size: STD vs. VACU, selecting drill bit OD
# Insert type and size: STD vs. VACU, selecting drill bit OD
4.3.7measurement
Once span, pitch, and oval measurements are recorded, the spec sheet needs to know what is going into the finger holes — bare finger, a standard insert, or a VACU-style insert — and what drill bit outer diameter (OD) to use. These entries directly determine the physical size of the holes drilled in the ball, so accuracy here is just as important as the span and pitch values that position them.
## 🔌 Insert Types: STD vs. VACU
### No Insert (Bare Finger)
If the bowler does not use finger inserts, select the bare finger or no-insert option. In this case the hole is drilled to the bowler's oval or round finger measurement directly, with no allowance for insert wall thickness. See *4.3.5 — How to input a finger oval measurement (no inserts)* for how oval dimensions are entered for bare finger fittings.
### STD (Standard Insert)
A **standard insert** is pressed into a hole drilled to a tight tolerance — the hole diameter is sized so the insert fits snugly and does not move once seated. The insert's inner diameter then becomes the effective finger hole the bowler uses.
- ✅ The most common insert type across all grip styles and skill levels.
- ✅ Available in a wide range of inner diameters and materials from multiple manufacturers.
- ✅ Once pressed in, a standard insert sits flush and stays fixed under normal use.
- ❌ If the pilot hole is drilled slightly oversized, a standard insert can work loose over time — precision on the OD entry matters.
### VACU (Vacuum-Style Insert)
A **VACU-style insert** uses a different fit philosophy. The pilot hole is drilled slightly **larger** than it would be for a standard insert of the same finger size, allowing a slightly **smaller** insert to be used. When the bowler inserts their finger, the insert expands to fill the gap and conforms to the finger's shape under pressure.
- ✅ The expansion fit produces a more custom, form-fitting feel for many bowlers — particularly those who find standard inserts uncomfortable at the first knuckle.
- ✅ Useful for bowlers with irregular finger cross-sections where a rigid standard insert does not seat comfortably.
- ✅ The slightly larger pilot hole means there is more tolerance in the drilling — a small OD variance has less impact on the final fit than with a standard insert.
- ❌ Not suitable for all insert materials — confirm the insert manufacturer supports VACU-style installation before selecting this option.
- ❌ Because the insert is smaller than it would be for a standard fit, selecting the wrong insert size for a VACU installation will produce a hole that is either too loose or unable to expand correctly.
STD
VACU
**Pilot hole vs. insert**
Tight fit — hole sized to grip the insert
Loose fit — hole slightly larger than insert OD
**Insert behaviour**
Fixed once pressed in
Expands to conform under finger pressure
**Best for**
Most bowlers; standard fitting workflow
Bowlers wanting a form-fitting feel or irregular finger geometry
**OD entry in Spectre Cloud**
OD of the insert — hole drilled to match
OD adjusted upward to allow expansion gap
*Verify with Spectre team: confirm whether Spectre Cloud automatically adjusts the pilot hole OD calculation when VACU is selected, or whether the operator enters the adjusted OD manually. Also confirm the standard expansion gap allowance used for VACU calculations.*
## 🛠️ Selecting Drill Bit OD
The **drill bit outer diameter (OD)** is the size of the bit used to drill the finger hole — or the pilot hole for an insert. The OD entry in Spectre Cloud determines the final hole size and must account for whether the bowler is using a bare finger, a standard insert, or a VACU insert.
### For bare finger (no insert)
The OD is set to match the bowler's finger measurement directly — either their round hole size or the larger dimension of their oval. The hole is the finger hole; there is no insert wall to account for.
### For standard inserts
The OD is set to match the **outer diameter of the insert** being used. The insert manufacturer's sizing chart determines which insert OD corresponds to the bowler's inner finger size. The hole is drilled to grip the insert; the insert's inner diameter is the effective fit dimension.
### For VACU inserts
The OD is set slightly **larger** than the insert's outer diameter to provide the expansion gap. The exact allowance depends on the insert material and manufacturer recommendation.
*Verify with Spectre team: confirm whether Spectre Cloud provides a drill bit OD lookup, dropdown of common sizes, or a free numeric entry field — and whether it cross-references insert manufacturer sizing data to suggest an OD automatically when an insert brand and size are selected.*
## 📋 Entering Insert Type and OD in Spectre Cloud
1. In the spec sheet, locate the **Insert** section for the middle and ring finger fields.
2. Select the insert type for each finger: `None`, `STD`, or `VACU`. Middle and ring can differ — enter each independently.
3. Enter or select the **drill bit OD** for each finger. This should reflect the insert's outer diameter (STD), the adjusted pilot hole size (VACU), or the bowler's direct finger measurement (no insert).
4. Double-check that the OD entry is consistent with the insert type selected — a VACU OD entered against an STD selection, or vice versa, will produce a hole sized incorrectly for the intended insert.
**Note:** Middle and ring finger insert types and OD values are entered independently. It is not uncommon for a bowler to use a larger insert on the middle finger than the ring finger, or to use VACU on one finger and STD on the other. Record what the bowler actually uses — do not default both fingers to the same values without checking.
## ✨ Tips for Accurate Insert and OD Entry
- ✅ When transferring records from a legacy fitting sheet, check whether the recorded hole size is the **insert OD** or the **inner finger size** — these are different values and the distinction is not always clear on older cards.
- ✅ Keep a reference card at the drill press with common insert brand OD sizes. Different manufacturers use slightly different OD standards for nominally equivalent insert sizes.
- ✅ If a returning bowler is switching insert brands, do not copy the OD from their previous spec sheet without checking the new brand's sizing — a `1/32"` OD difference between brands is common and will affect the fit.
- ✅ For VACU inserts, note the insert brand and model in the **Notes** field — the expansion gap allowance may differ between products and having the reference on record avoids ambiguity on future visits.
- ❌ Do not enter the insert's **inner** diameter as the OD — the inner diameter is the bowler's finger size; the OD is the size of the hole drilled in the ball.
### Related Sections
- 4.3.5 — How to input a finger oval measurement (no inserts)
- 4.3.6 — Ring finger 5/16" rule — auto and manual calculation
- 4.3.8 — Inputting thumb measurements
- 4.5 — IBPSIA auto-suggestions
- Book 05 — Oval Calculator
**Tip:** When drilling for a bowler for the first time, ask which insert brand they have been using — not just the size. Bringing their preferred insert to the fitting and measuring its OD directly with calipers is the most reliable way to ensure the pilot hole is drilled to exactly the right size, regardless of what the manufacturer's chart says.
```
# 4.4 — Thumb Measurements (Round)
# 4.4.1 Selecting "Round" thumb hole on the spec sheet
# Selecting "Round" thumb hole on the spec sheet
4.4.1thumb
The thumb hole is the largest hole on the ball and the one most responsible for the bowler's ability to release cleanly and consistently. Before entering thumb measurements, the spec sheet requires you to specify the thumb hole shape. Selecting **Round** tells Spectre Cloud that the thumb hole will be drilled as a standard circular hole — no oval shaping — and sets the measurement fields accordingly.
## 🎳 What "Round" Means for the Thumb Hole
A round thumb hole has a single diameter measurement — the hole is circular in cross-section at the point of insertion. The bowler's thumb sits in a hole that is the same width in every direction, relying on pitch, depth, and hole size alone to produce a comfortable fit.
- ✅ The most common thumb hole shape across all grip types and skill levels.
- ✅ Simpler to drill and measure than an oval thumb hole — one diameter value determines the hole size.
- ✅ Appropriate for most bowlers, including those using thumb slugs or inserts.
- ✅ Works well when the bowler's thumb cross-section is close to circular at the insertion point.
- ❌ May not provide the most precise fit for bowlers whose thumbs are notably wider than they are deep — in those cases an oval thumb hole may be worth considering. See *4.4.2 — Selecting "Oval" thumb hole on the spec sheet*.
## 🛠️ Selecting Round in Spectre Cloud
1. In the spec sheet, navigate to the **Thumb** section.
2. Locate the thumb hole shape selector and choose `Round`.
3. Spectre Cloud will display the measurement fields appropriate for a round thumb hole — a single diameter entry rather than separate width and depth fields.
4. Proceed to enter the thumb hole diameter, pitch, and any slug or insert details in the fields that follow.
*Verify with Spectre team: confirm the exact label and UI element used for the thumb hole shape selector — whether it is a dropdown, radio buttons, or a toggle — and whether Round is the default selection when a new spec sheet is created.*
## 📐 Round vs. Oval — Choosing the Right Shape
Bowler situation
Recommended shape
Thumb cross-section is approximately circular
✅ Round
Bowler uses a thumb slug or moulded insert
✅ Round (slug is shaped to the bowler separately)
Bowler has a noticeably wider-than-deep thumb
Consider Oval — see 4.4.2
Returning bowler — previous spec sheets used Round
✅ Round (match existing records unless fit has changed)
New bowler, no previous fitting history
✅ Round as starting point — review after first few games
Bowler reports thumb feels loose in one direction only
Consider Oval — measure before deciding
## 📋 What Happens After Selecting Round
Once Round is selected, the thumb section of the spec sheet activates the following fields for completion:
- ✅ **Thumb hole diameter** — the size of the round hole, entered as a single measurement.
- ✅ **Forward/reverse pitch** — the vertical tilt of the thumb hole.
- ✅ **Lateral pitch** — the side-to-side tilt of the thumb hole.
- ✅ **Slug / insert type** — whether a slug, standard insert, or no insert is used in the thumb hole.
- ✅ **Drill bit OD** — the outer diameter of the bit used to drill the hole or the pilot hole for a slug.
*Verify with Spectre team: confirm the complete list of thumb fields that appear after Round is selected, and whether any fields differ from those shown for the Oval option.*
## ✨ Tips for Round Thumb Entry
- ✅ Measure the bowler's thumb diameter at the **widest point of insertion** — for most bowlers this is just below the first knuckle joint, not at the tip or base.
- ✅ For returning bowlers, always verify the current thumb diameter before cloning and drilling — thumb size is the measurement most likely to change between visits due to temperature, time of day, weight fluctuation, or injury.
- ✅ If the bowler will be using a **thumb slug**, the round hole is drilled to accept the slug's outer diameter — not the bowler's thumb directly. The slug is then shaped or sized to the thumb separately. Record the slug OD in the drill bit OD field, not the bowler's thumb measurement.
- ❌ Do not measure the thumb at its thickest point — the goal is the measurement at the point of comfortable insertion depth, which is typically slightly narrower.
- ❌ Do not carry a thumb diameter forward from an old spec sheet without re-measuring. Thumb size is the single most variable measurement in a bowler's fitting history.
### Related Sections
- 4.4.2 — Selecting "Oval" thumb hole on the spec sheet
- 4.4.3 — Thumb pitch (forward, reverse, lateral)
- 4.4.4 — Thumb slug and insert entry
- 4.3.7 — Insert type and size: STD vs. VACU, selecting drill bit OD
- 4.3.5 — How to input a finger oval measurement (no inserts)
**Tip:** When in doubt between Round and Oval for a new bowler, start with Round. A round hole is quicker to drill, easier to adjust on a follow-up visit, and suitable for the vast majority of bowlers. Oval becomes the right choice once you have observed how the bowler's thumb actually sits in a round hole after a few sessions.
```
# 4.4.2 Entering thumb hole size
# Entering thumb hole size
4.4.2thumb
Once the thumb hole shape is selected, the spec sheet requires the actual size of the thumb hole. Whether the bowler uses a bare thumb, a slug, or an insert, the size entry tells Spectre Cloud — and ultimately the drill press operator — exactly how large to make the hole. Getting this measurement right is critical: the thumb hole is the primary control and release point for the ball, and even a small sizing error has a noticeable effect on how the ball feels and performs.
## 📐 What "Thumb Hole Size" Means
For a **round** thumb hole, size is a single diameter value — the width of the circular hole at the point of insertion. For an **oval** thumb hole, size is two values — width and depth — entered independently. In both cases, the size entered in Spectre Cloud represents the finished hole that the bowler's thumb will sit in, which may or may not be the same as the drill bit OD depending on whether a slug or insert is used.
Setup
What "size" refers to
What to measure
**Bare thumb, no slug or insert**
The hole drilled directly into the ball
The bowler's thumb at the point of insertion
**Thumb slug**
The inner diameter of the slug after installation
The bowler's thumb — the slug is sized or shaped to match; the pilot hole is drilled to the slug's OD
**Thumb insert (STD or VACU)**
The inner diameter of the insert
The bowler's thumb — the insert is selected to match; the pilot hole is drilled to the insert's OD
**Important:** The thumb hole size and the drill bit OD are two different values whenever a slug or insert is used. The size field records what the bowler's thumb fits into; the OD field records what goes into the ball. Do not enter the same value in both fields for slug or insert fittings. See *4.4.4 — Thumb slug and insert entry* for OD details.
## 🛠️ How to Measure Thumb Hole Size
Thumb hole size is measured directly from the bowler's thumb during the fitting. The goal is to find the diameter (or width and depth, for oval) at the **point of comfortable insertion** — where the thumb naturally sits when gripping the ball.
1. Ask the bowler to relax their thumb completely — no tension, no forced straightening.
2. Using a thumb gauge, digital calipers, or a ring sizer, measure the thumb at the point of insertion. For most fingertip and conventional bowlers this is just below the first knuckle joint.
3. For a **round hole**, record a single diameter. If the thumb reads differently in two directions, note which dimension is larger — this may be an indication that an oval hole would serve the bowler better.
4. For an **oval hole**, record width (across the knuckle) and depth (front to back) independently.
5. Add the appropriate **fit allowance** to the raw thumb measurement before entering into Spectre Cloud — see below.
## 📏 Fit Allowance — Sizing the Hole Correctly
A thumb hole drilled to exactly the bowler's thumb measurement will be too tight — the thumb needs a small amount of clearance to insert and release cleanly. The fit allowance is added to the raw thumb measurement to produce the correct hole size.
- ✅ A typical fit allowance for a bare thumb hole is `1/32"` to `1/16"` over the raw thumb measurement — enough for a firm but comfortable fit with no wobble.
- ✅ Bowlers who prefer a **relaxed fit** (common for two-handed bowlers or those with a relaxed thumb release) may use a larger allowance — up to `3/32"` or more.
- ✅ Bowlers who prefer a **snug fit** (common for players using thumb tape to fine-tune) typically use a smaller allowance and rely on tape to dial in the final feel.
- ❌ Do not drill to the raw thumb measurement without allowance — a zero-clearance hole will grip the thumb on release and cause injury risk over time.
**Tip:** Many experienced operators size the thumb hole to feel slightly loose at the time of drilling, knowing the bowler will use **thumb tape** inside the hole to tighten the fit to preference. If the bowler is a regular tape user, confirm their tape thickness preference before finalising the size entry — one layer of standard tape reduces the effective hole diameter by approximately `1/32"`.
## 🛠️ Entering Thumb Hole Size in Spectre Cloud
1. In the spec sheet thumb section, confirm the hole shape is set correctly — `Round` or `Oval` — before entering size. The shape selection determines which size fields are displayed.
2. For a **round hole**: enter the single diameter value in the thumb size field.
3. For an **oval hole**: enter the width value and the depth value in their respective fields.
4. Confirm the value includes your fit allowance — Spectre Cloud records what you enter; it does not automatically add clearance.
5. Proceed to the pitch and slug/insert fields.
*Verify with Spectre team: confirm whether thumb hole size is entered in fractional inches, decimal inches, or millimeters — and whether Spectre Cloud displays the value in a different unit than it is entered. Also confirm whether the IBPSIA auto-suggestion feature offers a recommended thumb hole size based on the measured thumb diameter.*
## 📊 Typical Thumb Hole Size Ranges
Bowler type
Typical thumb hole diameter
Notes
Adult male
`1⅛"` – `1¼"`
Wider range; hand size varies significantly
Adult female
`1"` – `1⅛"`
Narrower range on average
Youth
`¾"` – `1"`
Re-measure at every visit — thumb size changes quickly
**Note:** These ranges are general references only. Individual thumb anatomy varies widely and values outside these ranges are entirely normal. Never reject a measurement because it falls outside a typical range — measure carefully and trust the result.
## ✨ Tips for Accurate Thumb Size Entry
- ✅ Measure the thumb at the **same time of day** the bowler typically bowls — thumbs swell slightly with warmth and activity. A measurement taken cold and relaxed in the morning may produce a hole that feels tight after three games in a warm bowling centre.
- ✅ If a returning bowler reports the thumb hole consistently feels tight after a few frames, check whether the previous spec sheet size accounted for swelling — a `1/32"` increase in hole size often resolves the complaint.
- ✅ Record both the raw thumb measurement and the entered hole size in the **Notes** field for new bowlers — this makes it easy to reconstruct the fit allowance decision on future visits.
- ❌ Do not copy thumb hole size from a previous spec sheet on a different ball without re-measuring — thumb size is the measurement most likely to have changed between visits.
- ❌ Do not use the finger hole size as a reference for thumb size — they are unrelated measurements.
### Related Sections
- 4.4.1 — Selecting "Round" thumb hole on the spec sheet
- 4.4.3 — Thumb pitch (forward, reverse, lateral)
- 4.4.4 — Thumb slug and insert entry
- 4.3.7 — Insert type and size: STD vs. VACU, selecting drill bit OD
- 4.5 — IBPSIA auto-suggestions
**Tip:** Thumb sizing is as much an art as a measurement — experienced operators develop a feel for how a given bowler's thumb behaves over time. Until that relationship is established, erring slightly large and letting the bowler manage final fit with tape is a safe, reversible approach. You can always add tape to tighten; you cannot un-drill a hole that is too small.
```
# 4.4.3 Entering bowler's span (Full and Cut to Cut)
# Entering bowler's span (Full and Cut to Cut)
4.4.3thumb
This page walks through the process of entering a bowler's span measurements into the Spectre Cloud spec sheet form. For a full explanation of the difference between Full Span and Cut to Cut measurement methods, and how to take each measurement from a bowler's hand, see *4.3.2 — Entering span measurements (Full Span and Cut to Cut)*. This page focuses on the form itself — what to select, where to enter values, and what to check before moving on.
## 🛠️ Step-by-Step: Entering Span in the Spec Sheet
1. Open the spec sheet and navigate to the **Span** section.
2. Confirm the **Span Type** selector is set correctly before entering any measurements:
- `F` — Full Span (edge of thumb hole to edge of finger hole)
- `C` — Cut to Cut (center of thumb hole to center of finger hole)
- `O` — Oval (see *Book 05 — Oval Calculator*)
3. Enter the **middle finger span** in the Middle field.
4. Enter the **ring finger span** in the Ring field — or use the **5/16" auto calculation** if you have measured d. See *4.3.6 — Ring finger 5/16" rule*.
5. Review both values against your fitting sheet or hand measurement notes before proceeding.
*Verify with Spectre team: confirm whether the Span Type selector appears at the top of the span section or inline with the measurement fields, and whether changing the span type after values have been entered clears the fields or retains the numbers.*
## ⚠️ Before You Save — Quick Checks
Span entry errors are among the most consequential mistakes on a spec sheet — a transposed value or wrong span type will position the holes incorrectly even if every other measurement is perfect. Before moving to the next section, run through these checks:
Check
What to look for
**Span type matches measurement method**
The `F` / `C` selector matches how the span was actually taken. A Cut to Cut value entered under Full Span — or vice versa — is the most common span error.
**Middle span is entered in the Middle field**
Transposing middle and ring is easy when working quickly. Middle span is almost always longer than ring span — if your middle value is shorter, double-check.
**Values are in inches, not millimeters**
If transferring from a legacy sheet that used millimeters, convert before entry. A millimeter value entered as inches will produce a hole drilled far too close to the thumb.
**Values fall within a plausible range**
Adult fingertip Full Span typically falls between `3⅝"` and `4⅝"`. A value well outside this range for an adult bowler is worth a second look before drilling.
## 🔄 Changing Span Type After Entry
If you realise the wrong span type was selected after values have already been entered, correct the selector before saving — do not attempt to manually adjust the numbers to compensate. A span value is only meaningful in the context of the method used to take it. If you are unsure which method was used on a legacy fitting sheet, re-measure rather than guess.
**Tip:** If a bowler's new spec sheet is being created by cloning an existing one, the span type carries over automatically. Confirm it matches the method you intend to use for the new drilling before proceeding — especially if the bowler is switching from a Cut to Cut fitter to a Full Span workflow.
## ✨ Common Entry Mistakes and How to Avoid Them
- ❌ **Wrong span type selected** — always set `F` or `C` first, before typing any numbers.
- ❌ **Middle and ring transposed** — read the values back from the screen against your notes before moving on.
- ❌ **Millimeter values entered as inches** — if a legacy card looks unusually high (e.g. `107` for a middle span), it is almost certainly in millimeters.
- ❌ **Ring span copied from middle without applying the 5/16" rule** — even if both spans look similar, they are rarely identical. Use the auto calculation or measure independently.
### Related Sections
- 4.3.2 — Entering span measurements (Full Span and Cut to Cut) — full conceptual explanation
- 4.3.6 — Ring finger 5/16" rule — auto and manual calculation
- 4.2.3 — Selecting span type (F, C, O)
- 4.4.4 — Thumb slug and insert entry
- Book 05 — Oval Calculator
**Tip:** Span is one of the few measurements on a spec sheet that does not change unless the bowler's hand changes — unlike thumb size, which can vary visit to visit. Once you have a confirmed, comfortable span on file for a returning bowler, cloning is reliable. The span type selector is the one thing always worth a visual confirmation before drilling.
```
# 4.4.4 Entering vertical and lateral pitch for thumb
# Entering vertical and lateral pitch for thumb
Thumb pitch works on the same principle as finger pitch — the hole is drilled at an angle rather than straight down, tilted to match the natural resting position of the bowler's thumb. However, thumb pitch has a proportionally larger effect on feel and release than finger pitch, because the thumb is the first finger to exit the ball during the delivery. Small pitch changes at the thumb produce noticeable differences in how the ball comes off the hand. Vertical and lateral pitch are entered separately for the thumb, just as they are for the fingers.
For a full explanation of how vertical and lateral pitch are defined and measured, see *4.3.3 — Inputting vertical and lateral pitch for fingers*. This page covers thumb-specific considerations and how to enter the values in the spec sheet.
## 📐 Thumb Vertical Pitch — Key Differences from Finger Pitch
Vertical pitch for the thumb follows the same forward/zero/reverse axis as the fingers, but the typical ranges and their effects differ significantly.
Direction
What it means for the thumb
Typical use
**Forward**
Hole tilts toward the palm. The bottom of the thumb hole leans toward the fingers.
Helps a bowler who grips tightly or has difficulty releasing — forward pitch encourages the thumb to exit cleanly.
**Zero (0)**
Hole drilled perpendicular to the ball surface.
A common neutral starting point, particularly for conventional grips.
**Reverse**
Hole tilts away from the palm. The bottom of the thumb hole leans away from the fingers.
The most common thumb vertical pitch for fingertip bowlers — reverse pitch on the thumb promotes a cleaner, earlier release.
### Typical vertical pitch ranges for the thumb
- ✅ **Fingertip grip:** `¼"` to `½" reverse` is the most common starting range.
- ✅ **Conventional grip:** `0"` to `¼" forward` is typical — conventional bowlers generally benefit from less reverse or slight forward pitch at the thumb.
- ✅ **Two-handed bowlers:** thumb pitch varies widely and often requires individual assessment — many two-handed players use minimal reverse or zero pitch. *Verify with Spectre team: confirm whether Spectre Cloud has any specific field or flag for two-handed bowler configurations.*
- ❌ Reverse thumb pitch beyond `¾"` is uncommon and should be verified before drilling — it may indicate a measurement error or an atypical release that warrants closer discussion with the bowler.
**Note:** The thumb and finger pitches do not need to mirror each other. It is entirely normal — and common — for a bowler to have reverse pitch on the thumb and forward pitch on the fingers simultaneously. Each hole is fitted independently.
## ↔️ Thumb Lateral Pitch — Key Differences from Finger Pitch
Lateral pitch on the thumb describes the tilt toward or away from the fingers (toward the middle finger side, or away from it). Because the thumb sits on the opposite side of the ball from the fingers, the directional language can feel counterintuitive when transferring from a legacy fitting sheet — take care with the direction entry.
Direction
What it means for the thumb
Typical use
**Toward fingers**
Thumb hole tilts in the direction of the finger holes.
The most common lateral direction for the thumb — mirrors the natural inward angle of the thumb when gripping the ball.
**Zero (0)**
No lateral tilt.
Used as a neutral baseline or for bowlers with a very straight thumb position.
**Away from fingers**
Thumb hole tilts away from the finger holes.
Less common — occasionally used for bowlers with a pronounced outward thumb angle.
### Typical lateral pitch ranges for the thumb
- ✅ **Most bowlers:** `0"` to `¼" toward fingers` is the standard starting range.
- ❌ Lateral thumb pitch beyond `3/8"` in either direction is uncommon — verify before drilling.
## 🛠️ Entering Thumb Pitch in Spectre Cloud
1. In the spec sheet, navigate to the **Thumb Pitch** fields within the Thumb section.
2. Enter the **vertical pitch value** — the amount in inches — and select the direction: `Forward`, `Zero`, or `Reverse`.
3. Enter the **lateral pitch value** and select the direction: `Toward Fingers`, `Zero`, or `Away from Fingers`.
4. Review both entries against your fitting notes before moving to the next section.
*Verify with Spectre team: confirm the exact direction labels used in the Spectre Cloud UI for thumb lateral pitch — specifically whether the app uses "toward fingers," "toward middle finger," or a left/right convention relative to the bowler's hand orientation. Also confirm whether pitch is entered as fractions or decimals for the thumb, consistent with finger pitch entry.*
## 📋 Transferring Thumb Pitch from Legacy Fitting Sheets
Legacy fitting sheets use a variety of notations for thumb pitch. The translation table from *4.3.3* applies here as well, with one additional consideration for lateral direction:
Legacy notation
How to enter in Spectre Cloud
`¼R` / `¼ Rev` / `¼ Reverse`
Vertical: `¼"`, direction: **Reverse**
`¼F` / `¼ Fwd` / `¼ Forward`
Vertical: `¼"`, direction: **Forward**
`0` / `Zero`
Vertical or lateral: `0"`, direction: **Zero**
`¼ In` / `¼ toward fingers` / `¼T`
Lateral: `¼"`, direction: **Toward Fingers**
`¼ Out` / `¼ away`
Lateral: `¼"`, direction: **Away from Fingers**
`¼L` or `¼R` used for lateral (left/right convention)
Determine whether left/right refers to the bowler's perspective or the ball face — then map to toward/away from fingers accordingly. When in doubt, confirm with the bowler or original fitter.
**Tip:** Left/right lateral notation on legacy cards is the single most common source of thumb pitch transfer errors. A `¼" right` entry means something different for a right-handed bowler than a left-handed bowler, and some older cards recorded lateral from the ball's perspective rather than the bowler's. Always clarify the convention before entering.
## ✨ Tips for Accurate Thumb Pitch Entry
- ✅ When fitting a new bowler, the IBPSIA auto-suggestion feature in Spectre Cloud can provide a recommended starting thumb pitch based on grip type and span. Use it as a reference point, then adjust based on the bowler's release and any feedback from previous drillings.
- ✅ If a returning bowler reports that their thumb feels like it is catching or dragging on release, the vertical pitch is almost always the first thing to adjust — typically increasing the reverse pitch by `1/16"` to `⅛"`.
- ✅ Record the bowler's reported feel alongside the pitch values in the **Notes** field — knowing that a previous drilling at `¼" reverse` felt slightly tight helps you calibrate the next adjustment accurately.
- ❌ Do not assume thumb pitch from a previous ball applies unchanged to a new one — different ball weights, slug materials, and hole depths can all affect how a given pitch feels in practice.
- ❌ Do not confuse thumb vertical pitch with thumb forward/reverse pitch on legacy cards that use inconsistent terminology — confirm the axis before entering.
### Related Sections
- 4.3.3 — Inputting vertical and lateral pitch for fingers
- 4.3.4 — CLT (Corrected Lateral Tilt) and its effect on lateral pitch
- 4.4.2 — Entering thumb hole size
- 4.4.5 — Thumb slug and insert entry
- 4.5 — IBPSIA auto-suggestions
**Tip:** Thumb pitch is the measurement bowlers are most likely to have strong opinions about — many competitive bowlers know their preferred pitch values from memory and will tell you exactly what they want. When a bowler gives you their pitch preferences directly, record them as stated and note in the **Notes** field that the values came from the bowler's own specification. This protects both the bowler and the shop if a fit question arises later.
```
# 4.4.5 Installing a pre-drilled thumb insert
# Installing a pre-drilled thumb insert
4.4.5thumb
A pre-drilled thumb insert arrives from the manufacturer already bored to a standard inner diameter. Rather than drilling the thumb hole to the bowler's exact size and shaping it in place, the operator selects an insert whose inner diameter matches the bowler's thumb, installs it into the ball, and records the details in the spec sheet. This page covers both the physical installation procedure and how to enter the insert details into Spectre Cloud.
## 🎳 What Is a Pre-Drilled Thumb Insert
A pre-drilled thumb insert — sometimes called a thumb slug — is a cylindrical plug, typically made from urethane, rubber, or a similar material, that is pressed or glued into the thumb hole of the ball. The bowler's thumb goes into the insert rather than directly into the ball surface. Pre-drilled inserts come in standard inner diameter sizes and a range of outer diameters to suit different pilot hole sizes.
- ✅ Provides a consistent, replaceable thumb hole — if the fit changes, the insert can be removed and replaced without re-drilling the ball.
- ✅ Available in a wide range of materials and hardnesses to suit different release styles and preferences.
- ✅ Standard inner diameters allow quick fitting from a size chart without custom drilling of the insert itself.
- ❌ Requires an accurately drilled pilot hole — a pilot hole that is too large will not hold the insert securely; too small and the insert cannot be seated correctly.
## 🛠️ Physical Installation Procedure
### Step 1 — Select the correct insert size
1. Measure the bowler's thumb at the point of insertion as described in *4.4.2 — Entering thumb hole size*.
2. Add the appropriate fit allowance (`1/32"` to `1/16"` for most bowlers) to arrive at the target inner diameter.
3. Select a pre-drilled insert whose inner diameter matches the target. If the exact size is not available, size up rather than down — a slightly loose fit managed with thumb tape is preferable to an insert the bowler cannot release cleanly.
4. Note the selected insert's **outer diameter (OD)** — this determines the pilot hole size.
### Step 2 — Drill the pilot hole
1. Set up the ball on the drill press with pitch and span measurements entered and confirmed in Spectre Cloud.
2. Select the drill bit whose OD matches the insert's outer diameter. For a **STD insert**, the pilot hole should be a tight press fit — typically the same size as the insert OD or `1/64"` under. For a **VACU insert**, the pilot hole is drilled slightly larger to allow the insert to expand under finger pressure — see *4.3.7 — Insert type and size* for the expansion gap allowance.
3. Drill the pilot hole to the correct depth for the insert length being used.
4. Clean the hole thoroughly — remove all ball material dust before attempting to seat the insert.
### Step 3 — Prepare and seat the insert
1. Lightly scuff the outer surface of the insert with fine sandpaper if required by the manufacturer or your shop's standard practice — this improves adhesive bonding.
2. Apply a thin, even layer of bowling ball plug or approved insert adhesive to the outer surface of the insert and/or the walls of the pilot hole, per the adhesive manufacturer's instructions.
3. Seat the insert into the pilot hole, aligning it so the grain or marking on the insert faces the correct direction if the insert is directional.
4. Press the insert firmly and evenly until it is fully seated and flush with — or very slightly proud of — the ball surface.
5. Wipe away any adhesive squeeze-out immediately.
6. Allow the adhesive to cure fully before the bowler uses the ball. Follow the adhesive manufacturer's cure time — do not rush this step.
### Step 4 — Finish the insert
1. Once cured, check that the insert is fully seated and secure.
2. If the insert sits slightly proud, sand or file it flush with the ball surface.
3. Bevel the inner edge of the insert opening lightly if needed — a small bevel eases thumb entry and exit.
4. Have the bowler test the fit before leaving the shop — confirm the thumb enters and exits cleanly and that the fit feels correct with and without tape.
**Tip:** Always have the bowler test the insert fit with their bowling hand warmed up — a few minutes of light activity before the test gives a more accurate read of how the insert will feel during actual play than a cold, first-impression fit check.
## ☁️ Recording the Insert in Spectre Cloud
### Entering insert details in the spec sheet
1. In the spec sheet, navigate to the **Thumb** section.
2. Select the insert type — `STD` or `VACU` — from the insert type selector.
3. Enter the insert's **inner diameter** in the thumb hole size field — this is the effective hole size the bowler's thumb sits in.
4. Enter the insert's **outer diameter** in the drill bit OD field — this is the size of the pilot hole drilled in the ball.
5. Confirm the **vertical and lateral pitch** values are entered correctly — pitch applies to the pilot hole, not the insert itself.
*Verify with Spectre team: confirm whether Spectre Cloud has a dedicated field for insert brand and model, or whether this information should be recorded in the Notes field. Also confirm whether the inner diameter and outer diameter are entered in separate labeled fields or whether the UI handles this differently for insert vs. bare thumb fittings.*
### What to record in the Notes field
For pre-drilled thumb inserts, the Notes field is especially useful. Consider recording:
- ✅ Insert brand and model — different manufacturers use slightly different OD standards for nominally equivalent sizes.
- ✅ Insert material and hardness if known — useful context if the bowler wants to replicate the feel on a future ball.
- ✅ Adhesive used and cure time observed — helpful if the insert ever needs to be removed and replaced.
- ✅ Bowler's reported fit at test — e.g. `Fit confirmed comfortable with one layer of tape.`
- ✅ Any beveling or finishing adjustments made after installation.
## 📊 Insert Size Reference
Inner diameter (bowler fit)
Typical bowler
Notes
`1"` and under
Youth, small adult hands
Confirm fit carefully — range where sizing errors are most noticeable
`1 1/16"` – `1 1/8"`
Most adult female bowlers
Common range — keep a full size run in stock
`1 3/16"` – `1 1/4"`
Most adult male bowlers
Common range — keep a full size run in stock
`1 5/16"` and above
Large adult hands
Less commonly stocked — worth ordering ahead if a bowler is in this range
**Note:** These ranges are general references only — individual thumb anatomy varies widely. Always fit from measurement, not from assumptions about hand size.
## ✨ Tips for Pre-Drilled Insert Fittings
- ✅ Keep a full size run of your most common insert brand on hand — being unable to match a bowler's thumb size on the day of drilling is avoidable with good stock management.
- ✅ When a bowler switches insert brands, measure the new insert's OD with calipers before drilling — do not rely solely on the manufacturer's stated OD. A `1/32"` variance between brands is common.
- ✅ If a bowler uses thumb tape routinely, confirm how many layers they typically use before finalising the inner diameter selection — each standard layer reduces the effective inner diameter by approximately `1/32"`.
- ❌ Do not reuse an insert removed from a previous ball without inspecting it for cracks, compression deformation, or adhesive residue — a compromised insert will not seat correctly or hold securely.
- ❌ Do not rush the adhesive cure. A partially cured insert that shifts or loosens during the bowler's first session is far more disruptive than the extra wait time at the bench.
### Related Sections
- 4.4.1 — Selecting "Round" thumb hole on the spec sheet
- 4.4.2 — Entering thumb hole size
- 4.4.4 — Entering vertical and lateral pitch for thumb
- 4.3.7 — Insert type and size: STD vs. VACU, selecting drill bit OD
- 4.5 — IBPSIA auto-suggestions
**Tip:** Recording insert brand, model, and OD in the Notes field takes under thirty seconds and pays dividends every time the bowler returns. When a bowler comes back two years later asking for "the same insert as last time," having that detail on record means you can match it exactly — rather than approximating from memory and hoping for the best.
```
# 4.5 — Thumb Measurements (Oval)
# 4.5.1 Selecting "Oval" thumb hole on the spec sheet
# Selecting "Oval" thumb hole on the spec sheet
4.5.1KEYoval
Drilling an oval thumb hole requires more setup information than a round hole. In addition to the standard thumb measurements, Spectre Cloud needs four oval-specific inputs to generate the correct drilling sequence: the **starting bit size**, the **oval width**, the **oval degrees**, and the **taper**. Together these four values define the shape, orientation, and profile of the finished oval hole so the drill press operator knows exactly where and how to make each cut.
## 🔵 Starting Bit
The starting bit is the diameter of the initial round pilot hole drilled before any oval cuts are made. It must fit entirely within the narrowest dimension of the intended oval — typically the depth — so that all subsequent oval passes remove material outward from the pilot hole without cutting outside the intended oval boundary.
- ✅ Select the largest round bit that fits comfortably within the oval's narrowest dimension (usually the depth measurement).
- ✅ A larger starting bit means less material to remove on the oval passes, reducing the risk of tearout or an uneven finish.
- ❌ Do not select a starting bit larger than the oval's narrowest dimension — it will cut outside the intended oval shape before the oval passes begin.
- ❌ Do not select a starting bit so small that an excessive number of oval passes are needed — this increases drilling time and the risk of the ball shifting in the fixture.
**Tip:** A starting bit sized to the depth measurement (the narrower axis for most thumbs) is a reliable default. If depth and width are close in value, size down by `1/32"` to give yourself a clean margin on the oval passes.
## ↔️ Oval Width
The oval width is the finished width of the thumb hole — the larger of the two oval dimensions, measured across the thumb at the point of insertion. This is the target dimension the oval passes will open the starting pilot hole out to.
- ✅ Oval width should include the appropriate fit allowance above the raw thumb width measurement — the same `1/32"` to `1/16"` clearance used for round hole sizing.
- ✅ The difference between the oval width and the starting bit diameter determines how much material the oval passes must remove on each side.
- ❌ Do not confuse oval width with the starting bit size — they are different values. The starting bit is always smaller than the oval width.
*Verify with Spectre team: confirm whether Spectre Cloud also requires a separate oval depth entry field in addition to oval width, or whether depth is derived from the starting bit size and the width entry together.*
## 🔄 Oval Degrees
Oval degrees define the **orientation** of the oval cut — the angle at which the width axis of the oval is positioned relative to the thumb hole, using the hole as a 360° circle with `0°` / `360°` at the top, toward the fingers.
Because the thumb does not sit perfectly vertical in the hole — it rests at a natural angle unique to each bowler's hand — the oval must be oriented to match that angle rather than defaulting to a horizontal cut.
Degree value
Clock position equivalent
What it means
`0°` / `360°`
12:00
Oval width axis points directly toward the fingers — cuts made at top and bottom of the hole
`45°`
~1:30
Oval width axis rotated 45° clockwise from top
`90°`
3:00
Oval width axis runs horizontally — cuts made at left and right of the hole
`135°`
~4:30
Oval width axis rotated 135° clockwise from top — a common angle for right-handed bowlers whose thumb naturally rests toward the lower-right quadrant
`180°`
6:00
Oval width axis points directly away from the fingers
### How to determine the correct oval degrees for a bowler
1. Ask the bowler to place their thumb into a round hole of approximately the correct size — either a fitting gauge or a previously drilled ball of similar sizing.
2. Observe the natural resting angle of the thumb inside the hole — specifically, which direction the thumb presses most firmly against the hole wall.
3. Identify the clock position that corresponds to that contact point — this is the direction the oval width axis should face.
4. Convert the clock position to degrees using the 0° = 12:00 convention and enter the value in Spectre Cloud.
**Tip:** For most right-handed bowlers, the thumb naturally rests toward the lower-right of the hole — oval degrees in the `120°`–`150°` range are common starting points. For left-handed bowlers, the natural resting angle typically mirrors this toward the lower-left — `210°`–`240°`. These are starting references only; always observe the individual bowler's thumb position directly. *Verify with Spectre team: confirm whether Spectre Cloud's degree convention is clockwise from 0° at top-toward-fingers, as described here.*
## 📐 Taper
Taper describes how much larger the top of the thumb hole is compared to the bottom. The thumb is not a uniform cylinder — it widens toward the base, and the amount of widening varies significantly between bowlers. A hole with the correct taper allows the thumb to seat fully at its natural depth without binding at the base or feeling loose at the tip.
- ✅ A bowler with a **meaty or thick thumb base** — where the thumb widens significantly below the first knuckle — requires **more taper**. Without it, the base of the thumb will bind against the narrower lower portion of the hole before the thumb is fully seated.
- ✅ A bowler with a **slender or tapered thumb base** — where the thumb stays relatively consistent in diameter from tip to base — requires **less taper**. Excess taper on a slender thumb produces a hole that feels sloppy at insertion depth.
- ✅ Taper is assessed visually and by feel during the fitting — observe how the bowler's thumb narrows or widens from the insertion point toward the base.
*Verify with Spectre team: confirm the unit in which taper is entered in Spectre Cloud — whether it is expressed in degrees, as a measurement difference between top and bottom diameter (e.g. `1/16"` larger at top than bottom), or as a categorical selection (e.g. none / light / standard / heavy). Also confirm the typical range of taper values entered in practice.*
## 🛠️ Entering All Four Values in Spectre Cloud
1. In the spec sheet thumb section, confirm `Oval` is selected as the hole shape.
2. Enter the **starting bit** diameter — the largest round bit that fits within the oval's narrowest dimension.
3. Enter the **oval width** — the finished width of the oval hole including fit allowance.
4. Enter the **oval degrees** — the orientation angle of the oval width axis, measured clockwise from `0°` at top-toward-fingers.
5. Enter the **taper** value — the amount by which the top of the hole is larger than the bottom, per the bowler's thumb profile.
6. Review all four values before proceeding — an error in any one of these inputs will affect the drilling sequence generated by Spectre Cloud.
## ✨ Tips for Oval Input Accuracy
- ✅ Take your time with oval degrees — it is the most judgement-dependent of the four inputs and the most common source of oval thumb fit complaints. When in doubt, observe the bowler's thumb in a round hole before committing to a degree value.
- ✅ Record your fitting observations in the **Notes** field alongside the entered values — e.g. `Thumb rests at approx. 4:30 position. Meaty base, standard taper applied.` This context is invaluable on future visits.
- ✅ For a bowler's first oval thumb fitting at your shop, consider scheduling extra time — the observation and measurement steps take longer than a standard round fitting.
- ❌ Do not estimate oval degrees without observing the bowler's thumb in a hole. The natural resting angle varies enough between individuals that a default assumption will produce a poor fit for a meaningful proportion of bowlers.
### Related Sections
- 4.5.1 — Selecting "Oval" thumb hole on the spec sheet
- 4.5.3 — How the system calculates the oval cuts from your inputs
- 4.5.4 — Entering the span with an oval thumb
- 4.4.1 — Selecting "Round" thumb hole on the spec sheet
- Book 05 — Oval Calculator
**Tip:** An oval thumb hole, done well, is one of the most significant fit improvements you can offer a competitive bowler. The extra inputs and observation time are an investment in a result that round drilling simply cannot match for bowlers whose thumbs do not sit symmetrically in a circular hole.
```
# 4.5.2 Entering Starting Bit, Oval Width, Oval Degree, and Taper
# Entering Starting Bit, Oval Width, Oval Degree, and Taper
4.5.2oval
*TODO — write this page.*
# 4.5.3 How the system calculates the oval cut from your inputs
# How the system calculates the oval cut from your inputs
4.5.3oval
Once the four oval inputs — starting bit, oval width, oval degrees, and taper — have been entered into the spec sheet, Spectre Cloud calculates the drilling instructions needed to produce the finished oval hole. Rather than requiring the operator to work out the geometry manually, the system outputs a set of **x-axis and y-axis offset movements** that tell the driller exactly how to reposition the ball relative to the drill bit to elongate the pilot hole into the correct oval shape.
## ⚙️ What the System Calculates
The starting pilot hole is round — drilled straight down to the starting bit diameter. The oval cuts extend that hole along the line defined by the oval degrees entry, opening it out to the full oval width. Spectre Cloud resolves the oval degrees angle into two linear components — horizontal (**x-axis**) and vertical (**y-axis**) — so the driller can execute the cuts using the drill press's standard lateral adjustment controls rather than needing a rotary fixture.
- ✅ The **x-axis value** is the horizontal distance the ball must be moved relative to the bit — left or right — to position the cut correctly along the oval degrees line.
- ✅ The **y-axis value** is the vertical distance the ball must be moved relative to the bit — forward or back — to complete the movement along the same line.
- ✅ Together, x and y define a straight line through the center of the pilot hole at exactly the angle specified by the oval degrees entry — the finished hole will be elongated along this line to the full oval width.
- ✅ Taper is factored into the depth profile of the cuts — the system accounts for how much wider the top of the hole needs to be than the bottom when generating the offset values.
**In plain terms:** The system is doing trigonometry on your behalf. You enter an angle (oval degrees) and a target width — Spectre Cloud converts those into the horizontal and vertical movements your drill press can actually execute.
## 📐 How X and Y Relate to Oval Degrees
The relationship between the oval degrees angle and the x/y output values follows standard trigonometric decomposition. The oval width defines the total distance to travel along the oval degrees line; x and y are the horizontal and vertical components of that travel.
Oval degrees
Clock position
X component
Y component
`0°`
12:00
Zero — no horizontal movement needed
Full travel — all movement is vertical (toward/away from fingers)
`45°`
~1:30
Moderate horizontal movement
Equal to x — movement split evenly between axes
`90°`
3:00
Full travel — all movement is horizontal
Zero — no vertical movement needed
`135°`
~4:30
Moderate horizontal movement
Equal to x but in opposite vertical direction
`180°`
6:00
Zero — no horizontal movement needed
Full travel in opposite direction to 0°
**Note:** The x and y values output by Spectre Cloud are always positive distances paired with a direction indicator — the system tells you both how far to move and which way. Read both the value and the direction before making any drill press adjustment. *Verify with Spectre team: confirm how direction is indicated in the output — whether as +/− signs, labeled arrows, or explicit left/right/forward/back text labels.*
## 🛠️ How to Use the Calculated Output at the Drill Press
1. Drill the starting pilot hole straight down — no lateral movement, centered on the thumb hole position as marked on the ball.
2. Without removing the ball from the fixture, read the x and y offset values from the Spectre Cloud spec sheet output.
3. Move the ball along the **x-axis** by the specified distance in the specified direction.
4. Move the ball along the **y-axis** by the specified distance in the specified direction.
5. With the ball held at the offset position, make the oval cut — the bit will now remove material along the oval degrees line, elongating the pilot hole toward the full oval width.
6. Return the ball to center and make the mirror cut in the opposite direction along the same axis to complete the oval — the hole is now elongated symmetrically around the original pilot hole center.
7. Apply taper cuts as indicated — the system's taper calculation specifies how much additional material to remove at the surface relative to depth to match the bowler's thumb profile.
*Verify with Spectre team: confirm whether the oval cut is made in two passes (one in each direction from center) or as a single continuous pass through center, and whether the taper instructions are output as a separate set of values or integrated into the main x/y offset sequence.*
## 📋 Checking the Output Before Drilling
Before making any cuts, review the calculated x/y values against the inputs to confirm the output looks reasonable. This is a quick sanity check that catches data entry errors before they become drilling errors.
- ✅ If oval degrees is close to `0°` or `180°`, the x value should be close to zero and the y value should carry most of the travel — confirm this matches the output.
- ✅ If oval degrees is close to `90°`, the y value should be close to zero and x should carry most of the travel.
- ✅ If oval degrees is close to `45°` or `135°`, x and y should be approximately equal — confirm both values are similar in magnitude.
- ✅ The combined travel distance (the hypotenuse of x and y) should approximately equal half the difference between the oval width and the starting bit diameter — if it looks significantly larger or smaller, recheck the width and starting bit entries.
- ❌ If either x or y is zero when the oval degrees entry is between `10°` and `80°` (or between `100°` and `170°`), something has been entered incorrectly — a non-cardinal angle should always produce non-zero values on both axes.
## ✨ Tips for Working with the Calculated Output
- ✅ Print or display the spec sheet at the drill press before beginning — having the x/y values visible throughout the drilling sequence prevents errors from misremembering a value mid-cut.
- ✅ Make small, controlled movements when repositioning the ball for oval cuts — drill press lateral adjustments on a ball fixture have little margin for overshoot.
- ✅ If your drill press uses a digital readout for lateral positioning, zero the readout after drilling the pilot hole so the x and y offsets can be dialed in directly from the Spectre Cloud output values.
- ❌ Do not estimate the x/y movements by eye — the precision of the oval depends on executing the calculated offsets accurately. A `1/32"` error in lateral positioning produces a visibly off-center oval.
- ❌ Do not skip the sanity check on the output values before cutting — a transposed oval degrees entry (e.g. `45°` entered as `54°`) produces x/y values that look plausible but will orient the oval incorrectly on the ball.
### Related Sections
- 4.5.2 — Entering starting bit, oval width, oval degrees and taper
- 4.5.4 — Entering the span with an oval thumb
- 4.5.1 — Selecting "Oval" thumb hole on the spec sheet
- 4.4.4 — Entering vertical and lateral pitch for thumb
- Book 05 — Oval Calculator
- Book 06 — Drilling Your First Ball
**Tip:** The first time you drill an oval thumb hole using Spectre Cloud's calculated output, go slowly and check your positioning at each step. Once you have drilled a few oval thumbs using the x/y offset workflow, it becomes a fast and reliable part of the drilling sequence — but the first time deserves extra care.
```
# 4.5.4 Entering thumb oval span and pitch information
# Entering thumb oval span and pitch information
4.5.4oval
For most spec sheets, span is measured and entered the same way regardless of thumb hole shape. Oval thumb holes introduce one specific scenario where the entered span requires an adjustment — when the driller chooses to make oval cuts in **both directions** from the pilot hole center. Understanding when this adjustment applies, and how to account for it, ensures the finished span matches the bowler's fitting measurement after all cuts are complete.
## 🔄 Two Approaches to Making Oval Cuts
When executing the x/y offset cuts calculated by Spectre Cloud, the driller has a choice about where to place the material removal:
### Option 1 — Cuts made at the bottom of the hole only
All oval material is removed from the side of the hole **away from the finger holes**. The top edge of the thumb hole — the edge closest to the finger holes — remains at the original pilot hole boundary and does not move.
- ✅ Span is unaffected — the top of the thumb hole stays exactly where it was drilled, so the distance to the finger holes remains consistent with the entered span measurement.
- ✅ No span adjustment is needed in Spectre Cloud when using this approach.
### Option 2 — Cuts made in both directions (bidirectional)
Oval material is removed from **both sides** of the pilot hole — including the side facing toward the finger holes. For example, at `45°` oval degrees, cuts are made at both the `4:30` position and the `10:30` position on the clock face of the hole.
- ✅ Produces a more symmetrically centred oval — some drillers prefer this approach for the finished appearance and feel.
- ❌ The cut at the top of the hole (`10:30` in the example above) moves the top edge of the thumb hole **toward the finger holes** — effectively shortening the span if no adjustment is made.
- ❌ If the finger holes were drilled first and no span allowance was added, the finished span will be shorter than the bowler's measurement requires.
## 📐 The Span Allowance for Bidirectional Cuts
When bidirectional oval cuts are planned and the finger holes have already been drilled, the span entered in Spectre Cloud must include an allowance equal to the distance the top-of-hole cut will travel toward the finger holes. This ensures that after the cut is made, the effective span — from the finished top edge of the thumb hole to the finger holes — matches the bowler's measured span.
The allowance is determined by the **y-axis component** of the oval cut at the top of the hole — specifically, how much of the bidirectional cut travel moves in the direction of the finger holes.
- ✅ At `0°` oval degrees (cuts at 12:00 and 6:00), the top cut moves directly toward the finger holes — the full y-axis travel distance becomes the span allowance.
- ✅ At `90°` oval degrees (cuts at 3:00 and 9:00), neither cut moves toward or away from the finger holes — no span allowance is needed even with bidirectional cuts.
- ✅ At `45°` oval degrees (cuts at 1:30 and 7:30) or `135°` (cuts at 4:30 and 10:30), only the y-axis component of the top cut contributes to span encroachment — the allowance is the y-axis portion of the offset travel, not the full cut distance.
- ✅ Spectre Cloud's calculated x/y output gives you the y-axis value directly — use this as the basis for the span allowance when bidirectional cuts include a top-of-hole pass with a y-axis component toward the fingers.
*Verify with Spectre team: confirm whether Spectre Cloud prompts the operator to specify bidirectional vs. bottom-only cuts and calculates the span allowance automatically, or whether the operator is expected to calculate and apply the allowance manually before entering the span value.*
## 🛠️ Entering Span for an Oval Thumb in Spectre Cloud
1. Determine which oval cut approach the driller will use — **bottom-only** or **bidirectional**. Confirm this before entering the span, not after drilling.
2. If using **bottom-only cuts**: enter the span as measured — no adjustment needed.
3. If using **bidirectional cuts**:
1. Review the y-axis value from the Spectre Cloud oval cut output for the top-of-hole pass.
2. Add this y-axis value to the measured span before entry — this is the span allowance.
3. Enter the adjusted span value in the span field.
4. Note in the **Notes** field which cut approach was used and whether a span allowance was applied — e.g. `Bidirectional oval cuts. Span adjusted +3/32" for top cut y-axis encroachment.`
**Important:** The span allowance only applies when the **finger holes are drilled first**. If the thumb hole is drilled first, the finger holes are positioned relative to the finished thumb hole edge after the oval cuts are complete — no pre-adjustment is needed. Confirm the drilling order before deciding whether to apply the allowance. *Verify with Spectre team: confirm whether Spectre Cloud tracks or prompts for drilling order (thumb first vs. fingers first) as part of the spec sheet workflow.*
## 📊 Span Adjustment — Quick Reference
Cut approach
Oval degrees
Finger holes drilled first?
Span adjustment needed?
Bottom-only
Any
Yes or No
✅ No — top edge of thumb hole unchanged
Bidirectional
`90°`
Yes
✅ No — top cut has no y-axis component toward fingers
Bidirectional
`0°` or `180°`
Yes
❌ Yes — top cut moves directly toward fingers; full y-axis value is the allowance
Bidirectional
Any angle with y-axis component toward fingers
Yes
❌ Yes — y-axis component of top cut is the allowance
Bidirectional
Any
No (thumb drilled first)
✅ No — finger holes positioned after oval cuts complete
## ✨ Tips for Oval Thumb Span Entry
- ✅ Decide on the cut approach — bottom-only or bidirectional — as part of the fitting conversation, before the bowler leaves the counter. Changing approach after the finger holes are drilled is too late to adjust the span.
- ✅ Document the cut approach and any span allowance in the Notes field every time. On a future visit when a ball is being cloned, this note prevents the next driller from applying or omitting an allowance incorrectly.
- ✅ If you are unsure which approach a previous driller used on a cloned spec sheet with no notes, measure the finished thumb hole on the existing ball — a symmetrical oval indicates bidirectional cuts; an oval that extends only to one side of the pilot center indicates bottom-only.
- ❌ Do not apply a span allowance when drilling thumb-first — the allowance only compensates for encroachment on already-drilled finger holes. Applying it unnecessarily will push the finger holes further from the thumb than the bowler's measurement requires.
### Related Sections
- 4.5.2 — Entering starting bit, oval width, oval degrees and taper
- 4.5.3 — How the system calculates the oval cuts from your inputs
- 4.5.1 — Selecting "Oval" thumb hole on the spec sheet
- 4.4.3 — Entering bowler's span (Full and Cut to Cut)
- 4.3.2 — Entering span measurements (Full Span and Cut to Cut)
- Book 06 — Drilling Your First Ball
**Tip:** The span allowance for bidirectional oval cuts is a small detail that is easy to overlook — but a bowler who comes back reporting their ball feels slightly cramped after an oval thumb drilling is almost always experiencing the result of a missing allowance. Making it standard practice to note the cut approach on every oval spec sheet eliminates this class of complaint entirely.
```