4.3 — Finger Measurements
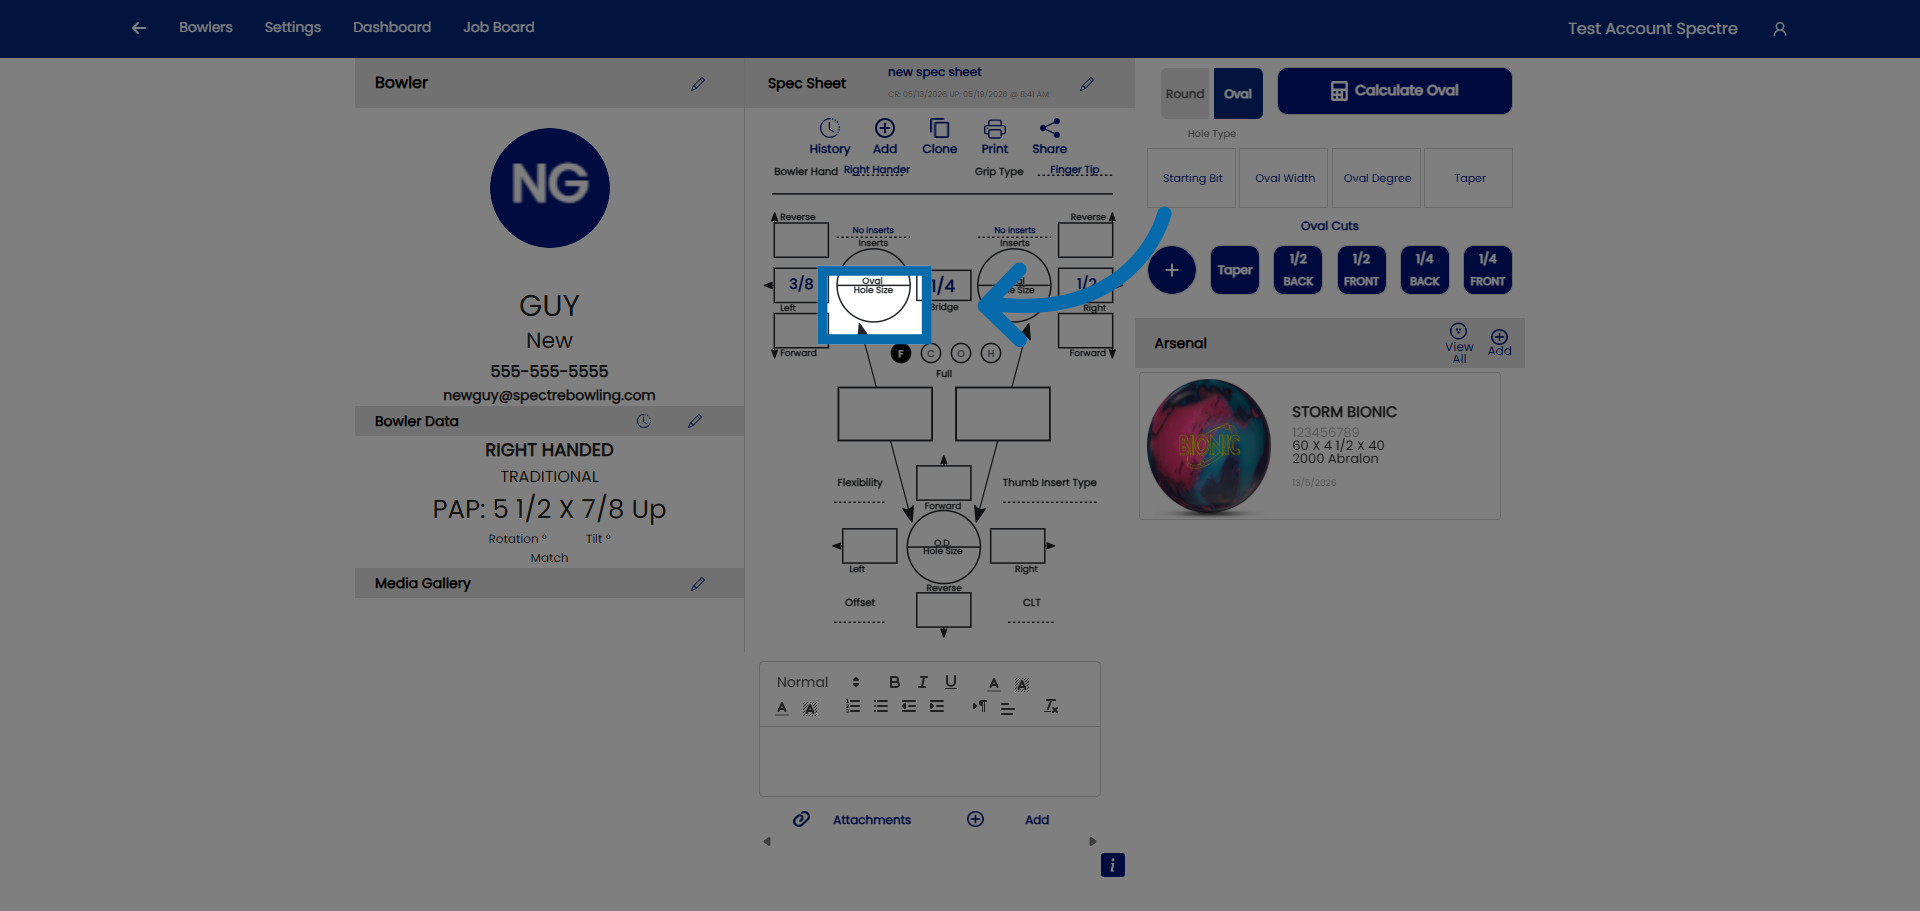
- 4.3.1 Entering finger hole size (ring and middle fingers)
- 4.3.2 Entering span measurements, F, C, O, H
- 4.3.3 Inputing Vertical and Lateral pitch for fingers
- 4.3.4 CLT (Corrected lateral tilt) angle and its effect on lateral pitch
- 4.3.5 How to input a finger oval measurement (no inserts)
- 4.3.6 Ring Finger 5/16" rule — auto and manual calculation
- 4.3.7 Insert type and size: STD vs. VACU, selecting drill bit OD
4.3.1 Entering finger hole size (ring and middle fingers)
1. Select Customer Account
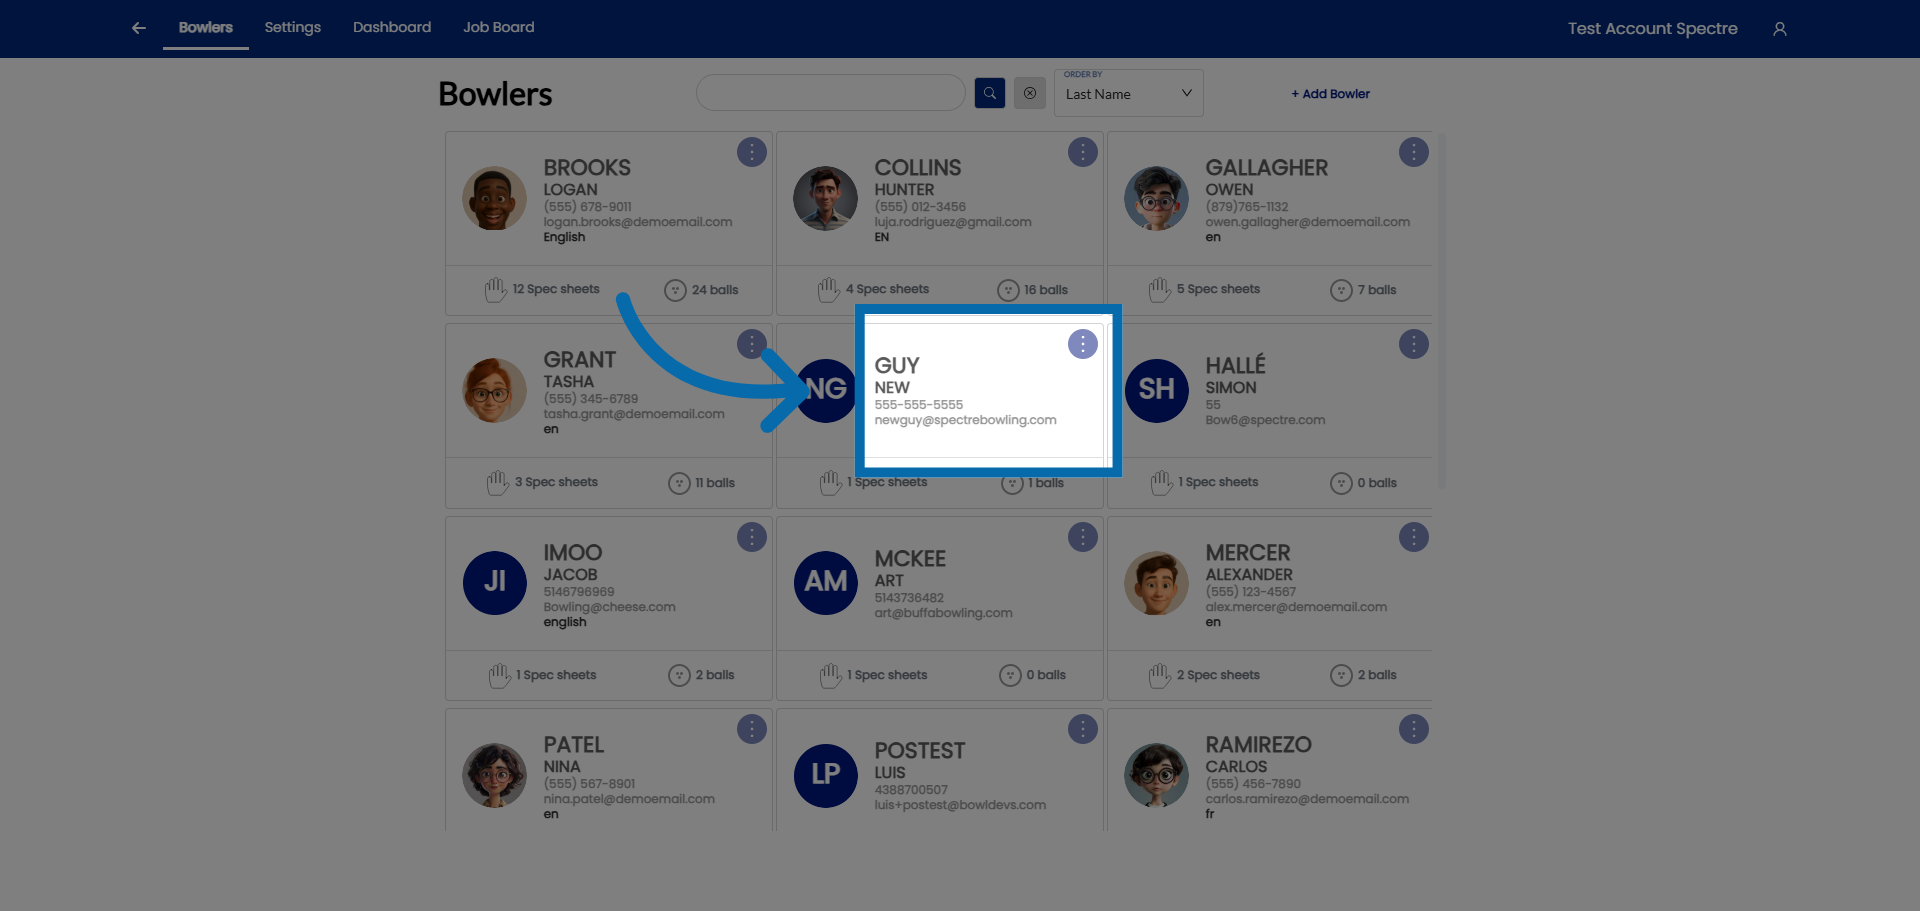
2. Hole size
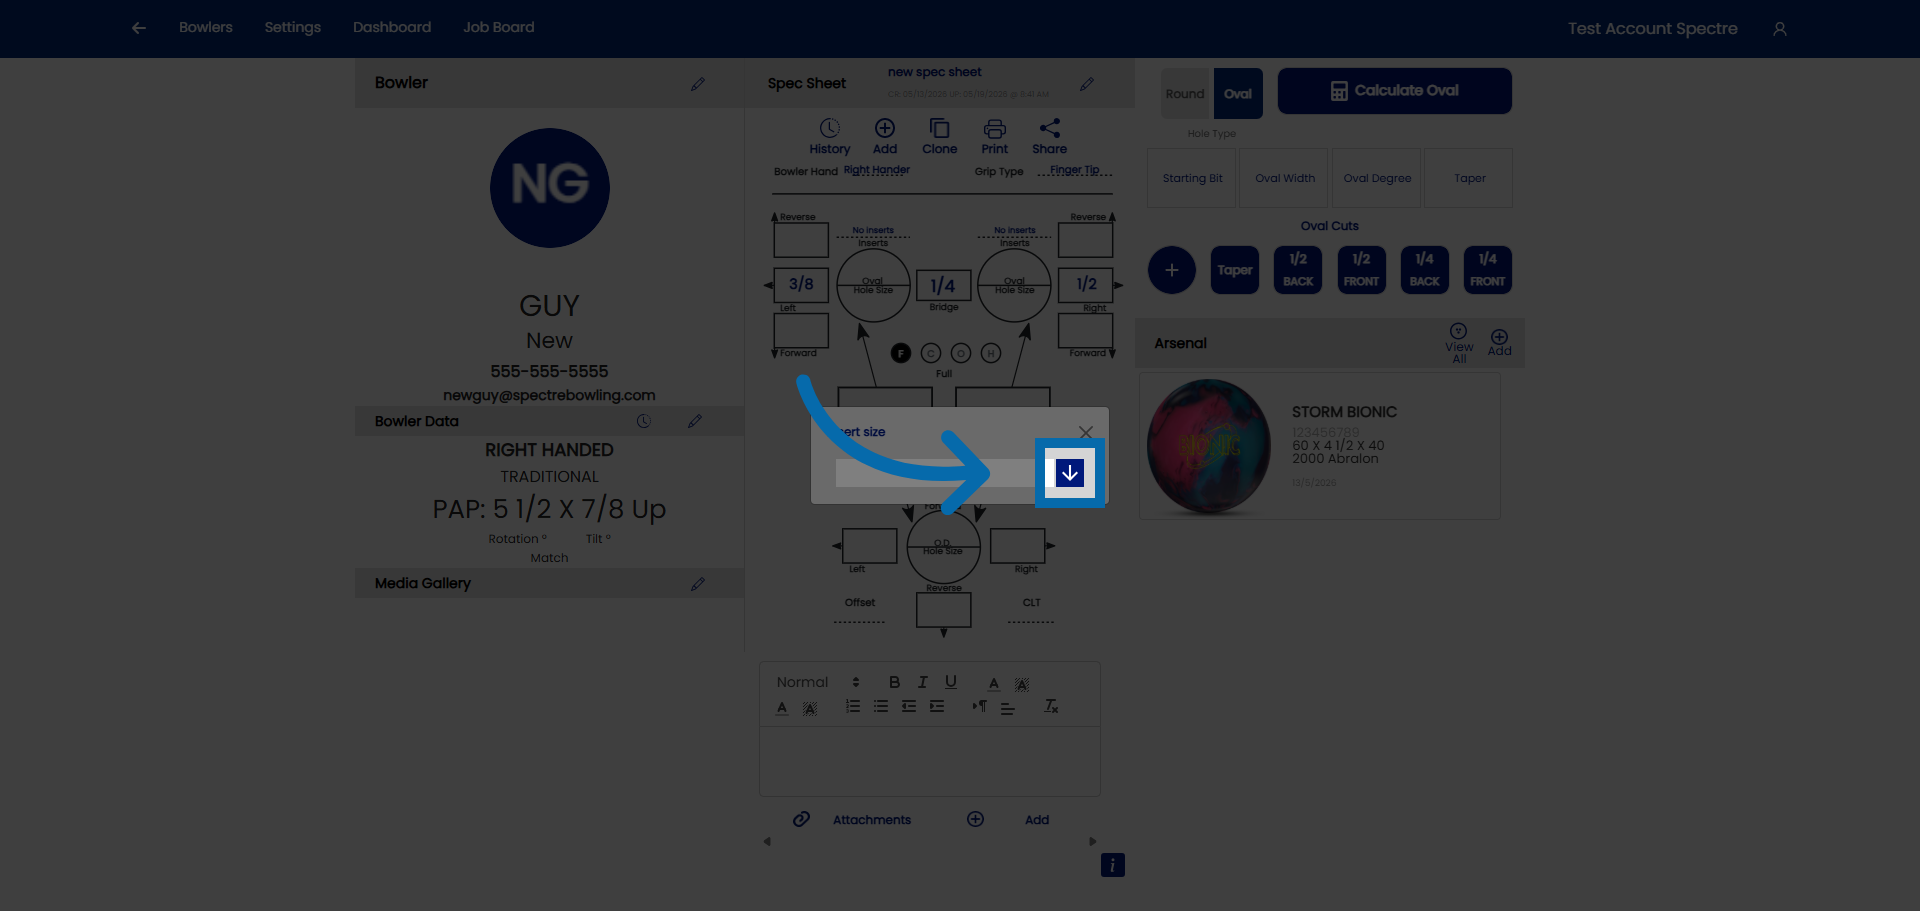
3. Open drop down
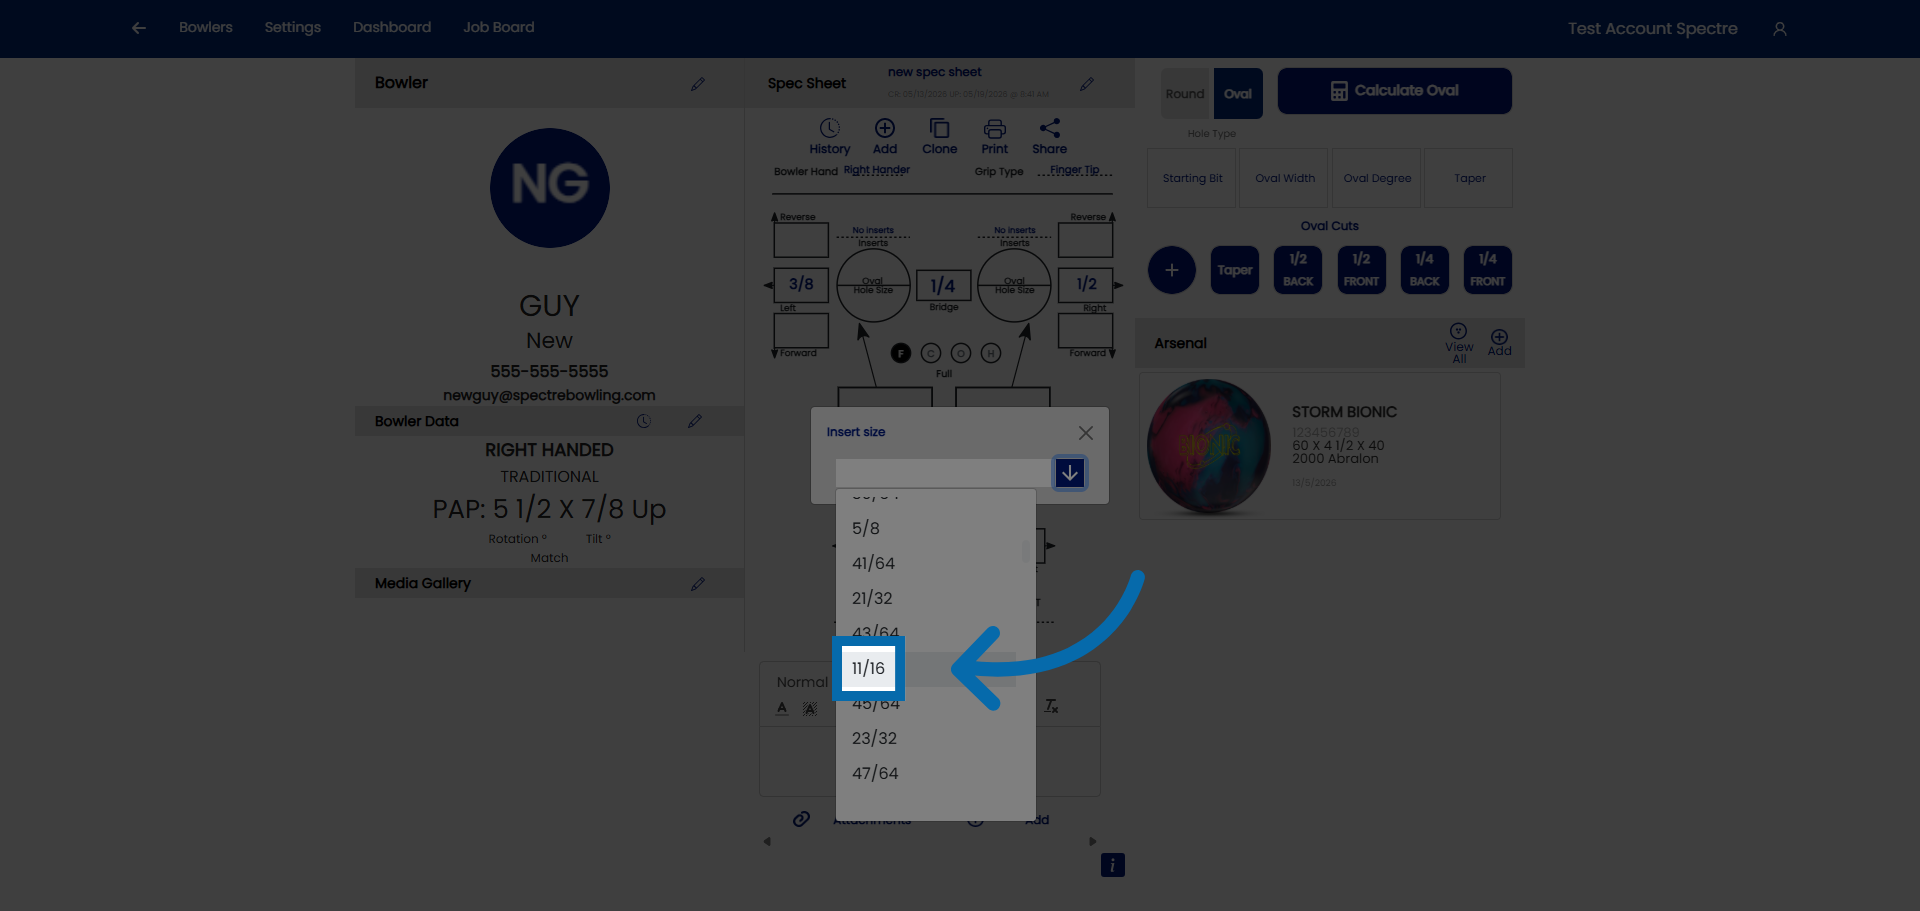
4. Select the size
5. Hole size
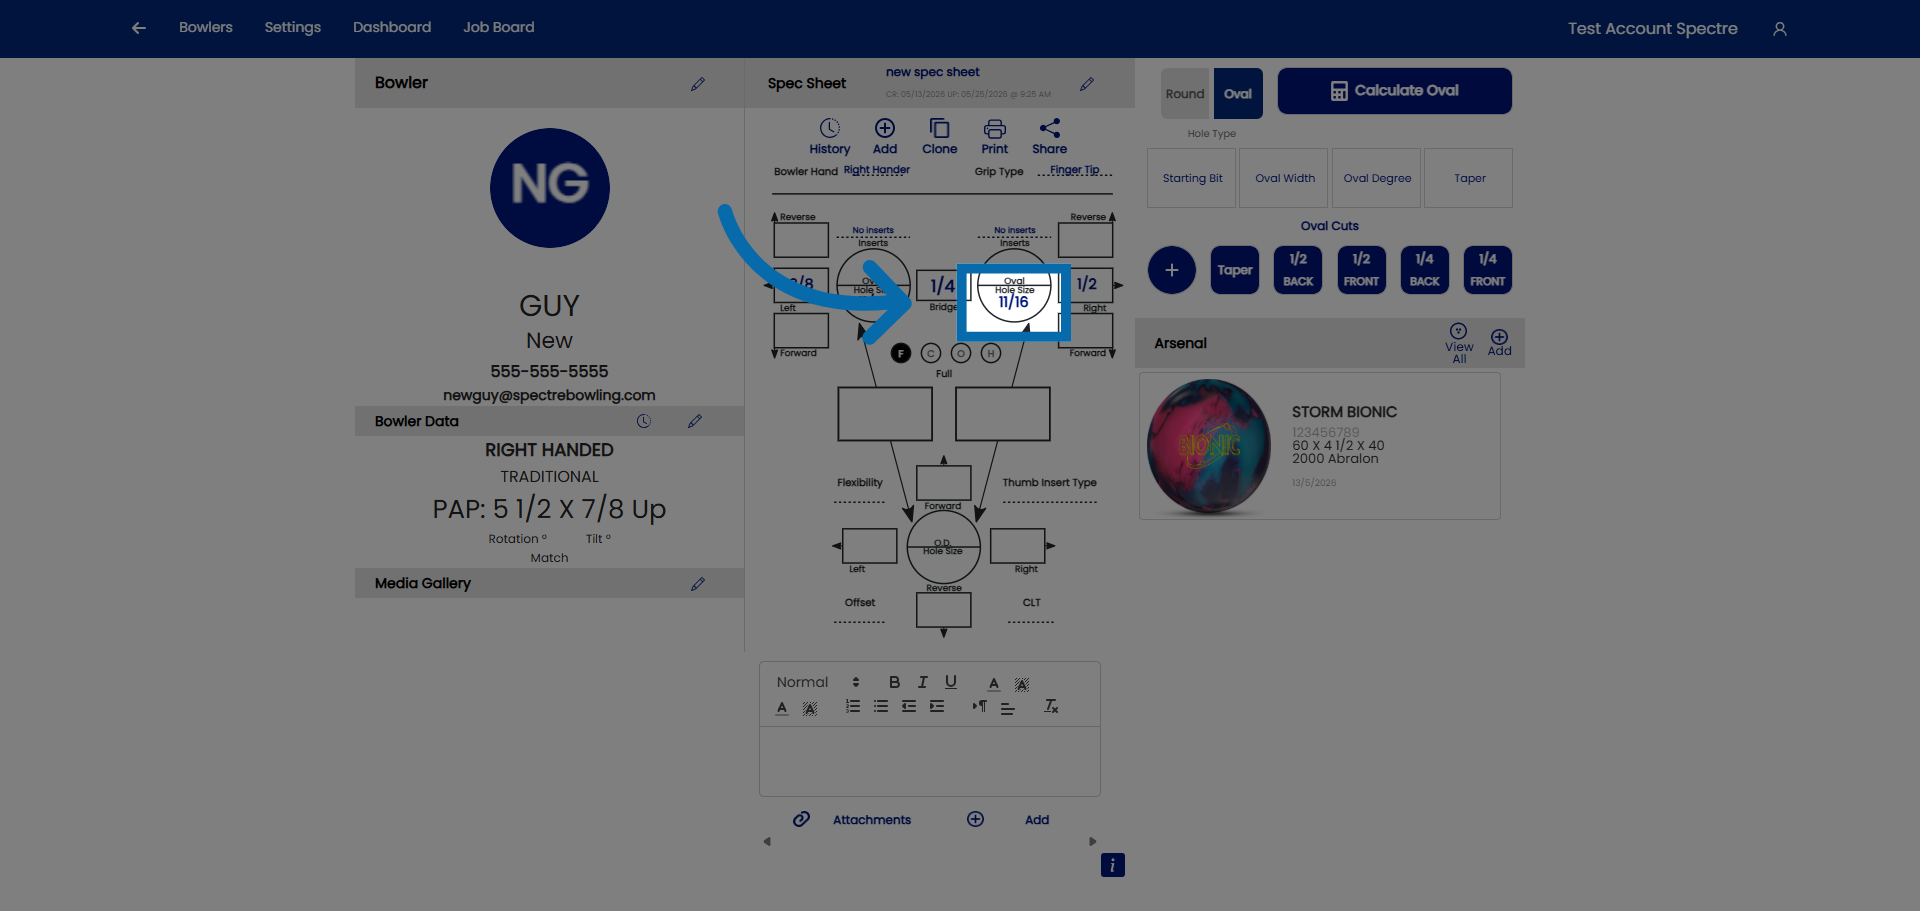
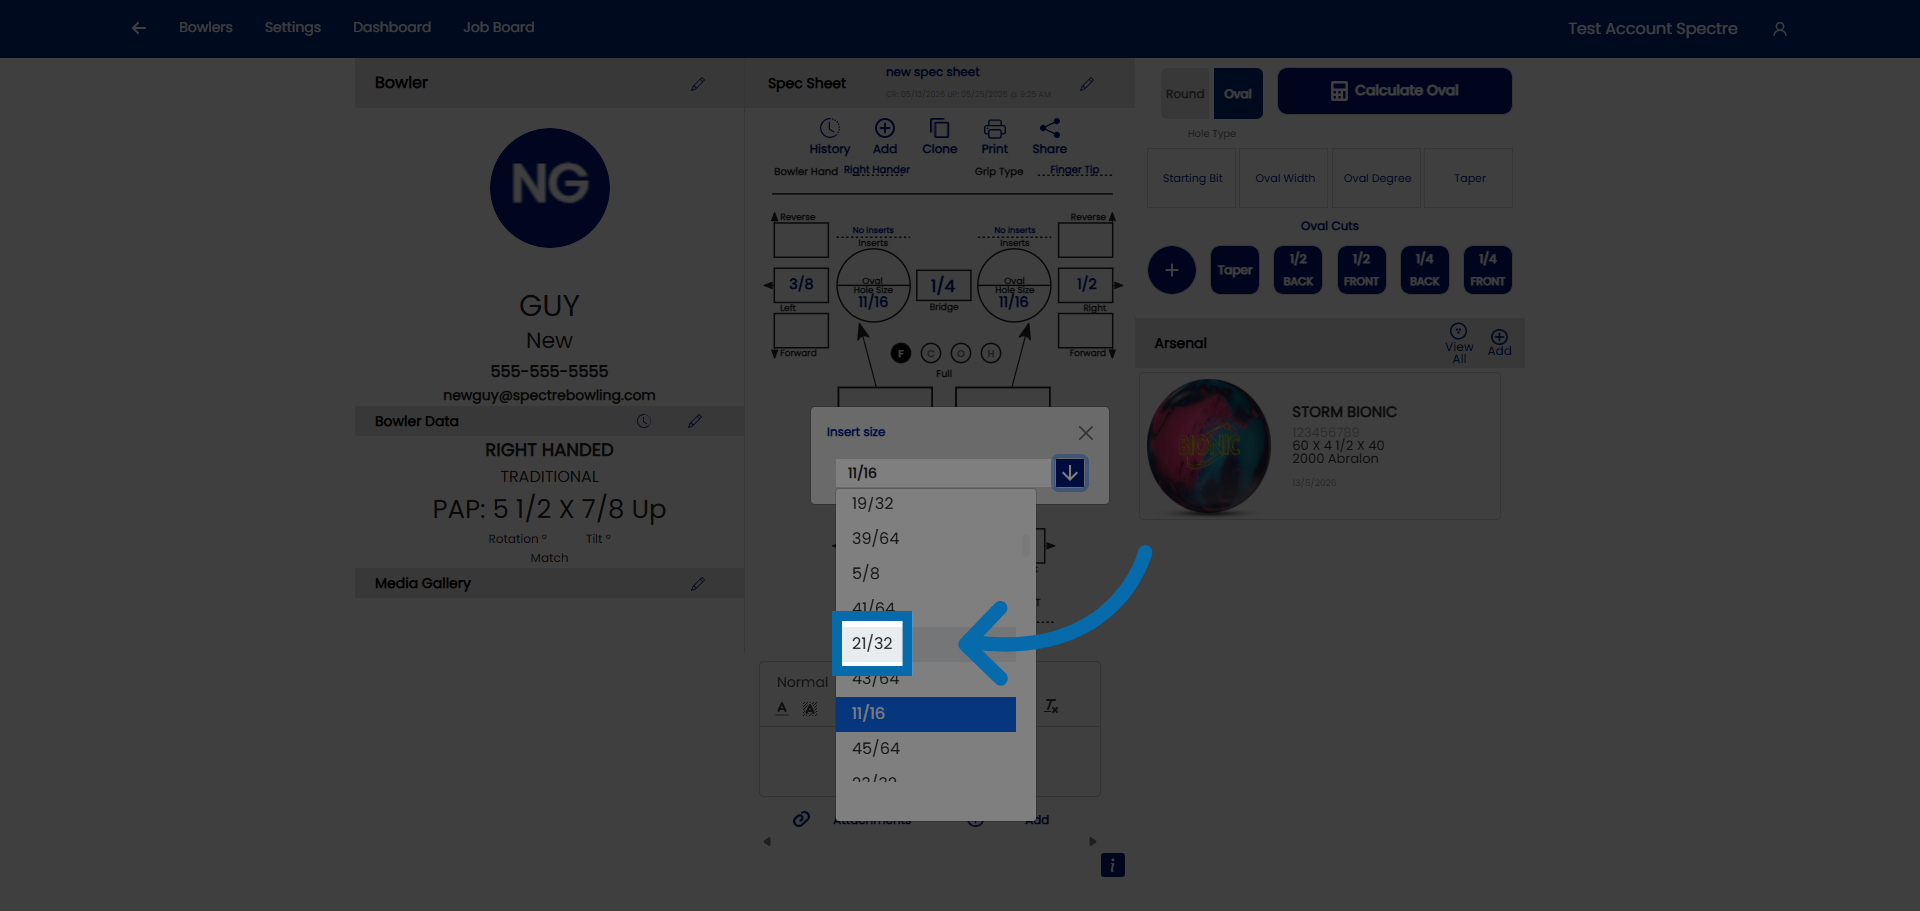
6. Open drop down
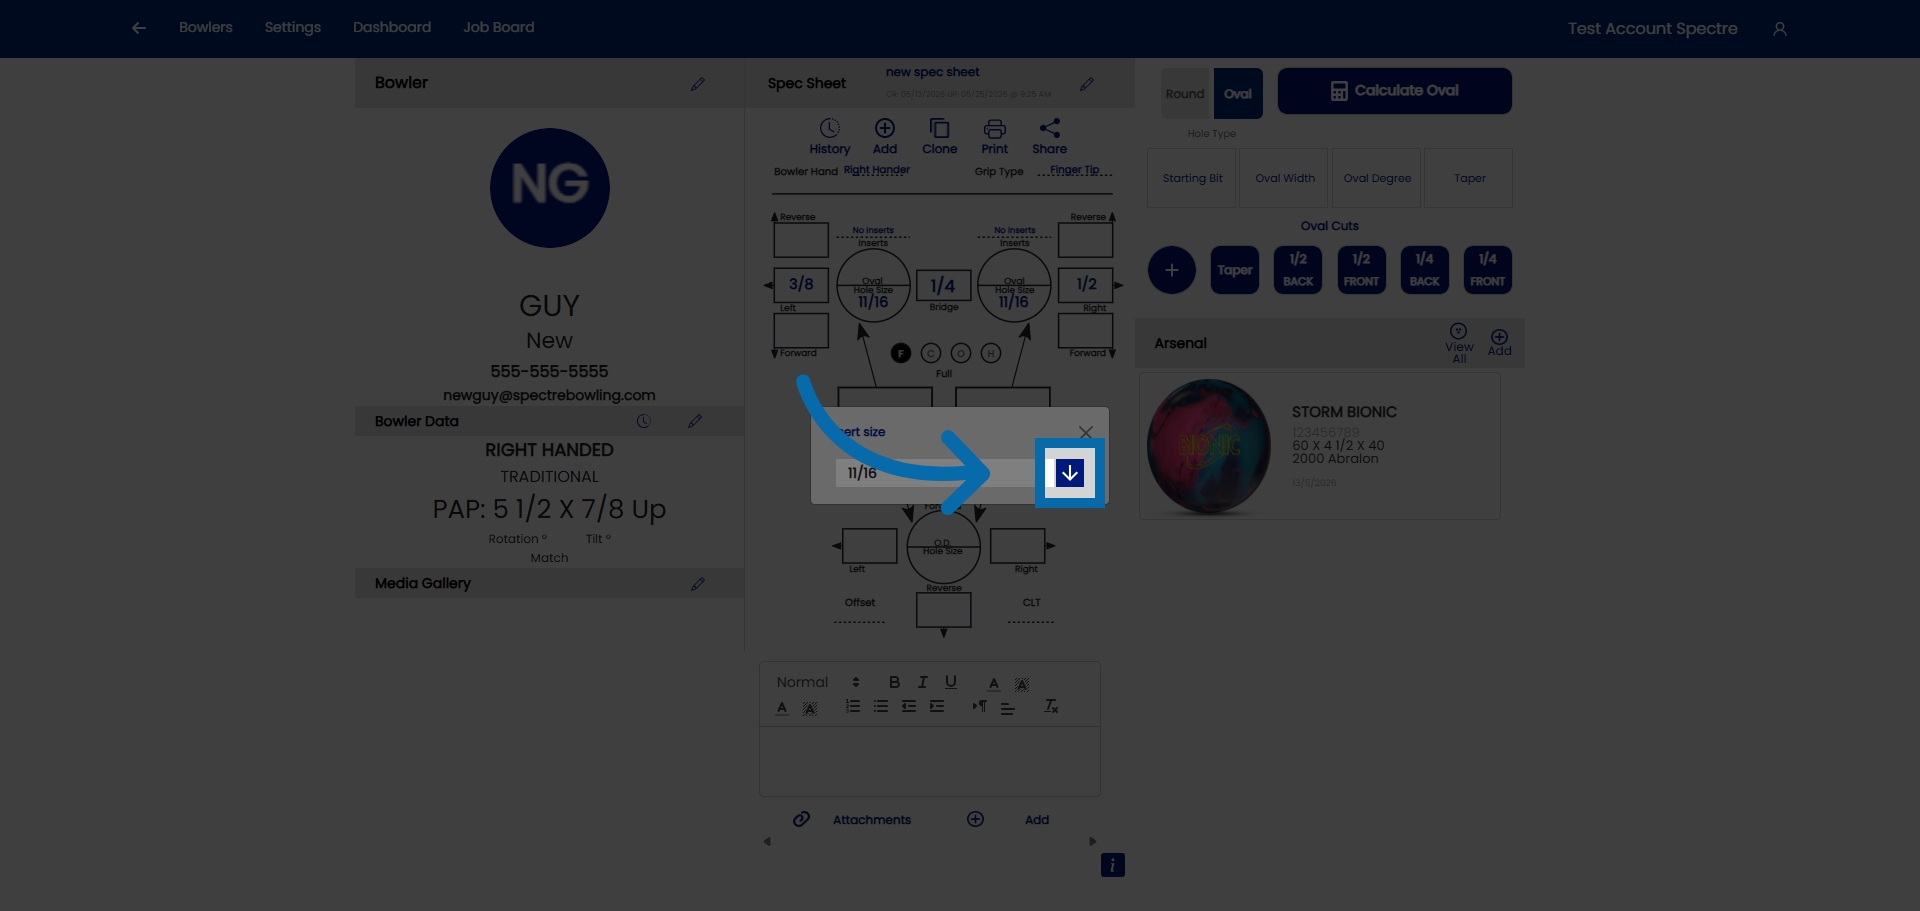
7. Select the size
4.3.2 Entering span measurements, F, C, O, H
4.3.2 step-by-step
Span measurements define the distance between the thumb hole and each finger hole. Spectre Cloud supports four span types, and it's important to enter values under the correct one — the number only means what it's supposed to when it's paired with the right span type.
📐 The Four Span Types (Summary)
Spectre Cloud uses four span measurement types. Each is explained in full — including how it's measured and when to use it — in 4.1.2. In brief:
- ✅ Full Span (F) — the complete measured span, everything included, inserts and all.
- ✅ Cut to Cut (C) — Full Span minus the insert thickness; used when drilling thumb-first.
- ✅ Outer to Cut (O) — for interchangeable thumbs; inside of the female interchangeable to the cut of the finger OD hole.
- ✅ Hole to Hole (H) — biggest hole to biggest hole (what the PBA truck calls "Cut-to-Cut").
For the full detail on each type, see 4.1.2 — Span types. This page covers how to enter the values once you know which type you're working in.
🎳 The Span Fields on the Spec Sheet
The two span boxes sit at the center of the spec sheet, directly below the finger holes. For a right-handed bowler:
- ✅ The left box is the middle finger.
- ✅ The right box is the ring finger.
Enter each finger's span in its box. The values are almost always different from one another, so confirm you're entering each in the correct field.
Note: The middle and ring finger boxes flip when you change the bowler's dominant hand. Because handedness mirrors the layout, switching a bowler from right-handed to left-handed (or vice versa) swaps which box is the middle finger and which is the ring — so always confirm the bowler's hand is set correctly before reading or entering span values.
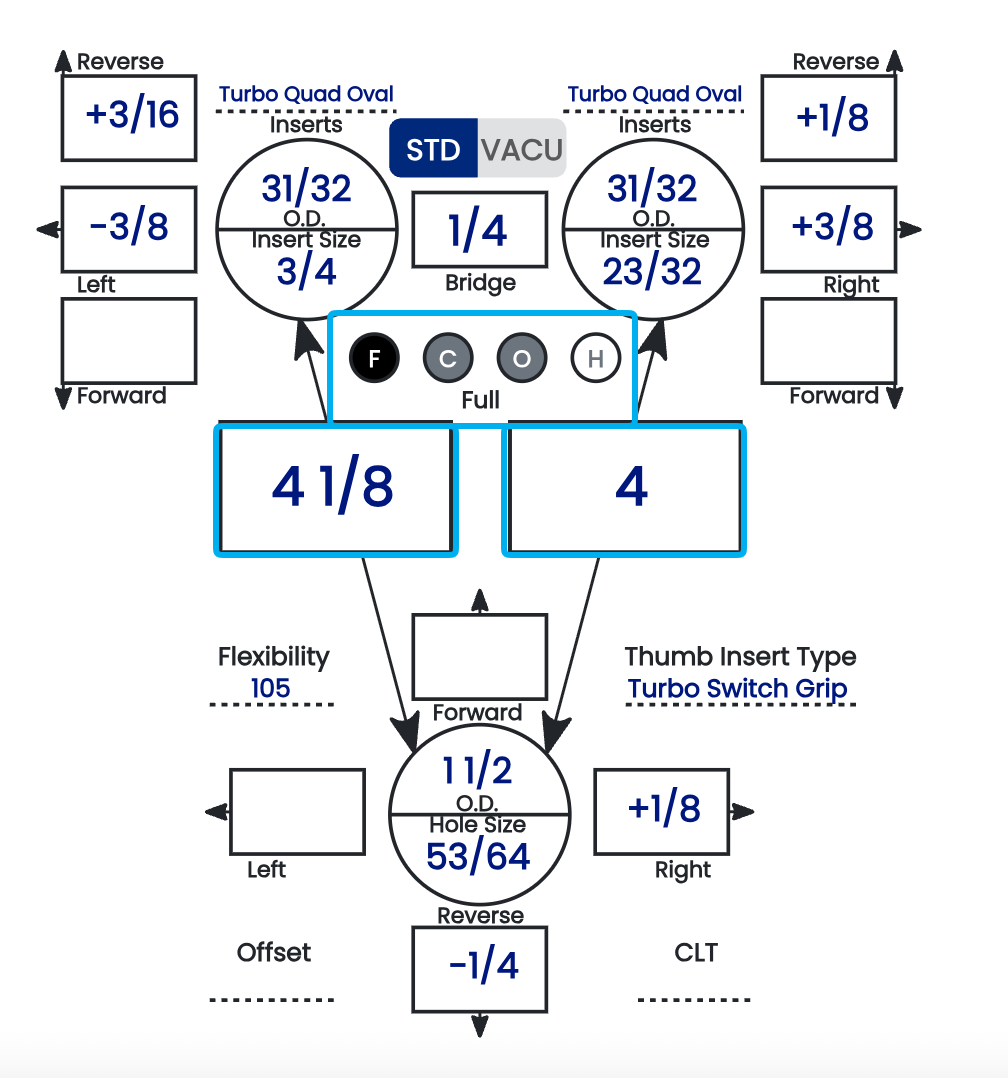
🔘 Reading the F / C / O / H Bubbles
Between the two span boxes is a row of four bubbles — F, C, O, H — one for each span type. Their shading tells you, at a glance, which span type is currently displayed and which ones already hold a value:

| Bubble state | Meaning |
|---|---|
| Black background | This is the span type currently being displayed in the span boxes. |
| Grey background | A value is present for this span type (but it's not the one currently displayed). |
| White background | Nothing is present — the value for this span type is blank or incomplete. |
The bubbles let you switch which span type is shown and immediately see which types are already filled in. A grey bubble means that span exists on the sheet; a white bubble means it doesn't yet.
⚙️ Only Cut to Cut Is Automated
This is the key thing to understand about span entry: Cut to Cut is the only span type with any automation behind it.
- ✅ Cut to Cut (C) has an automated toggle in the settings — Autofill Cut to Cut (2.6.9) — which derives the value from the Full Span and insert dimensions.
- ❌ Full Span, Outer to Cut, and Hole to Hole are manual entry only. There is no automation behind them — whatever you type is what's recorded.
- ❌ None of the span types have error validation. Spectre Cloud will not flag a value that's out of range, transposed, or entered under the wrong span type — the entry is taken exactly as given.
Because there's no validation catching mistakes, the responsibility for a correct value sits entirely with the person entering it. Confirm the span type and re-check the numbers before saving.
🔢 Adjusting Span Increments
The values available when entering a span come from a drop-down, and the increment of that drop-down is adjustable in the settings (see 2.2.7). If the default steps are finer or coarser than you like to work in, change the increment so the drop-down offers the values that match your shop's habits.
📋 Entering Span — Step by Step
- Confirm the bowler's dominant hand is set correctly — this determines which box is the middle finger and which is the ring.
- Confirm the span type is set correctly (see 4.2.3) — check that the intended bubble (F, C, O, or H) is the one with the black background.
- Enter the middle finger span in its box.
- Enter the ring finger span in its box.
- Double-check both values against your fitting source before moving on.
Related Sections
- 4.1.2 — Span types explained in detail: Full Span, Cut to Cut, Outer to Cut, Hole to Hole
- 2.2.7 — Adjusting span measurement increments
- 4.2.3 — Selecting span type (F, C, O, H)
- 4.2.4 — Identifying grip type from a measurement sheet
- 2.6.9 — Autofill Cut to Cut: the one automated span toggle
- 4.3.3 — Entering pitch values
Tip: Glance at the bubble row before you save. A black bubble tells you which span you're looking at, and the grey ones tell you which other spans are already on file — an easy way to confirm nothing you meant to enter was left white and blank.
4.3.3 Inputing Vertical and Lateral pitch for fingers
4.3.3 measurement
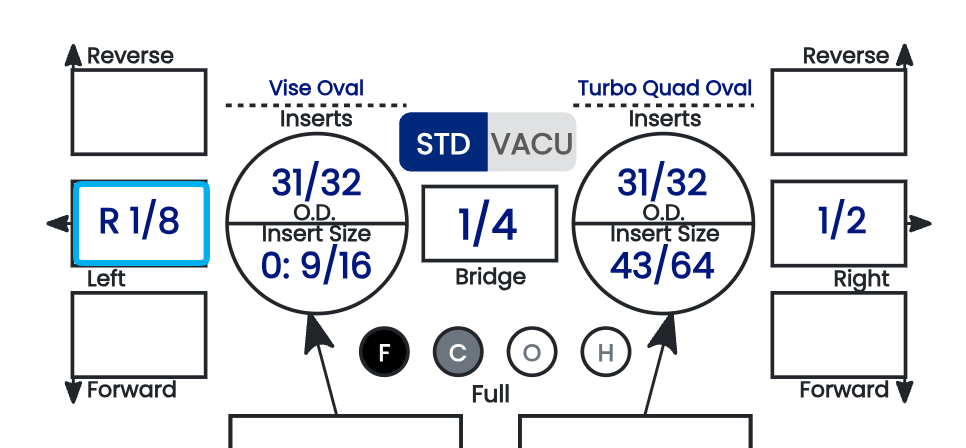
Finger pitch is entered directly into the pitch tiles surrounding each finger hole on the spec sheet. There's no direction to "select" — the tile you put the value in is the direction. This page covers how to read and enter those tiles for the middle and ring fingers.
🛠️ How the Pitch Tiles Work
Each finger hole is framed by pitch tiles, and the tile's position on the sheet determines the direction of the pitch:
- ✅ Forward — always points toward the middle of the sheet. Enter your forward pitch in the forward tile.
- ✅ Reverse — always points toward the outer side of the sheet. Enter your reverse pitch in the reverse tile.
- ✅ Lateral — the Left and Right tiles, self-explanatory by position.
You don't set a direction from a dropdown — you enter the value in the tile that corresponds to the direction you want. Forward/reverse and lateral are separate tiles, so a finger can carry both at once.
Note: To apply a pitch against a tile's default direction — for example, Right pitch on the left finger — scroll to the absolute bottom of that tile's drop-down. There you'll find values listed as Rx, where x is the desired pitch. These cross-direction entries live at the very end of the list, below the standard values.
Note: On fingertip fits, it is quite rare to see forward pitches on the fingers — most fingertip finger pitch is zero or reverse. Treat a forward finger pitch on a fingertip sheet as something worth double-checking against your source.
⚙️ Finger Pitch Is Fully Manual
There is no automation for finger pitch. Every finger pitch value — forward, reverse, and lateral, on both fingers — is manual data entry. Spectre Cloud records exactly what you type, with no auto-suggestion and no error validation behind these fields, so accuracy is entirely on the person entering it.
📋 Entering Finger Pitch — Step by Step
- Locate the pitch tiles around the middle finger and ring finger holes.
- For each finger, enter the forward or reverse value in the correct tile — forward points toward the middle of the sheet, reverse toward the outer side.
- Enter the lateral value in the Left or Right tile as needed.
- Repeat for both fingers.
- Review all the finger pitch entries before moving on to thumb pitch.
- For a cross-direction pitch (e.g. Right on the left finger), use the
Rxvalues at the bottom of the drop-down.

Related Sections
- 4.3.2 — Entering span measurements
- 4.3.4 — Inputting thumb pitch
- 4.1.4 — Pitch terminology: Forward, Reverse, Lateral, Zero
- 4.2.4 — Identifying grip type from a measurement sheet
- 4.5 — IBPSIA auto-suggestions
Tip: Because forward points to the middle of the sheet and reverse to the outer side, the sheet's own layout tells you the direction — you don't have to remember a sign convention. Enter each value in the tile that matches the direction you measured, and read the finger pitches back before saving, since nothing here is validated for you.
4.3.4 CLT (Corrected lateral tilt) angle and its effect on lateral pitch
CLT (Corrected lateral tilt) angle and its effect on lateral pitch
When a bowler places their hand on a ball during a fitting, the natural resting angle of the fingers is rarely perfectly vertical. Corrected Lateral Tilt (CLT) is a measurement — taken in degrees — that captures how far the bowler's fingers deviate from vertical when seated in the grip. Spectre Cloud uses this value to automatically apply a correction to the lateral pitch, ensuring that what gets drilled matches the bowler's actual hand angle rather than an idealized flat-hand measurement.
CLT is entered by the operator as a direct measurement taken during the fitting process. Spectre Cloud handles the correction calculation internally — you do not need to do the math yourself.
📐 What CLT Measures
When a bowler grips a ball, gravity, hand anatomy, and finger flexibility all cause the fingers to tilt slightly to one side. A lateral pitch value entered without accounting for this tilt may feel correct on paper but produce a grip that pulls or torques the fingers during the release.
CLT quantifies this tilt by measuring the angle — in degrees — between the bowler's finger axis and true vertical, taken while the bowler's hand is actually in the ball during the fitting.
- ✅ A CLT of
0°means the bowler's fingers sit perfectly vertical — no correction is needed. - ✅ A positive CLT value means the fingers tilt in one direction; a negative value means they tilt the other way. Verify with Spectre team: confirm the sign convention — which direction is positive and which is negative, and how this maps to toward-thumb vs. away-from-thumb tilt.
- ✅ Most bowlers will show a small but measurable CLT — a reading of
0°is the exception rather than the rule.
🛠️ How to Measure CLT During a Fitting
- Have the bowler place their hand in the ball in their natural grip position — fingers and thumb seated, hand relaxed, not forced.
- Observe the angle of the middle and ring fingers relative to vertical. Use a protractor, fitting gauge, or tilt measurement tool to capture the angle.
- Record the measurement in degrees. Note the direction of tilt.
- Enter the value into the CLT field in the Spectre Cloud spec sheet.
Verify with Spectre team: confirm the recommended measurement tool or technique for taking the CLT reading — whether a specific gauge, a phone-based level app, or a visual estimation method is standard practice, and whether middle and ring finger CLT are measured and entered separately or as a single shared value.
⚙️ How CLT Affects Lateral Pitch
Once a CLT value is entered, Spectre Cloud applies a correction formula to the raw lateral pitch value. The corrected lateral pitch — not the raw value — is what is used for the actual drilling.
- ✅ The correction is applied automatically — you enter the raw lateral pitch and the CLT measurement independently, and Spectre Cloud computes the adjusted drilling value.
- ✅ The greater the CLT angle, the more the effective lateral pitch deviates from the raw entered value.
- ✅ For bowlers with a CLT close to
0°, the correction is negligible — the drilled result will be very close to the raw lateral pitch entry. - ❌ Do not manually pre-adjust your lateral pitch entry to try to compensate for CLT yourself — entering both a manually adjusted pitch and a CLT value will result in double correction and an inaccurate drilling.
Verify with Spectre team: confirm and document the exact formula Spectre Cloud uses to derive corrected lateral pitch from the raw lateral pitch and CLT values, for operators who want to understand the underlying calculation.
📋 CLT in Practice — What to Expect
| CLT reading | What it indicates | Effect on lateral pitch |
|---|---|---|
0° |
Fingers sit perfectly vertical in grip | No correction applied — drilled lateral pitch equals entered value |
Small angle (e.g. 2°–5°) |
Slight natural tilt — very common | Minor correction; noticeable on precise fittings |
Moderate angle (e.g. 6°–10°) |
Pronounced tilt — often seen in bowlers with larger hands or strong release habits | Meaningful correction; skipping CLT entry would produce a noticeably off lateral pitch |
Large angle (>10°) |
Significant tilt — worth double-checking the measurement before proceeding | Substantial correction; verify the reading is genuine and not a measurement error |
Verify with Spectre team: confirm the realistic expected range of CLT values seen in practice, and whether Spectre Cloud flags or warns on unusually large CLT entries.
✨ Tips for Accurate CLT Entry
- ✅ Always measure CLT with the bowler's hand in a relaxed, natural grip — a forced or exaggerated position will produce a CLT value that does not reflect real drilling conditions.
- ✅ If a bowler reports that a previously drilled ball pulls their fingers sideways during the release, check whether CLT was measured and entered on that spec sheet. A missing or incorrect CLT entry is a common cause of lateral discomfort.
- ✅ For returning bowlers with a known CLT, clone their existing spec sheet — the CLT value carries over with all other measurements, saving time and ensuring consistency across balls.
- ❌ Do not skip CLT for bowlers who seem to have a "normal" grip. A small but consistent tilt left uncorrected compounds across multiple balls and can contribute to long-term finger strain.
- ❌ Do not enter CLT in a lateral pitch field by mistake — they are separate inputs and serve different purposes in the spec sheet.
Related Sections
- 4.3.3 — Inputting vertical and lateral pitch for fingers
- 4.3.5 — Inputting thumb pitch
- 4.3.2 — Entering span measurements (Full Span and Cut to Cut)
- 4.5 — IBPSIA auto-suggestions
- 4.2.5 — Cloning a spec sheet to preserve old measurements
Tip: CLT is one of the measurements that separates a precise professional fitting from a basic one. Taking the extra minute to measure and record it — especially for competitive bowlers who care about consistency across their arsenal — is a tangible demonstration of the quality of service your shop provides.
```
4.3.5 How to input a finger oval measurement (no inserts)
How to input a finger oval measurement (no inserts)
For bowlers who do not use finger inserts, the oval measurement captures the natural shape of each finger hole needed to achieve a comfortable, secure fit. Because fingers are not perfectly round in cross-section, drilling a round hole to a round measurement often produces a grip that feels loose or allows unwanted rotation. The oval measurement corrects for this by recording the finger's true cross-sectional dimensions — its width and depth — so the hole can be drilled to match.
This page covers how to enter oval measurements directly in the spec sheet. For the full oval calculation workflow, including how to derive oval dimensions from hand measurements, see Book 05 — Oval Calculator.
📐 What an Oval Measurement Consists Of
An oval measurement for a finger hole has two components:
- ✅ Width — the measurement across the finger in the lateral direction (side to side, across the knuckle).
- ✅ Depth — the measurement through the finger in the vertical direction (front to back, from the pad to the back of the finger).
Together, width and depth define the elliptical shape of the hole. When width and depth are equal, the hole is effectively round. When they differ, the hole is a true oval — wider than it is deep, or deeper than it is wide, depending on the bowler's finger geometry.
Note: Oval measurements are recorded separately for the middle finger and the ring finger. Do not assume both fingers share the same oval — most bowlers have measurable differences between the two. Verify with Spectre team: confirm whether Spectre Cloud also records an oval for the thumb on this same form section, or whether thumb oval is handled separately.
🛠️ How to Enter Oval Measurements in Spectre Cloud
- In the spec sheet, locate the Oval section for the finger measurements. This is separate from the span and pitch fields.
- Ensure the spec sheet span type is set to
O(Oval) if oval measurements are being used as the primary span reference, or confirm with the Spectre team whether oval dimensions can be entered alongside an F or C span type. Verify with Spectre team: clarify whether oval entry is only available when span type O is selected, or whether it is always accessible regardless of span type. - Enter the width measurement for the middle finger.
- Enter the depth measurement for the middle finger.
- Repeat for the ring finger — enter its width and depth independently.
- Review all four values before saving.
Verify with Spectre team: confirm the exact field labels used in the UI for oval width and depth, and whether measurements are entered in inches (fractions or decimal) or millimeters.
📏 How to Take Oval Measurements from the Bowler's Hand
Oval measurements are taken directly from the bowler's finger, typically using a dedicated oval gauge or digital calipers. For no-insert fittings, the goal is to measure the finger at the point of insertion — the first knuckle for fingertip grips, the second knuckle for conventional grips.
- Ask the bowler to extend their finger naturally — relaxed, not tensed or fully straightened.
- Position the measuring tool at the appropriate knuckle joint.
- Measure the width — across the finger, parallel to the knuckle crease.
- Measure the depth — through the finger, perpendicular to the knuckle crease.
- Record both values for middle and ring fingers before moving to the ball.
Tip: Take oval measurements with the bowler's hand warm and relaxed. Cold or tense hands can cause fingers to appear narrower than their natural resting size, resulting in a hole that fits correctly in the shop but feels tight after a few frames once circulation increases.
📊 Oval vs. Round — When It Matters
| Situation | Oval recommended? | Notes |
|---|---|---|
Width and depth differ by 1/32" or more |
✅ Yes | Even a small oval difference produces a meaningfully better fit for most bowlers. |
Width and depth are equal or within 1/64" |
Round hole is acceptable | A round hole will fit well — oval entry is still good practice for record accuracy. |
| Bowler reports finger rotation or looseness in a previously round-drilled ball | ✅ Yes — measure and record | Switching to an oval hole is often the solution for a grip that feels sloppy without being oversized. |
| Youth bowler with rapidly changing hand size | Situational | Record oval for accuracy, but note in the spec sheet that re-measurement is expected at the next visit. |
✨ Tips for No-Insert Oval Entry
- ✅ Record the oval even when width and depth are nearly equal — having both values on file gives you a complete history if the bowler's fingers change over time.
- ✅ If you are cloning a spec sheet for a new ball, verify the oval measurements are still current before drilling — finger dimensions can shift with age, weight change, or injury.
- ✅ Label your measurement notes clearly when taking readings in a busy shop — it is easy to transpose middle and ring values when moving quickly between a fitting and the keyboard.
- ❌ Do not use insert size as a proxy for oval on a no-insert fitting — insert sizes account for the insert wall thickness and are not equivalent to bare finger oval dimensions.
- ❌ Do not estimate oval by eye. Even experienced fitters can misjudge the depth dimension, which is harder to eyeball than width. Use a gauge.
Related Sections
- 4.3.3 — Inputting vertical and lateral pitch for fingers
- 4.3.4 — CLT (Corrected Lateral Tilt) angle and its effect on lateral pitch
- 4.3.6 — Inputting finger insert measurements
- Book 05 — Oval Calculator (full oval derivation workflow)
- 4.2.3 — Selecting span type (F, C, O)
Tip: The Oval Calculator in Book 05 can derive recommended oval dimensions from a set of hand measurements if you do not have a dedicated oval gauge available. Use it as a starting point, then verify with a physical measurement where possible.
```
4.3.6 Ring Finger 5/16" rule — auto and manual calculation
Ring Finger 5/16" rule — auto and manual calculation
When setting up a spec sheet, the ring finger span is rarely measured independently from scratch. Instead, it is derived from the middle finger span using the 5/16" Ring Finger Rule — a fitting convention that accounts for the natural anatomical difference between the two fingers. Spectre Cloud can apply this calculation automatically, or you can enter the ring finger span manually if you prefer to measure directly.
🎳 The Anatomy Behind the Rule
With a bowler's hand laid flat on a bowling ball, the second joint lines of the middle and ring fingers — measured from the base of each finger — do not line up evenly. The ring finger's second joint sits closer to the palm than the middle finger's. This difference, referred to here as d, is the key variable in the calculation.
If the two joint lines were perfectly aligned (d = 0"), the ring finger span would need to be 5/16" longer than the middle finger span to produce an equivalent fit. Because d is almost never zero, the actual ring finger span adjusts up or down from that baseline depending on each bowler's individual anatomy.
📐 The Formula
The ring finger span is calculated as follows:
Ring Finger Span = Middle Finger Span + (5/16" − d)
Where d is the observed difference between the second joint lines of the middle and ring fingers, measured while the bowler's hand is laid flat on the ball.
Working through the formula
| Scenario | d value | Adjustment (5/16" − d) | Effect on ring span |
|---|---|---|---|
| Ring joint sits exactly 5/16" closer to palm than middle joint | 5/16" |
0" |
Ring span equals middle span — no adjustment needed |
| Ring joint sits closer to palm than average (large d) | > 5/16" |
Negative | Ring span is shorter than middle span |
| Ring joint sits further from palm than average (small d) | < 5/16" |
Positive | Ring span is longer than middle span |
| Ring and middle joint lines are level (d = 0) | 0" |
+5/16" |
Ring span is 5/16" longer than middle span |
Note: It is entirely normal for the ring finger span to come out longer than the middle finger span for bowlers whose joint lines are close together. Do not assume the ring span must always be shorter — the formula determines the correct value, not anatomical intuition.
🛠️ How to Measure d
- Ask the bowler to place their hand flat and relaxed on the ball, fingers together in their natural resting position.
- Observe the second joint line (the joint closest to the base of the finger, not the fingertip joint) of the middle finger and the ring finger.
- Measure the distance between the two joint lines along the finger axis — from the middle finger's joint line to the ring finger's joint line.
- Record this as d. Note which finger's joint line sits closer to the palm — this determines the sign of the adjustment in the formula.
Tip: A small span ruler or fitting gauge works well for measuring d. The measurement does not need to be taken to finer than 1/32" precision for most fittings — but consistency matters more than extreme precision. Use the same technique each time.
⚙️ Auto Calculation in Spectre Cloud
When using the auto calculation mode for the ring finger span, Spectre Cloud applies the 5/16" rule on your behalf:
- Enter the middle finger span as measured.
- Enter the d measurement in the designated field.
- Spectre Cloud calculates and displays the ring finger span automatically using the formula:
Ring Span = Middle Span + (5/16" − d). - Review the calculated ring span before saving — confirm it looks anatomically reasonable for the bowler in front of you.
Verify with Spectre team: confirm the exact field label used for the d measurement input in the Spectre Cloud UI, and whether the calculated ring span is displayed as a read-only result or as an editable field the operator can still override.
✏️ Manual Entry Override
If you prefer to measure the ring finger span directly — or if a bowler has an unusual hand geometry where the calculated value does not feel right — you can enter the ring finger span manually, bypassing the auto calculation entirely.
- ✅ Manual entry is appropriate when you have taken independent measurements of both fingers and want to record exactly what you measured.
- ✅ Manual entry is also useful when transferring records from a legacy fitting sheet that already contains explicit ring span values taken by another fitter.
- ✅ If the auto-calculated value and your direct measurement disagree by more than
1/16", remeasure both the middle span and d before deciding which to use. - ❌ Do not use manual entry simply to avoid measuring d — skipping d and guessing the ring span is the most common source of ring finger fit complaints.
Verify with Spectre team: confirm how the operator switches between auto and manual mode for ring span entry — whether it is a toggle, a checkbox, or simply leaving the d field blank to enable direct ring span input.
✨ Tips for Consistent Results
- ✅ Measure d every time, even for returning bowlers — finger joint alignment can shift subtly with age, weight change, or injury, and the d value is quick to check.
- ✅ When cloning a spec sheet, the d value carries over with the other measurements. Verify it is still current before using the auto calculation for the new ball.
- ✅ Document the d measurement in the Notes field as a backup — if a question arises later about the ring span derivation, having d on record makes it easy to reconstruct the calculation.
- ❌ Do not conflate d with the ring finger span itself — d is an input to the formula, not a span measurement.
Related Sections
- 4.3.2 — Entering span measurements (Full Span and Cut to Cut)
- 4.3.3 — Inputting vertical and lateral pitch for fingers
- 4.3.5 — How to input a finger oval measurement (no inserts)
- 4.5 — IBPSIA auto-suggestions
- Book 05 — Oval Calculator
Tip: The 5/16" rule produces a starting span — not an immutable prescription. If a bowler tries the ball and reports that the ring finger feels consistently tighter or looser than the middle finger despite a correct-looking spec sheet, the d measurement is the first thing to recheck. A remeasure in-shop takes under a minute and often reveals a small error that explains the fit complaint.
```
4.3.7 Insert type and size: STD vs. VACU, selecting drill bit OD
Insert type and size: STD vs. VACU, selecting drill bit OD
4.3.7 measurement
Once span, pitch, and oval measurements are recorded, the spec sheet needs to know what is going into the finger holes — bare finger, a standard insert, or a VACU-style insert — and what drill bit outer diameter (OD) to use. These entries directly determine the physical size of the holes drilled in the ball, so accuracy here is just as important as the span and pitch values that position them.
🔌 Insert Types: STD vs. VACU
No Insert (Bare Finger)
If the bowler does not use finger inserts, select the bare finger or no-insert option. In this case the hole is drilled to the bowler's oval or round finger measurement directly, with no allowance for insert wall thickness. See 4.3.5 — How to input a finger oval measurement (no inserts) for how oval dimensions are entered for bare finger fittings.
STD (Standard Insert)
A standard insert is pressed into a hole drilled to a tight tolerance — the hole diameter is sized so the insert fits snugly and does not move once seated. The insert's inner diameter then becomes the effective finger hole the bowler uses.
- ✅ The most common insert type across all grip styles and skill levels.
- ✅ Available in a wide range of inner diameters and materials from multiple manufacturers.
- ✅ Once pressed in, a standard insert sits flush and stays fixed under normal use.
- ❌ If the pilot hole is drilled slightly oversized, a standard insert can work loose over time — precision on the OD entry matters.
VACU (Vacuum-Style Insert)
A VACU-style insert uses a different fit philosophy. The pilot hole is drilled slightly larger than it would be for a standard insert of the same finger size, allowing a slightly smaller insert to be used. When the bowler inserts their finger, the insert expands to fill the gap and conforms to the finger's shape under pressure.
- ✅ The expansion fit produces a more custom, form-fitting feel for many bowlers — particularly those who find standard inserts uncomfortable at the first knuckle.
- ✅ Useful for bowlers with irregular finger cross-sections where a rigid standard insert does not seat comfortably.
- ✅ The slightly larger pilot hole means there is more tolerance in the drilling — a small OD variance has less impact on the final fit than with a standard insert.
- ❌ Not suitable for all insert materials — confirm the insert manufacturer supports VACU-style installation before selecting this option.
- ❌ Because the insert is smaller than it would be for a standard fit, selecting the wrong insert size for a VACU installation will produce a hole that is either too loose or unable to expand correctly.
| STD | VACU | |
|---|---|---|
| Pilot hole vs. insert | Tight fit — hole sized to grip the insert | Loose fit — hole slightly larger than insert OD |
| Insert behaviour | Fixed once pressed in | Expands to conform under finger pressure |
| Best for | Most bowlers; standard fitting workflow | Bowlers wanting a form-fitting feel or irregular finger geometry |
| OD entry in Spectre Cloud | OD of the insert — hole drilled to match | OD adjusted upward to allow expansion gap |
Verify with Spectre team: confirm whether Spectre Cloud automatically adjusts the pilot hole OD calculation when VACU is selected, or whether the operator enters the adjusted OD manually. Also confirm the standard expansion gap allowance used for VACU calculations.
🛠️ Selecting Drill Bit OD
The drill bit outer diameter (OD) is the size of the bit used to drill the finger hole — or the pilot hole for an insert. The OD entry in Spectre Cloud determines the final hole size and must account for whether the bowler is using a bare finger, a standard insert, or a VACU insert.
For bare finger (no insert)
The OD is set to match the bowler's finger measurement directly — either their round hole size or the larger dimension of their oval. The hole is the finger hole; there is no insert wall to account for.
For standard inserts
The OD is set to match the outer diameter of the insert being used. The insert manufacturer's sizing chart determines which insert OD corresponds to the bowler's inner finger size. The hole is drilled to grip the insert; the insert's inner diameter is the effective fit dimension.
For VACU inserts
The OD is set slightly larger than the insert's outer diameter to provide the expansion gap. The exact allowance depends on the insert material and manufacturer recommendation.
Verify with Spectre team: confirm whether Spectre Cloud provides a drill bit OD lookup, dropdown of common sizes, or a free numeric entry field — and whether it cross-references insert manufacturer sizing data to suggest an OD automatically when an insert brand and size are selected.
📋 Entering Insert Type and OD in Spectre Cloud
- In the spec sheet, locate the Insert section for the middle and ring finger fields.
- Select the insert type for each finger:
None,STD, orVACU. Middle and ring can differ — enter each independently. - Enter or select the drill bit OD for each finger. This should reflect the insert's outer diameter (STD), the adjusted pilot hole size (VACU), or the bowler's direct finger measurement (no insert).
- Double-check that the OD entry is consistent with the insert type selected — a VACU OD entered against an STD selection, or vice versa, will produce a hole sized incorrectly for the intended insert.
Note: Middle and ring finger insert types and OD values are entered independently. It is not uncommon for a bowler to use a larger insert on the middle finger than the ring finger, or to use VACU on one finger and STD on the other. Record what the bowler actually uses — do not default both fingers to the same values without checking.
✨ Tips for Accurate Insert and OD Entry
- ✅ When transferring records from a legacy fitting sheet, check whether the recorded hole size is the insert OD or the inner finger size — these are different values and the distinction is not always clear on older cards.
- ✅ Keep a reference card at the drill press with common insert brand OD sizes. Different manufacturers use slightly different OD standards for nominally equivalent insert sizes.
- ✅ If a returning bowler is switching insert brands, do not copy the OD from their previous spec sheet without checking the new brand's sizing — a
1/32"OD difference between brands is common and will affect the fit. - ✅ For VACU inserts, note the insert brand and model in the Notes field — the expansion gap allowance may differ between products and having the reference on record avoids ambiguity on future visits.
- ❌ Do not enter the insert's inner diameter as the OD — the inner diameter is the bowler's finger size; the OD is the size of the hole drilled in the ball.
Related Sections
- 4.3.5 — How to input a finger oval measurement (no inserts)
- 4.3.6 — Ring finger 5/16" rule — auto and manual calculation
- 4.3.8 — Inputting thumb measurements
- 4.5 — IBPSIA auto-suggestions
- Book 05 — Oval Calculator
Tip: When drilling for a bowler for the first time, ask which insert brand they have been using — not just the size. Bringing their preferred insert to the fitting and measuring its OD directly with calipers is the most reliable way to ensure the pilot hole is drilled to exactly the right size, regardless of what the manufacturer's chart says.
```