4.1 — Terminology & Concepts
- 4.1.1 Acronyms Used in Spectre Cloud
- 4.1.2 Span types explained: F, C, O, H
- 4.1.3 Grip type definitions: Finger Tip vs. Conventional
- 4.1.4 Pitch terminology
- 4.1.5 Bridge: standard bridge sizes and their purpose
- 4.1.6 Insert OD: drill bit sizing for STD and VACU grips
4.1.1 Acronyms Used in Spectre Cloud
📐 Acronyms Used in Spectre Cloud
Beyond the three primary span type acronyms, Spectre Cloud uses a number of additional shorthand terms throughout its interface. The following reference covers the most commonly encountered.
| Acronym | Full Name | Where Used | What It Refers To |
|---|---|---|---|
| PAP | Positive Axis Point | Bowler profile; layout fields | The point on the ball's surface at the end of the bowler's initial axis of rotation at release — the geometric anchor for all structured layout systems |
| VAL | Vertical Axis Line | Layout fields (VLS, Dual Angle) | The vertical line running through the bowler's PAP — used as a reference for pin and mass bias placement in VLS and Dual Angle layouts |
| MB | Mass Bias | Layout fields | The heaviest point of the ball's core — its placement relative to the grip center affects the ball's flare potential and backend motion |
| VLS | Versatile Layout System | Layout type selector; spec sheets | Storm Bowling's chart-based layout system for traditional thumb bowlers — see 2.5.1.1 |
| 2LS | Two-Layout System | Layout type selector; spec sheets | Storm Bowling's layout system designed for two-handed bowlers — see 2.5.1.2 |
| PAL | Performance Axis Layout | Layout type selector; spec sheets | Three-input layout system (drilling angle, pin distance, VAL angle) — referred to as Dual Angle in Spectre Cloud's UI — see 2.5.1.3 |
| CLT | Center Line Transformation | Bowler profile; Auto-CLT setting | A fitting measurement that defines how a bowler's finger centerline relates to the ball's grip center — used to derive lateral finger pitch — see 2.6.3 |
| OD | Outside Diameter | Insert fields; spec sheets | The outer diameter of a finger insert — the drill bit must match this dimension for the insert to seat correctly — see 2.6.6 |
| RG | Radius of Gyration | Arsenal Plus; ball detail fields | A measure of how the ball's mass is distributed relative to its axis — lower RG = earlier roll, higher RG = longer skid |
| diff / differential | Differential of RG | Arsenal Plus; ball detail fields | The difference between a ball's highest and lowest RG values — higher differential = more flare potential and stronger backend reaction |
| V | Vertical | Oval calculator; milling settings | The vertical axis of oval cut movement — see 2.3.5 and 2.3.6 |
| H | Horizontal | Oval calculator; milling settings | The horizontal axis of oval cut movement — see 2.3.5 and 2.3.6 |
| RPM | Revolutions Per Minute | Bowler profile (rev rate field) | The unit used to record a bowler's rev rate — how many times the ball rotates on its axis per minute during lane travel |
| RH / LH | Right-Handed / Left-Handed | Bowler profile; pitch settings; Auto-Invert | Shorthand for the bowler's dominant hand — affects pitch sign conventions, layout orientation, and Auto-Invert behaviour |
| F | Full Span | Spec Sheet Span | Measured span with all inserts included. Also known as the complete span |
| C | Cut-to-Cut | Spec Sheet Span | Full Span minus the thickness of the inserts. This is used primarely when drilling the thumb first and then having to find the measurement for the 31/32 hole for the inserts. Cut-to-Cut on the PBA tour (biggest hole to biggest hole) is known as H in Spectre. |
| O | Outer-to-Cut | Spec Sheet Span | Used with an interchangeable thumb insert. Typically when drilling a new ball for a bowler using an interchangeable, they won't need you to drill another thumb. This measurement makes it easy when drilling a new ball for this bowler, as they can simply show up to your shop, the holes are in the right spot, and they simply have to lock in their male inner sleeve. |
| H | Hole-to-Hole | Spec Sheet Span | Known as Cut-to-Cut on the PBA services truck, this is the biggest hole to the biggest hole. |
Related Sections
- 4.1.2 — Spec sheet overview: sections and layout (if applicable)
- 2.3.2 — Span type configuration: Full Span, Edge, Center
- 2.5.1 — Default layout type: VLS, 2LS, Dual Angle, None
- 2.6.3 — Auto-CLT: lateral pitch of fingers based on CLT chart
- 2.6.6 — Autofill Insert OD: auto drill bit size per insert type and grip
- 5.x — Oval Calculator: overview
- 9.x — Tips and Troubleshooting: glossary of bowling fitting terms
Tip: Print this page and keep a copy at the drill press during onboarding of new staff. Acronym familiarity is one of the first barriers a new team member faces when reading a spec sheet under time pressure — having a quick reference to hand removes that barrier in the first few sessions and builds confidence faster than repeated explanation alone.
4.1.2 Span types explained: F, C, O, H
4.1.2 concept
The span type setting on a Spectre Cloud spec sheet defines the measurement convention used to record the distance between the finger holes and the thumb hole. Choosing the right span type — and understanding what each one measures — ensures spec sheet values are interpreted and drilled correctly every time. This page explains how each of the four span types works, how they differ, and how to choose between them for a given bowler or workflow.
Note: This page explains the span types conceptually. For the acronyms used to represent them on spec sheets (F, C, O, H), see 4.1.1. For oval hole measurement — a separate concept from span type — see the Oval Calculator (Book 05).
📐 What Is a Span Measurement?
A span measurement records the distance between a bowler's finger holes and their thumb hole on a drilled bowling ball. It is the primary dimension that determines how far the thumb must reach — and how comfortable and consistent the grip feels through the swing and release. All four span types describe this same fundamental distance, but they differ in where the measurement begins and ends and whether the inserts are included.
- ✅ Span is one of the most important measurements on a spec sheet — an incorrect span produces a grip that is either too stretched or too cramped, directly affecting ball control and release consistency.
- ✅ The same bowler measured in two different span types will produce different numeric values — the numbers are not interchangeable without conversion.
- ✅ Spectre Cloud stores the span type alongside the measurement value on every spec sheet, so a value is never interpreted without its corresponding convention.
📐 Full Span (F)
Full Span is the complete measured span, everything included — inserts and all. It is taken with the bowler's grips/inserts in place, capturing the full distance the thumb must reach from the seated finger position to the thumb hole. It is also referred to as the complete span.
When to Use Full Span
- ✅ The most widely used convention and a sensible default for most shops — it describes the bowler's actual reach with their grips installed.
- ✅ Intuitive to explain to a bowler, since it reflects the grip exactly as they feel it.
- ✅ Required input for the Cut to Cut auto-suggestion — Full Span must be entered on both fingers for that calculation to run (see below).
📐 Cut to Cut (C)
Cut to Cut is the Full Span minus the thickness of the insert — the span measured to the actual drilled cut of the finger hole, before the inserts are accounted for. It is most useful when you drill the ball thumb-first: rather than mentally subtracting the grip thickness to find where the finger holes go, you work directly from the Cut to Cut value.
When to Use Cut to Cut
- ✅ Ideal for a thumb-first drilling workflow — the number already accounts for the insert thickness, so there's no mental math at the press.
- ✅ References the physical cut on the ball, making it reproducible across fitters.
- ✅ Supported by a built-in auto-suggestion in Spectre Cloud (see Autofill Cut to Cut, 2.6.9).
- ❌ Less intuitive for the bowler, since it describes the drilled hole rather than the felt grip.
Autofill requirements: The Cut to Cut auto-suggestion doesn't measure anything on its own — it derives the value. For it to run, the spec sheet needs a Full Span measurement on both fingers, plus the insert type and insert size for each. From the insert type and size, Spectre Cloud calculates the insert wall thickness and subtracts it from the Full Span to produce the Cut to Cut value. If any of those inputs is missing, the autofill can't calculate.
Watch the terminology: Spectre's Cut to Cut (C) is not the same thing the PBA services truck calls "Cut-to-Cut." The PBA truck's "Cut-to-Cut" (biggest hole to biggest hole) is Spectre's Hole to Hole (H) — see below.
📐 Outer to Cut (O)
Outer to Cut is used for interchangeable thumbs. It is measured from the inside of the female portion of the interchangeable to the cut of the finger's outer-diameter hole. It has nothing to do with oval holes — the "O" stands for Outer to Cut, not Oval.
Its purpose is repeat-drilling convenience. When a bowler with an interchangeable thumb comes in for a new ball, you don't need to drill a fresh thumb hole for them. Using the Outer to Cut measurement, the holes land in exactly the right spot, and the bowler simply locks in their own male inner sleeve.
When to Use Outer to Cut
- ✅ Any bowler who uses an interchangeable thumb system.
- ✅ Repeat customers — they can show up, and the ball is ready for their existing sleeve without re-fitting the thumb.
- ✅ Keeps a consistent reference across every ball in that bowler's arsenal.
- ❌ Only relevant to interchangeable setups — not applicable to bowlers drilling a fixed thumb hole.
📐 Hole to Hole (H)
Hole to Hole is measured biggest hole to biggest hole — for example, from a 1 1/2" thumb hole to a 31/32" finger hole. It is a purely physical, edge-to-edge measurement of the largest openings on the ball.
This is the measurement the PBA services truck refers to as "Cut-to-Cut." Because Spectre already uses "Cut to Cut" for a different measurement (C, above), that PBA convention lives under the name Hole to Hole in Spectre to avoid confusion.
When to Use Hole to Hole
- ✅ Quick physical reference straight off the ball, independent of inserts or grips.
- ✅ Familiar to anyone coming from a PBA-truck background, where this is called "Cut-to-Cut."
- ✅ Useful for verifying a drilled ball against spec, since it references fixed points on the ball.
- ❌ Does not describe the bowler's felt reach — it's a hole-geometry measurement, not a grip measurement.
📊 Span Types Compared
| Full Span (F) | Cut to Cut (C) | Outer to Cut (O) | Hole to Hole (H) | |
|---|---|---|---|---|
| What it measures | Complete span, inserts and all | Full Span minus insert thickness | Inside of the female interchangeable to the cut of the finger OD hole | Biggest hole to biggest hole (e.g., 1½" to 31/32") |
| Inserts included? | Yes — everything included | No — insert thickness removed | Interchangeable system (female/male sleeve) | N/A — hole edge to hole edge |
| Primary use | General fitting; the default/complete reference | Thumb-first drilling; deriving finger-hole position | Bowlers with interchangeable thumbs; repeat drilling | Quick physical reference; PBA-truck workflows |
| PBA truck term | — | Not the truck's "Cut-to-Cut" | — | This is the truck's "Cut-to-Cut" |
| Auto-suggestion | — | Yes — needs Full Span (both fingers) + insert type & size (2.6.9) | — | — |
🔄 Span Type and Spectre Cloud's Auto-Suggestions
Spectre Cloud's auto-suggestion features are aware of the span type selected on the current spec sheet and apply their calculations within that convention. The primary one tied to span type is Autofill Cut to Cut, which derives the Cut to Cut value from the Full Span rather than requiring you to measure it separately.
For Autofill Cut to Cut to run, the spec sheet must contain:
- A Full Span measurement on both fingers (middle and ring).
- The insert type for each finger.
- The insert size for each finger.
From the insert type and size, Spectre Cloud determines the insert wall thickness, then subtracts it from the Full Span to produce the Cut to Cut value. If any of these inputs is missing, the calculation can't complete.
- ✅ Auto-Calculate Ring Span (2.6.8) operates within the selected span type's convention.
- ⚠️ Verify with your Spectre team: confirm which (if any) auto-suggestions are active for Outer to Cut (O) and Hole to Hole (H), as these behaviours may differ from Full Span and Cut to Cut.
Related Sections
- 4.1.1 — Understanding acronyms: F, C, O, H and other Spectre Cloud shorthand
- 2.6.8 — Auto-Calculate Ring Span
- 2.6.9 — Autofill Cut to Cut: based on Full Span, insert type, and insert size
- 05 — Oval Calculator: oval hole shape (a separate concept from span type O)
- 9.x — Tips & Troubleshooting: converting between span types
Tip: If your shop is setting a default span type, Full Span is the lowest-friction choice — it's the complete measurement most fitters already work in, it aligns with published fitting charts, and it's the input the Cut to Cut autofill depends on. Reach for Cut to Cut when you drill thumb-first, Outer to Cut for bowlers on interchangeable thumbs, and Hole to Hole when you want the biggest-hole-to-biggest-hole reference the PBA truck calls "Cut-to-Cut." Remember: none of these is "Oval" — that's a hole shape, not a span type.
4.1.3 Grip type definitions: Finger Tip vs. Conventional
4.1.3 concept
A bowler's grip type defines how deeply their fingers are inserted into the ball — and it is one of the most consequential decisions in a pro shop fitting. Grip type determines the standard span, pitch, bridge, and insert values that apply to a bowler, and it is the first meaningful fitting choice for any new bowler purchasing their first personal ball. This page explains the two primary grip types — Fingertip and Conventional — how they differ physically and in terms of ball motion, and how the choice is reflected throughout Spectre Cloud.
Note: Spectre Cloud also supports a Semi-Fingertip grip type, which falls between Fingertip and Conventional in insertion depth. Semi-Fingertip is covered briefly at the end of this page. The primary focus here is on Fingertip and Conventional, which together account for the overwhelming majority of fittings in most pro shops.
🎳 Fingertip Grip
In a fingertip grip, the middle and ring fingers are inserted into the ball to the first knuckle only — the fingertip. This is a shallower insertion than conventional, leaving the bulk of the finger outside the ball and relying on the fingertip's contact with the hole edge (or insert) to hold and release the ball.
Physical Characteristics
- ✅ Fingers inserted to the first knuckle — approximately to the first crease of the finger from the tip.
- ✅ Produces a longer lever arm from the wrist to the finger contact point — this increases the torque available at the moment of release.
- ✅ The thumb exits the ball before the fingers, allowing the fingers to impart lift and rotation — the primary source of revolutions and hook for most competitive bowlers.
- ✅ Almost universally used with finger inserts — the shallower insertion depth means the fingertip bears significant load, and inserts cushion this contact point and provide a consistent grip surface.
Ball Motion Characteristics
- ✅ Higher rev rate potential than conventional — the longer lever arm allows more rotation to be imparted at release.
- ✅ Greater hook potential — more axis rotation and tilt are achievable with a fingertip grip.
- ✅ More sensitive to release technique — small changes in finger lift angle produce noticeable changes in ball path.
- ✅ Preferred by the majority of league and competitive bowlers for its performance potential.
Fitting Standards — Fingertip
- ✅ Standard bridge:
1/4"— the narrower bridge suits the shallower insertion depth and the extended finger position. - ✅ Inserts: strongly recommended — most fingertip bowlers use inserts on both middle and ring fingers.
- ✅ Span: longer than an equivalent conventional span for the same hand — the shallower insertion places the fingertip further from the thumb hole.
🎳 Conventional Grip
In a conventional grip, the middle and ring fingers are inserted into the ball to the second knuckle — past the first crease, with a deeper portion of the finger inside the hole.
Physical Characteristics
- ✅ Fingers inserted to the second knuckle — approximately to the second crease from the tip.
- ✅ Produces a shorter lever arm than fingertip — the deeper insertion places the contact point closer to the palm.
- ✅ The ball is held more securely in the hand — less reliance on finger strength to maintain the grip through the swing.
- ✅ Used without inserts — the deeper insertion provides sufficient grip surface from the ball hole itself. Holes will have alot of outer bevel to ensure the comfort of the bowler.
- ❌ Inserts are not suggested.
Ball Motion Characteristics
- ✅ Lower rev rate than fingertip — the shorter lever arm limits the rotation imparted at release.
- ✅ Straighter ball path — less hook potential makes conventional grip better suited to targeting-based play styles.
- ✅ More forgiving of release inconsistency — the deeper, more secure grip reduces the sensitivity to finger angle variations at release.
- ✅ Preferred by beginners, youth bowlers, senior bowlers, or anyone who has a hard time holding onto the ball with a finger-tip grip.
Fitting Standards — Conventional
- ✅ Standard bridge:
3/8"— the wider bridge accommodates the deeper insertion depth and the more upright finger position. - ❌ Inserts: not recommended.
- ✅ Span: shorter than an equivalent fingertip span for the same hand.
📊 Fingertip vs. Conventional — Side-by-Side
| Fingertip | Conventional | |
|---|---|---|
| Insertion depth | To first knuckle | To second knuckle |
| Lever arm | Longer — more torque at release | Shorter — more secure hold |
| Rev rate potential | Higher | Lower |
| Hook potential | Higher | Lower |
| Release sensitivity | Higher — technique-dependent | Lower — more forgiving |
| Standard bridge | 1/4" |
3/8" |
| Inserts | Strongly recommended | Not recommended |
| Typical bowler profile | League, competitive, performance-oriented | Beginner, youth, senior, recreational |
| Autofill Bridge in Spectre Cloud | 1/4" (2.6.5) |
3/8" (2.6.5) |
🔄 Grip Type in Spectre Cloud
Grip type is recorded on the bowler's profile (see 3.1.2) and is used throughout Spectre Cloud to drive autofill defaults and IBPSIA-standard suggestions. Selecting the correct grip type at profile creation ensures every subsequent spec sheet starts with the right baseline values.
- ✅ Autofill Bridge (2.6.5) — applies
1/4"for fingertip,3/8"for conventional. - ✅ Autofill Insert OD (2.6.6) — insert OD lookup is grip-sensitive; fingertip and conventional grips may use different insert seating approaches for the same insert model.
- ✅ Pitch Suggestion (2.6.2) — forward pitch norms differ between grip types; the suggestion engine applies grip-appropriate starting values.
- ✅ Span suggestions — IBPSIA span starting points differ by grip type; selecting the correct type ensures span autofill applies the correct baseline.
- ✅ Grip type can be updated on the bowler's profile at any time — see 3.2.2 for editing guidance.
Related Sections
- 4.1.2 — Span types explained: Full Span vs. Cut to Cut vs. Oval Span
- 4.1.1 — Understanding acronyms: F, C, O and other Spectre Cloud shorthand
- 3.1.2 — Required fields: name, hand, grip type
- 2.6.5 — Autofill Bridge: auto standard bridge (1/4" fingertip, 3/8" conventional)
- 2.6.6 — Autofill Insert OD: auto drill bit size per insert type and grip
- 2.6.2 — Pitch suggestion: auto forward pitch based on hand flexibility
- 4.1.4 — Creating a new spec sheet (if applicable)
4.1.4 Pitch terminology
4.1.4 concept
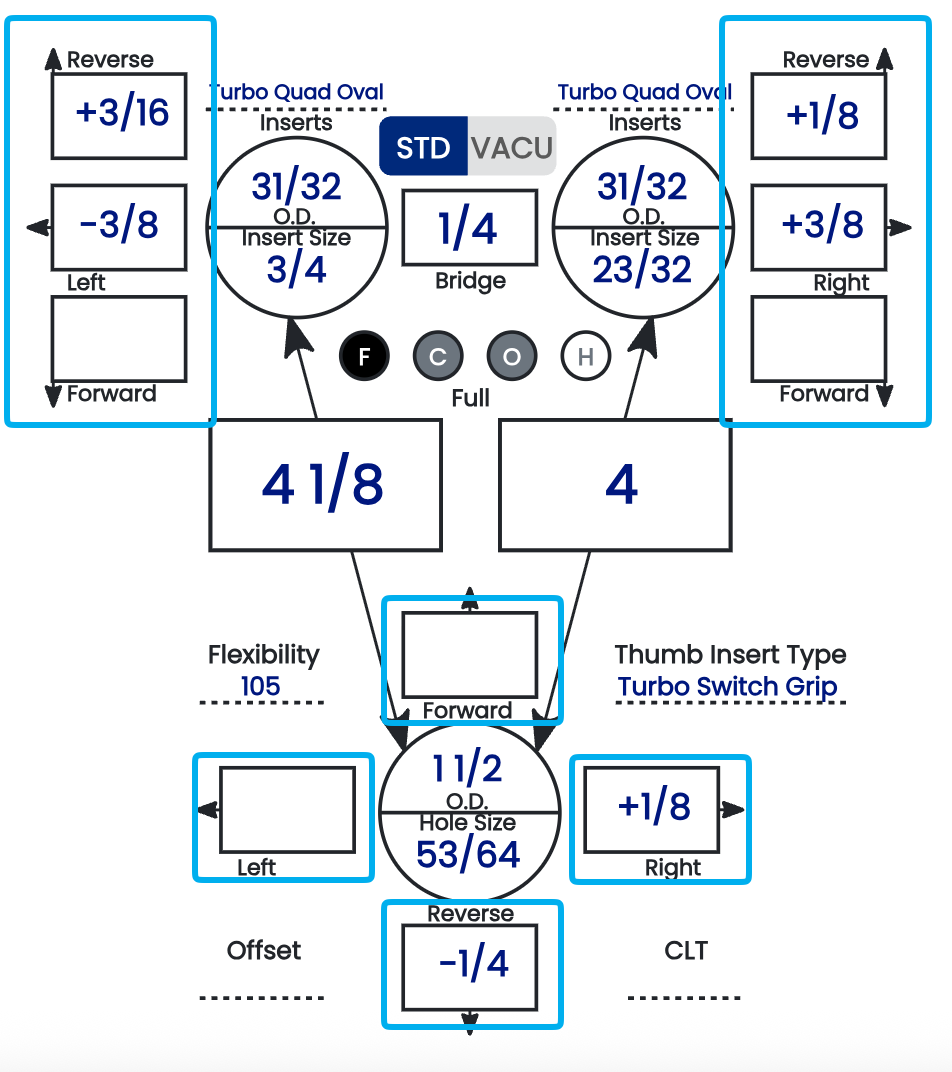
Pitch is the angle at which a finger or thumb hole is drilled relative to the ball's center. It affects grip comfort, how securely the ball is held through the swing, and how cleanly it releases. In Spectre Cloud, you set pitch for each hole using the pitch tiles on the spec sheet — the boxes framed by directional arrows around each hole. This page explains how those tiles work and defines the four pitch terms: Forward, Reverse, Lateral, and Zero.
Note: For the display and sign settings referenced here, see chapter 2.4. For the auto-suggestions that propose pitch values, see 2.6.2 and 2.6.3.
🛠️ Setting Pitch with the Pitch Tiles
On a Spectre Cloud spec sheet, each hole — thumb, middle finger, and ring finger — has its own pitch tile. Each tile is surrounded by arrows that represent the two pitch axes:
- ✅ Forward / Reverse — the arrows pointing toward and away from the ball's center. Forward tilts the hole toward the center of the ball; reverse tilts it toward the outside.
- ✅ Lateral — the sideways arrows, tilting the hole toward or away from the adjacent hole.
You enter the pitch amount in the tile in the chosen direction. Forward/reverse and lateral are independent, so a single hole can carry both at once (for example, a small forward pitch and a small lateral pitch together).
🔢 Fractions or Thousandths of an Inch
Pitch values in the tiles can be displayed two ways, controlled by a Spectre Cloud setting:
- ✅ Fractions — e.g.
1/4",1/8",3/16". - ✅ Thousandths of an inch — the same values shown in decimal, e.g.
1/4"as.250"and1/8"as.125".
The value is identical either way — only the notation changes. Choose whichever matches how your drill press readout and your shop's habits express pitch, so there's no conversion in your head at the press.
⚠️ Verify with your Spectre team: confirm the exact name and location of the fractions-vs-thousandths display setting so it can be linked precisely from this page.
➕➖ Pitch Polarity (+/-)
By default the arrows around each tile carry the direction. You can also turn on polarity so a + or − sign appears in the pitch tiles, giving you the direction as a sign in addition to the arrows. This is set in chapter 2.4 and is worth aligning to your specific machine:
- ✅ Whether right lateral pitch reads as positive or negative — 2.4.1.
- ✅ Whether forward thumb pitch reads as positive or negative — 2.4.2.
- ✅ Whether the +/- signs display in the pitch tiles at all — 2.4.3.
Matching these to how your drill press signs its pitch is the single best way to avoid drilling a hole in the wrong direction.
📐 The Four Pitch Terms
Forward pitch angles the hole toward the center of the ball. It draws the thumb or finger deeper in, increasing grip security and slowing the exit slightly. Common for less flexible thumbs, conventional grips, or a ball that feels loose. Typical range: 0 to 1/2" forward; 1/4" is the common IBPSIA starting point.
Reverse pitch angles the hole toward the outside of the ball, away from center. It assists the thumb's exit for a faster, cleaner release, but reduces grip security if overapplied. Common for higher rev-rate bowlers, very flexible thumbs, or a thumb that hangs. Typical range: 1/16" to 1/4" reverse.
Lateral pitch tilts the hole sideways, toward or away from the adjacent hole, to relieve side pinching and align with the bowler's hand geometry. Direction is described relative to the ring-finger side and flips for left-handed bowlers:
| Direction | Right-Handed | Left-Handed |
|---|---|---|
| Toward ring finger | Tilts opening to the right | Tilts opening to the left |
| Away from ring finger | Tilts opening to the left | Tilts opening to the right |
Typical range: 0 to 3/8"; 1/8" toward the ring finger is among the most common.
Zero pitch — also called manufacturer's or no added pitch — drills the hole straight toward the ball's center with no added tilt on either axis. It's a valid, complete spec (not a placeholder) and a common starting point for a first fitting.
Note: Because lateral direction is physically opposite for RH and LH bowlers, dominant hand is a required field on the bowler profile. The Auto-Invert setting (2.6.4) flips lateral pitch automatically when cloning or templating across handedness.
📊 Pitch Summary Table
| Pitch Type | Direction | Primary Effect |
|---|---|---|
| Forward | Toward center of ball | Increases grip security; slows exit |
| Reverse | Toward outside of ball | Faster, cleaner thumb exit |
| Lateral | Toward/away from ring finger | Relieves side pinch; aligns to hand geometry |
| Zero | Straight toward center | Neutral; no added adjustment |
Related Sections
- 4.1.3 — Grip type definitions: Fingertip vs. Conventional
- 4.1.2 — Span types: Full Span, Cut to Cut, Outer to Cut, Hole to Hole
- 2.4.1 — Does your machine display right pitch as positive? Y/N
- 2.4.2 — Does your machine display forward thumb pitch as positive? Y/N
- 2.4.3 — Display +/- in pitch tiles: showing direction to avoid errors
- 2.6.2 — Pitch suggestion: auto forward pitch based on hand flexibility
- 2.6.3 — Auto-CLT: lateral pitch of fingers based on CLT chart
- 2.6.4 — Auto-invert standard lateral pitches when changing RH to LH
Tip: Before you drill, make sure your fractions-vs-thousandths and +/- polarity settings match how your drill press readout expresses pitch. When the spec sheet and the press speak the same language, you read the tile and drill it directly — no mental conversion, no risk of reversing a direction.
4.1.5 Bridge: standard bridge sizes and their purpose
4.1.5 concept
The bridge is the distance between the near edges of the middle and ring finger holes on a drilled ball — the strip of material, or land area, that holds the two finger holes apart. It's one of the smallest measurements on a spec sheet, but it's a fixed industry standard, and Spectre Cloud defaults it for you.
📏 The 1/4" Industry Standard
The bridge is a constant. The industry standard is 1/4", and that is the value Spectre Cloud suggests by default for fingertip fitting.
The reason is the warranty. Ball manufacturers will not warrant a ball that cracks if the bridge was drilled narrower than 1/4" — below that width, the land area between the finger holes is too thin to reliably survive repeated impact. Drilling to the 1/4" standard keeps the ball within warranty and protects both you and the bowler.
- ✅
1/4"is the industry-standard bridge and Spectre Cloud's default suggestion. - ✅ Staying at or above 1/4" keeps the manufacturer's crack warranty intact.
- ❌ A bridge narrower than 1/4" risks cracking the land area — and voids the warranty if it does.
🛠️ Autofill Bridge in Spectre Cloud
When Autofill Bridge (2.6.5) is enabled, Spectre Cloud pre-populates the bridge field with the standard 1/4" value automatically — you don't need to enter it on a routine drill. The fitter only intervenes when a specific, deliberate reason calls for a different value.
🖥️ Bridge on the Spec Sheet
The bridge field sits in the insert and finger hole section of the spec sheet.
- ✅ It's shown in whatever unit and format your account uses — fractional or decimal, per your display settings.
- ✅ The autofilled value can be overridden by typing a different measurement directly.
- ✅ A manually entered bridge is saved to the sheet's history and is visible when the sheet is reviewed or cloned.
- ✅ When cloning a spec sheet, the bridge carries forward — confirm it's still appropriate for the new ball before saving.
Related Sections
- 4.1.4 — Pitch terminology: Forward, Reverse, Lateral, Zero
- 4.1.3 — Grip type definitions: Fingertip vs. Conventional
- 4.1.2 — Span types: Full Span, Cut to Cut, Outer to Cut, Hole to Hole
- 2.6.5 — Autofill Bridge: applies the standard 1/4" bridge
- 9.x — Tips & Troubleshooting: narrow bridge and land area considerations
Tip: Treat 1/4" as the floor, not just the default. It's the value Spectre suggests, the value the widest range of balls and bowlers work with, and the line manufacturers draw for their crack warranty. Only go narrower for a specific, documented fitting reason — and know you're giving up the warranty if you do.
4.1.6 Insert OD: drill bit sizing for STD and VACU grips
4.1.6 concept
When drilling finger holes for bowlers who use inserts, the drill bit must match the insert's Outside Diameter (OD) — the outer dimension that sets the hole size. Spectre Cloud sizes these holes for you through Autofill Insert OD (2.6.6). This page explains what OD is, how it differs from insert size, and how the two insert systems — STD and VACU — are drilled and recorded on the spec sheet.
🎳 Insert OD vs. Insert Size
Two dimensions matter for an insert, and it's important not to confuse them:
- ✅ OD (Outside Diameter) — the outer dimension of the insert, published by the manufacturer. This is the drill bit size. You match the bit to the OD, never to the bowler's finger.
- ✅ Insert size — the inner diameter (ID), sized to fit the bowler's finger. In Spectre Cloud, the insert size field is the ID — Spectre does not track ID as a separate value.
- ✅ Spectre derives the OD (drill bit size) from the insert type and insert size you record — so entering both correctly is what makes Autofill Insert OD accurate.
📐 STD (Standard) Inserts
Standard inserts are press-fit: the hole is drilled to the insert's OD and the insert is pressed in, held by friction against the ball's coverstock.
- ✅ Drill bit size equals the insert's published OD — a direct, one-to-one match, at full depth.
- ✅ A correct STD fit presses in with firm hand pressure or a seating tool — it should not drop in freely or require excessive force.
- ✅ If the insert spins after seating, the hole was drilled slightly too large — re-drilling to size is preferable on a new ball.
📐 VACU (Vacuum) Inserts
VACU inserts are drilled in two diameters so the insert has room to expand. The hole is stepped: an oversized pocket at the top, then the insert's true OD deeper down.
- Drill the top portion of the hole at the size shown on the spec sheet.
- Drill that top portion
1"deep. - Continue to the full depth of the insert using the insert's regular, actual OD.
The oversized top creates a pocket — a void where the insert does not touch the surrounding ball wall. That void gives the insert room to expand.
- ✅ The spec-sheet OD value for a VACU insert is the top-portion (pocket) size, not the insert's body OD.
- ✅ The deeper portion is drilled at the insert's actual OD, exactly as a STD hole would be.
- ❌ Drilling the whole hole at the actual OD removes the pocket entirely — the insert loses its room to expand, defeating the purpose of a VACU fit.
📊 STD vs. VACU — Key Differences
| STD (Standard) | VACU (Vacuum) | |
|---|---|---|
| Drilling method | Single diameter at the insert's OD, full depth | Two diameters — oversized top ~1" deep, then the actual OD to full depth |
| What the spec-sheet OD means | The drill bit size for the whole hole | The top-portion (pocket) drill size |
| Why it's sized this way | Friction press-fit secures the insert | The oversized top leaves a void so the insert can expand |
| Common use case | General fingertip / insert fitting | Bowlers whose fingers need room to expand |
⚙️ How Spectre Cloud Handles STD vs. VACU
Autofill Insert OD (2.6.6) populates the drill bit size on the spec sheet from the insert type and insert size recorded for the bowler. Recording the insert type correctly is what tells Spectre which sizing to apply.
- ✅ When the insert type is STD, the autofilled OD is the drill bit size for the full hole.
- ✅ When the insert type is VACU, the autofilled OD is the top-portion (pocket) size — drill that ~1" deep, then switch to the insert's actual OD for the rest.
The drill bit size is saved to the spec sheet and carries forward when the sheet is cloned. Confirm the insert type and OD are still correct for the new ball before saving, and if a bowler switches systems (STD to VACU or vice versa), create a new spec sheet so the history reflects what was actually drilled on each ball.
Related Sections
- 4.1.5 — Bridge: the standard 1/4" bridge
- 4.1.4 — Pitch terminology: Forward, Reverse, Lateral, Zero
- 4.1.3 — Grip type definitions: Fingertip vs. Conventional
- 2.6.6 — Autofill Insert OD: auto drill bit size per insert type and size
- 2.6.7 — Auto-Repeat Insert Size: mirror size from ring to middle finger
- 9.x — Tips & Troubleshooting: insert seating issues and OD mismatches
Tip: The most common VACU error is drilling the whole hole at one size. Remember it's two cuts: the spec-sheet size for the first inch to form the pocket, then the insert's actual OD to depth. If your shop is adding VACU for the first time, walk every driller through that two-diameter step at the press before the first VACU ball — it's the one detail that's easy to miss and easy to get right once seen.