02 Settings
Configuration · Preferences · Calibration
- 2.1 — Language
- 2.2 — System Defaults
- 2.2.1 Bowler Hand — setting your default (RH / LH)
- 2.2.2 Grip Type — Finger Tip vs. Conventional as default
- 2.2.3 Display in Decimal vs. Fraction (0.000 vs. fractions)
- 2.2.4 Oval Degree Increments — 1° vs. 5° increments
- 2.2.5 Insert Installation — STD vs. VACU grip default
- 2.2.6 Vacu Installation Increment from O.D. (1/32, 1/16…)
- 2.2.7 Display Measurements in your preferred denominator
- 2.2.8 Display Pitches by your preferred denominator
- 2.3 — Thumb Hole Preferences
- 2.3.1 Default Hole Type — Round vs. Oval
- 2.3.2 Initial pitch inside the total oval — Edge vs. Center & Pitch Included Yes/No
- 2.3.3 Oval Width Calculator — Bit Size, Decimal, or Difference input method
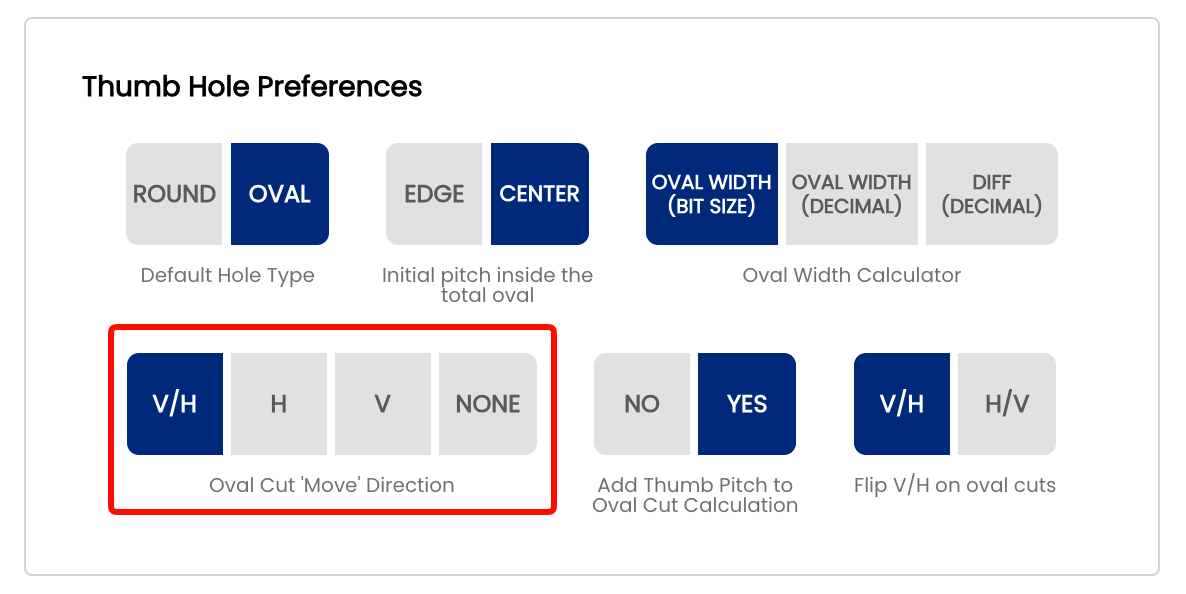
- 2.3.5 Oval Cut 'Move' Direction — V/H, H only, V only, or None
- 2.3.6 Flip V/H on oval cuts — matching your drill press DRO display order
- 2.4 — Drill Press Calibration
- 2.4.1 Does your machine display Right Pitch Positive? (YES / NO)
- 2.4.2 Does your machine display Forward Thumb Pitch Positive? (YES / NO)
- 2.4.3 Display +/- in pitch tiles — showing polarity to match DRO's to avoid errors
- 2.5 — Layout Preferences
- 2.5.1 Default Layout Type — VLS, 2LS, PAL, or NONE
- 2.5.2 Default Dual Angle Degree Increments — 1° vs. 5°
- 2.6 — Auto-Suggestions
- 2.6.1 Overview — why leaving all Auto-Suggestions ON saves time
- 2.6.2 Pitch Suggestion — auto forward pitch based on hand flexibility
- 2.6.3 Auto-CLT — lateral pitch of fingers based on CLT chart
- 2.6.4 Auto-Populate Lateral Pitches
- 2.6.5 Autofill Bridge
- 2.6.6 Autofill Insert OD
- 2.6.7 Auto-Repeat Insert Type and Size
- 2.6.8 Ring finger 5/16 rule difference calculator
- 2.6.9 Autofill Cut to Cut measurement based on insert type/size
- 2.6.10 Layout Suggestions
2.1 — Language
2.1.1 Changing the display language
2.1.1 setting
Spectre Cloud is available in nine display languages. Changing your display language updates all menus, labels, and interface text across the app — your bowler data and spec sheet content are not affected.
🌍 Available Languages
| Language | Code | Coverage |
|---|---|---|
| English | en |
Full interface |
| French | fr |
Full interface |
| Spanish | es |
Full interface |
| German | de |
Full interface |
| Italian | it |
Full interface |
| Japanese | ja |
Full interface |
| Korean | ko |
Full interface |
| Portuguese | pt |
Full interface |
| Simplified Chinese | zh-Hans |
Full interface |
🖥️ Changing the Language — Desktop
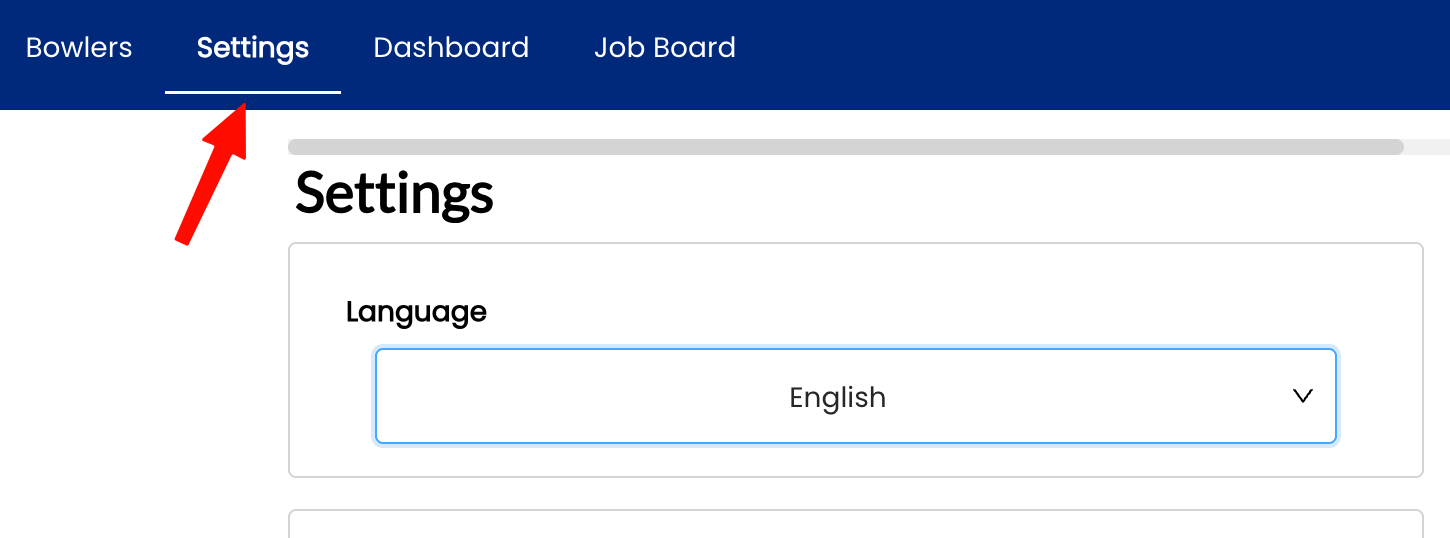
- Open Spectre Cloud at
cloud.spectrebowling.comand log in. - Select Settings from the menu.
- Navigate to the System Defaults section.
- Locate the Display Language field and select your preferred language.
- Changes are saved automatically. The interface will reload in the selected language.
📱 Changing the Language — Mobile
- Open Spectre Cloud at
cloud.spectrebowling.comand log in. - Tap the avatar icon in the top-right corner to open the Profile menu.
- Tap Settings.
- Navigate to the System Defaults section.
- Tap the Display Language field and select your preferred language.
- Changes are saved automatically. The app will reload in the selected language.

☁️ Does the Language Setting Sync Across Devices?
Yes — your display language preference is saved to your Spectre Cloud account, so it stays consistent whether you log in from a desktop browser, tablet, or mobile device.
Related Sections
Tip: If a teammate on the same account prefers a different language, each user can set their own language independently — it does not affect other users on the account.
2.1.2 How language affects measurement labels and UI text
2.1.2 setting
When you change the display language in Spectre Cloud, more than just menu text changes. Button labels, field names, span type abbreviations, measurement unit labels, and instructional text throughout the interface all update to reflect the selected language. This page explains exactly what changes — and what stays the same.
🌍 What Changes When You Switch Languages
| UI Element | What changes |
|---|---|
| Navigation menus | All top-menu and sidebar labels translate (e.g. Bowlers → Quilleurs / Bolicheros) |
| Button labels | Save, Cancel, Delete, Edit, Clone, and all action buttons translate |
| Field names & placeholders | Form field labels and input placeholder text translate on spec sheets, bowler profiles, and settings |
| Span type labels | Full Span, Cut to Cut, Oval and their abbreviations (F, C, O) remain consistent across languages — these are industry-standard abbreviations |
| Measurement unit labels | Unit abbreviations (in, mm, oz) do not change — they are universal. Surrounding descriptive text does translate. |
| Error & validation messages | All form validation messages and error alerts translate |
| Tooltips & help text | Inline tips and hover tooltips translate |
| IBPSIA suggestion labels | Suggestion category names translate where applicable |
🔒 What Does NOT Change
- ✅ Bowler names and data — all client records, spec sheet values, and notes you have entered remain exactly as typed.
- ✅ Measurement units — inches, millimeters, ounces, and degrees are universal abbreviations and do not translate.
- ✅ Span type abbreviations — F, C, and O are consistent across all languages.
- ✅ Ball brand and model names — product names from bowlingdatabase.com are displayed as-is.
- ✅ Your pro shop name — displayed exactly as entered in your account settings.
📋 Side-by-Side Label Reference
Key interface terms across all three supported languages:
| English | French | Spanish |
|---|---|---|
| Bowlers | Quilleurs | Bolicheros |
| Spec Sheet | Fiche technique | Hoja de especificaciones |
| Arsenal | Arsenal | Arsenal |
| Settings | Paramètres | Configuración |
| Save Changes | Enregistrer | Guardar cambios |
| Full Span | Envergure complète | Envergadura completa |
| Cut to Cut | Coupe à coupe | Corte a corte |
| Oval | Ovale | Óvalo |
| Clone | Cloner | Clonar |
| Dashboard | Tableau de bord | Panel principal |
📌 Verify with Spectre team: The French and Spanish UI terms above are representative translations. Confirm exact in-app label wording against the live interface at cloud.spectrebowling.com before publishing.
✨ Tips for Multi-Language Shops
- Each user account stores its own language preference — staff members can each work in their preferred language on the same shop account.
- Spec sheets and bowler records entered in one language display the same data regardless of which language a colleague uses — only the surrounding UI labels change.
- If you switch languages mid-session, the page reloads automatically and you will land back on the dashboard.
Related Sections
- 2.1.1 — Changing the display language
- 2.2 — Account & profile settings
- 3.1 — Creating and managing bowler profiles
Tip: Not sure which language a teammate has set? Their language setting is personal to their login and does not affect what you see in your own session.
2.2 — System Defaults
2.2.1 Bowler Hand — setting your default (RH / LH)
2.2.1 setting
The Bowler Hand default setting controls whether new bowler profiles and new spec sheets are pre-filled as right-handed or left-handed. It is a time-saving convenience — nothing more. You can always change the handedness on any individual bowler or spec sheet after the fact.
🎳 What This Setting Does
When you create a new bowler profile or a new spec sheet, Spectre Cloud pre-fills the Bowler Hand field with your default. That's all it affects. It does not change anything on existing profiles or existing spec sheets — only on records you create after changing the default.
🛠️ Changing the Default
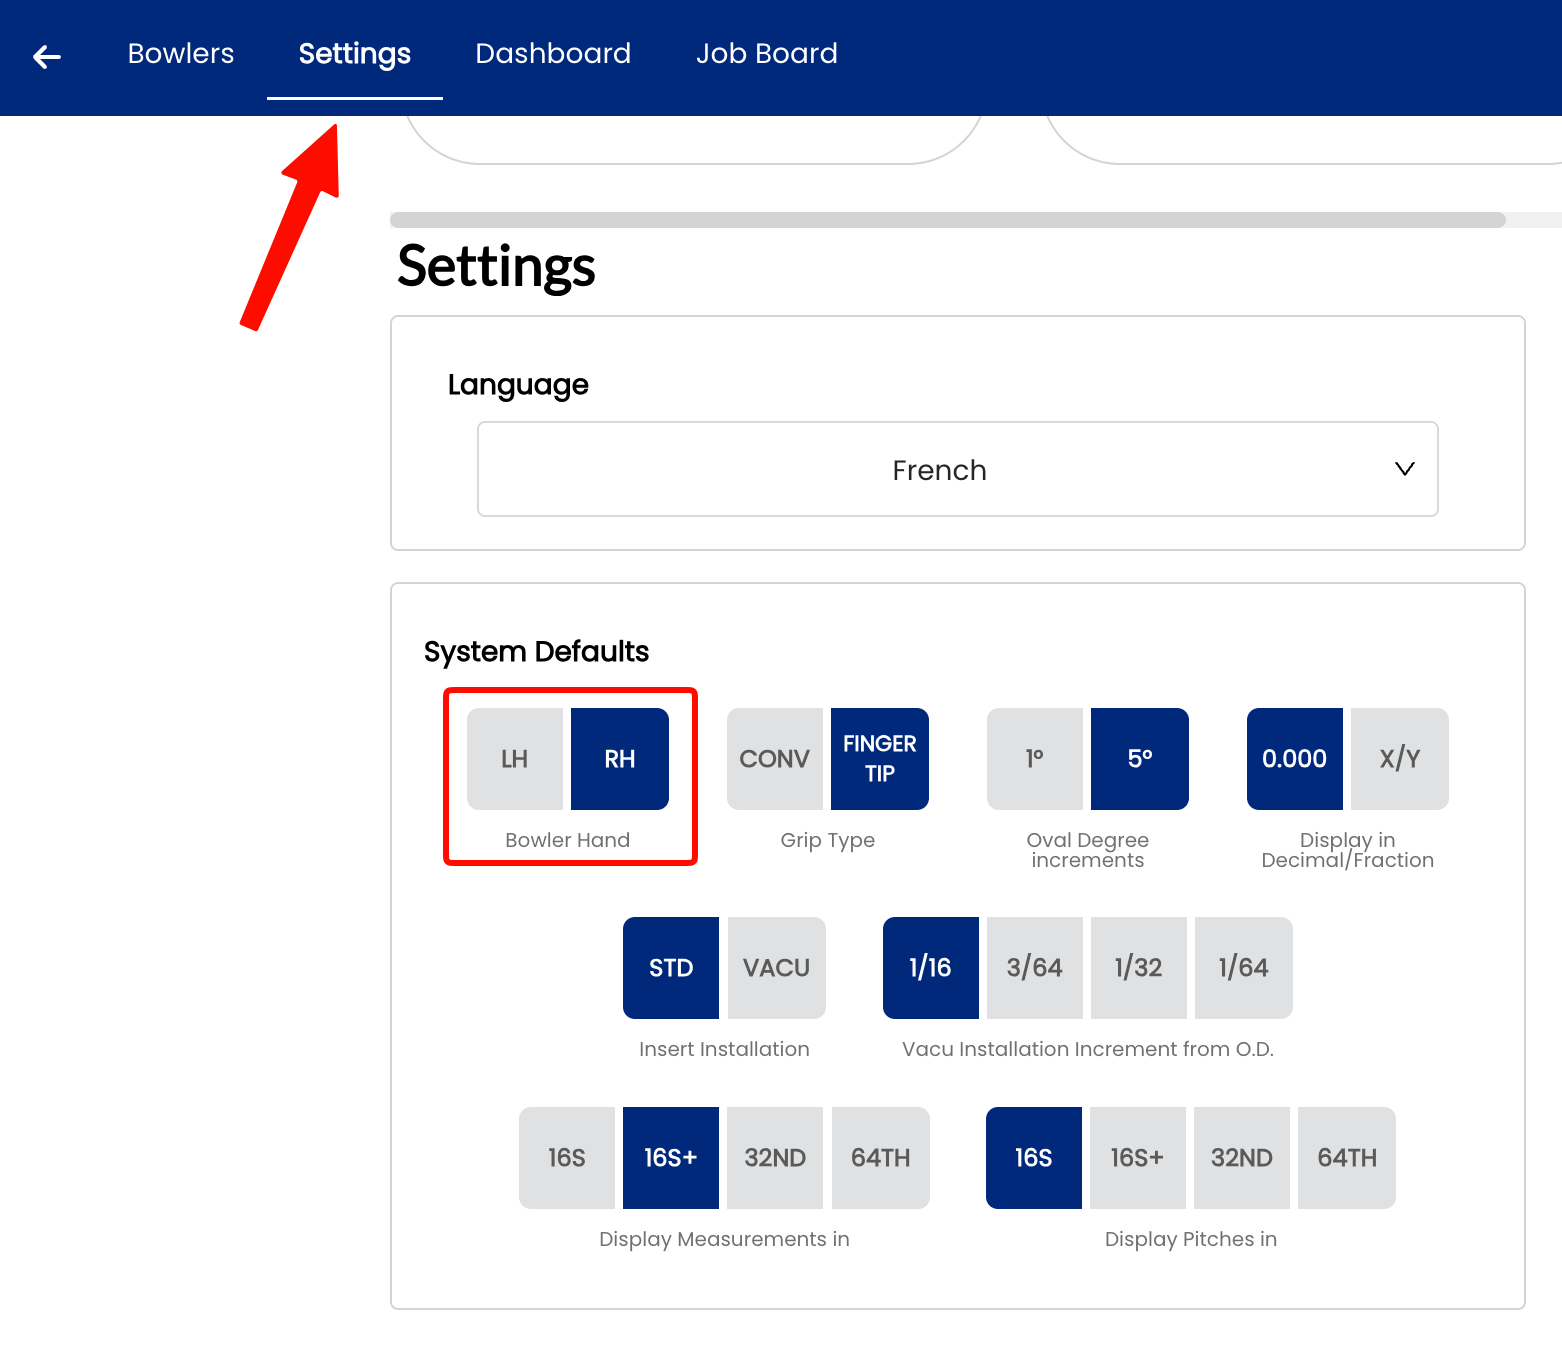
- Select Settings
- Under the System Defaults tab, locate the Bowler Hand field.
- Select
Right HandorLeft Hand. - Changes will save automatically.

📌 Important: Handedness Exists in Two Separate Places
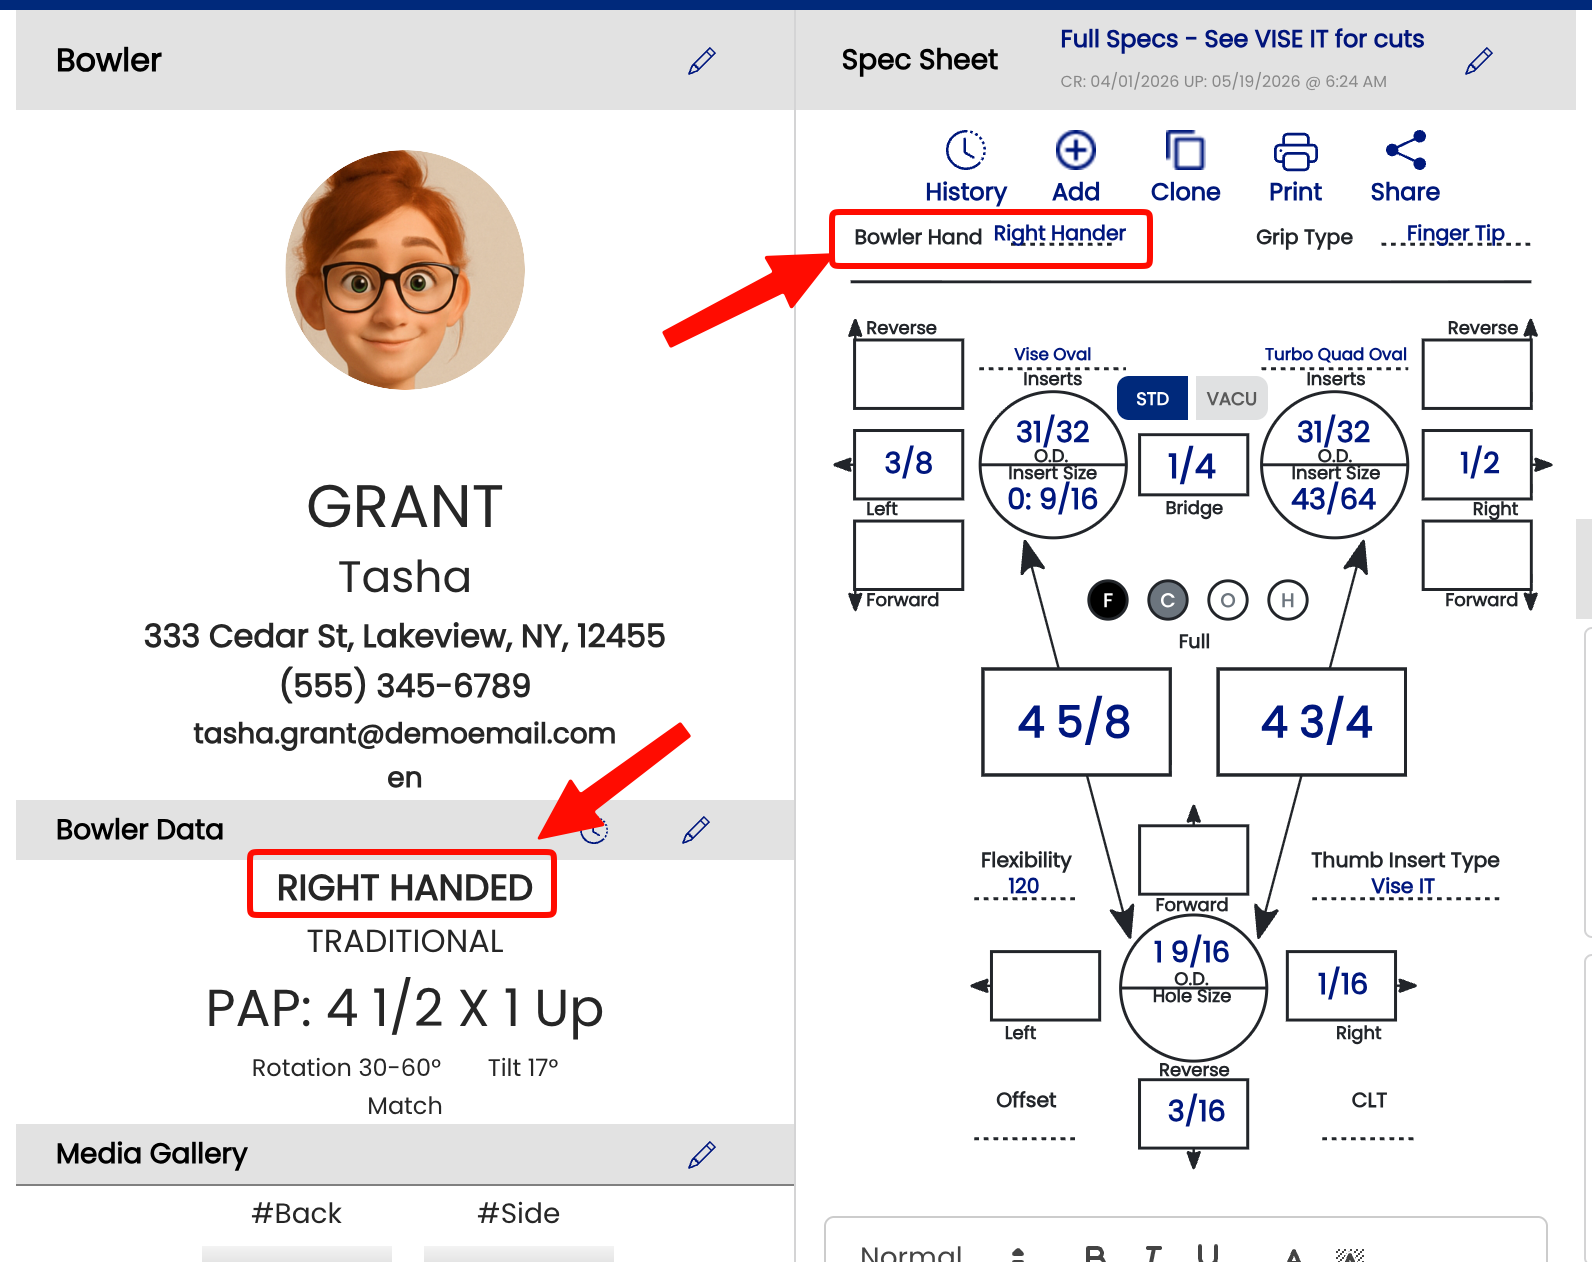
This is one of the most common points of confusion in Spectre Cloud. Handedness is stored independently in two places:
- ✅ The bowler profile — the hand setting for that client.
- ✅ The spec sheet — the hand setting for that specific drilling record.
These two values are not linked. Changing a bowler's hand in their profile will not update any spec sheets that already exist for that bowler.
⚠️ Why This Matters — The Oval Calculator
The oval calculator uses the handedness stored on the spec sheet itself, not the bowler profile. This is a frequent source of confusion.
A common scenario:
- You create a bowler profile as Right Hand.
- You create a new spec sheet — it inherits Right Hand at the time of creation.
- You later correct the bowler profile to Left Hand.
- The existing spec sheet still reads Right Hand — and the oval calculator will calculate accordingly.
If you notice the oval calculator producing unexpected results, check the handedness field directly on the spec sheet, not just on the bowler profile. Update the spec sheet itself if needed.
Related Sections
- 2.2.2 — Setting Your Default Span Type
- 2.2.3 — Setting Your Default Ball Weight
- 5.x — Oval Calculator Overview
Tip: If you switch a bowler from right-handed to left-handed in their profile, take a moment to open any existing spec sheets and update the hand field there too — especially if you plan to use the oval calculator on those sheets.
2.2.2 Grip Type — Finger Tip vs. Conventional as default
2.2.2 default
The Grip Type setting controls which grip style is pre-selected when you create a new spec sheet. Choosing the right default for your shop saves time — your drillers won't need to manually switch the grip type for every new client.
🤚 What Is Grip Type?
Grip type describes how deeply a bowler's fingers are inserted into the ball:
- Fingertip — fingers inserted to the first knuckle. Produces higher rev rates and more hook potential. The most common grip for league and sport bowlers, and the most frequently used grip in a typical pro shop.
- Conventional — fingers inserted to the second knuckle. Offers more control with less hook. Common for beginners, recreational bowlers, and some senior bowlers.
Note: The grip type setting affects only the default pre-selection on new spec sheets — you can always override it on a per-bowler or per-sheet basis.
⚙️ Setting Your Default Grip Type
- Open Spectre Cloud at
cloud.spectrebowling.comand log in. - Select Settings from the menu.
- Navigate to the System Defaults section.
- Locate the Grip Type field and select either Fingertip or Conventional from the dropdown.
- Changes will be saved automatically.

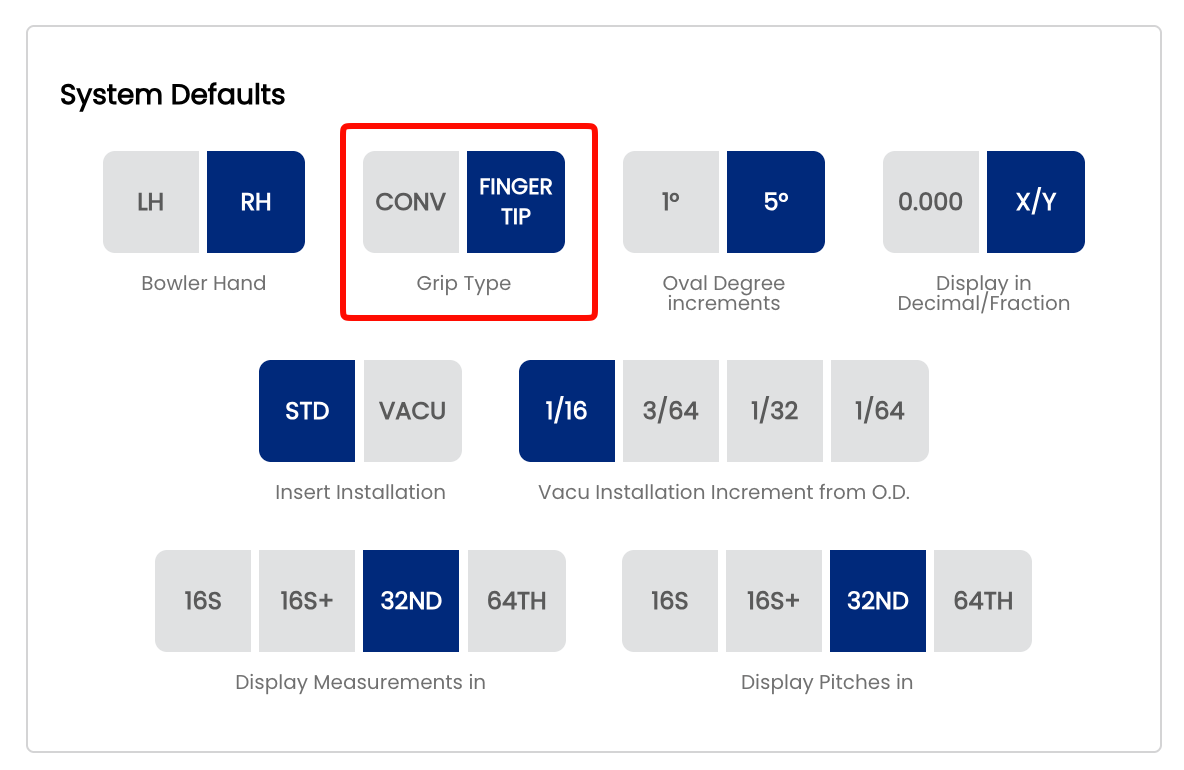
From this point forward, all new spec sheets will open with the selected grip type pre-filled. Existing spec sheets are not affected.
🎳 Which Default Should You Choose?
| Shop Type | Recommended Default | Reason |
|---|---|---|
| Competitive / league-focused shop | Fingertip | Majority of sport bowlers use fingertip grip |
| Family or recreational shop | Conventional | Beginners and casual bowlers typically use conventional |
| Mixed clientele | Fingertip | Fingertip is the Spectre Cloud factory default and suits most shops |
🔄 Overriding the Default on a Spec Sheet
Even after setting a shop-wide default, the grip type can be changed on any individual spec sheet:
- Open or create a spec sheet for a bowler.
- Locate the Grip Type field near the top of the sheet.
- Select the appropriate grip from the dropdown — Fingertip or Conventional.
- The change applies to that sheet only and does not affect your shop default.

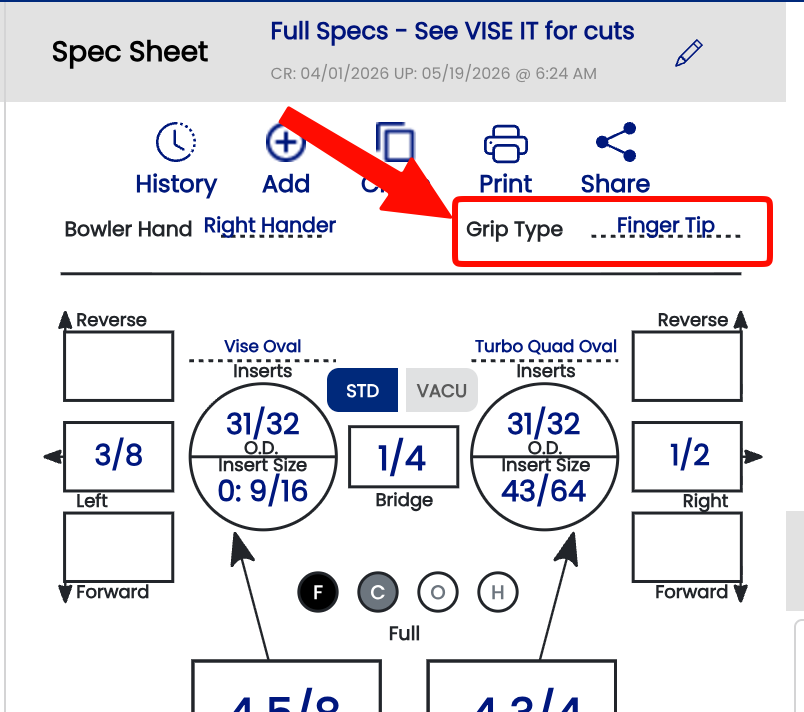
Tip: If you notice your drillers frequently overriding the default, it may be worth revisiting your shop default setting to better match your typical clientele.
Related Sections
- 2.2.1 — Span Type Defaults (Full Span, Cut to Cut, Oval)
- 2.2.3 — Insert Defaults
- 4.1 — Creating a New Spec Sheet
- 4.2 — Understanding Span Types
2.2.3 Display in Decimal vs. Fraction (0.000 vs. fractions)
2.2.3 display
The Measurement Display setting controls whether span, oval, bridge, and depth measurements appear throughout Spectre Cloud in decimal format (e.g. 4.25") or fractional format (e.g. 4 ¼"). This is a display-only preference — the underlying values are the same either way.
📐 Decimal vs. Fractional — What's the Difference?
Both formats represent the same physical measurements. The choice comes down to your shop's convention and what your drillers are most comfortable reading at a glance:
- ✅ Decimal — displays measurements as a number with up to three decimal places (e.g.
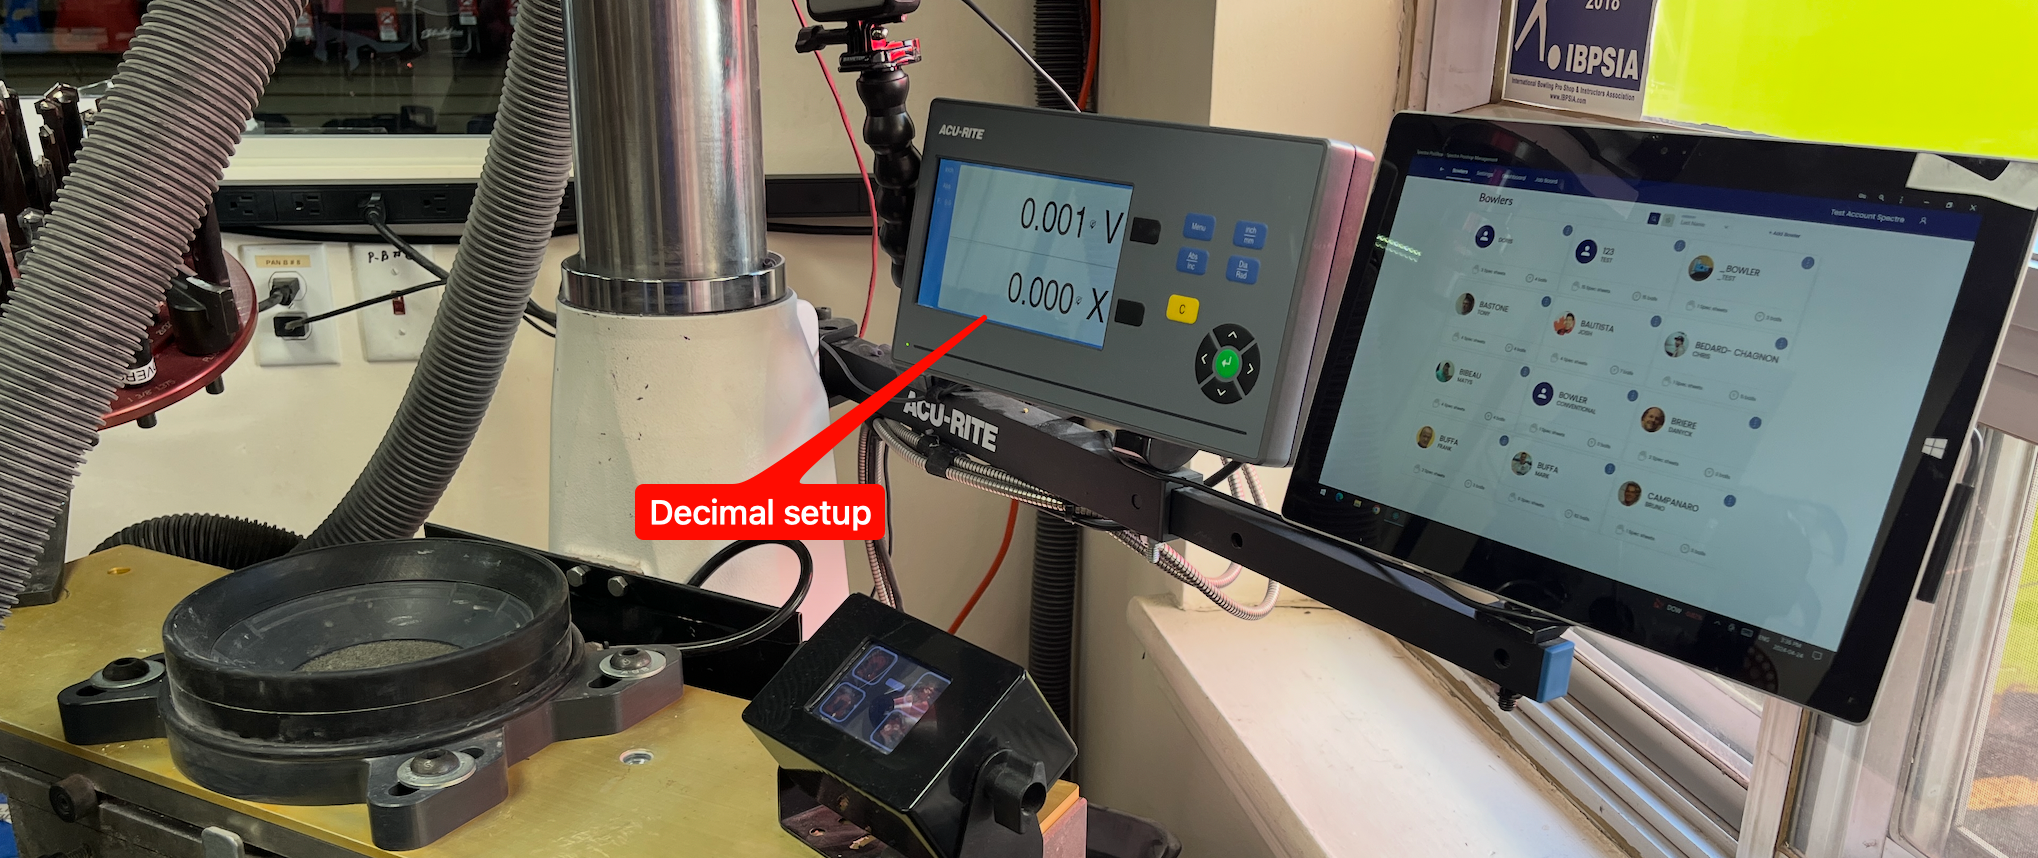
0.250"). Easier to use on the drill press when using a digital display that is always in decimal. - ✅ Fractional — displays measurements using traditional fractions (e.g.
1/4"). The longtime standard in the pro shop industry and widely used when writing spec sheets by hand.
Note: This setting applies across all pitches in the spec sheet.
⚙️ Changing the Display Format
- Open Spectre Cloud at
cloud.spectrebowling.comand log in. - Select Settings from the menu.
- Navigate to the System Defaults section.
- Locate the Display in Decimal/Fraction field and select either Fractional(0.000) or Decimal(X/Y).
- Changes are saved automatically.
📏 Which Format Should You Use?
The right choice depends on how your shop works at the drill press.
If your drill press has digital readouts and you run them in fractional mode, stick with fractional — it keeps Spectre consistent with what you're already reading on the machine. If your readouts are in decimal, set Spectre to decimal for the same reason.
Decimal is also a solid choice for shops without digital readouts. A decimal value maps directly to your drill press handle — 0.500" means 5 full turns on the axis wheel, which makes it easy to translate from screen to press without any mental conversion.
🖨️ Effect on Printed Spec Sheets & Exports
When you print a spec sheet or export bowler records, the measurements will appear in whichever format is currently active in your settings. If you share spec sheets with another pro shop or a ball manufacturer, confirm which format they prefer before printing.
- ✅ Printed spec sheets reflect the active display format at the time of printing.
- ❌ There is no per-sheet override — the setting is shop-wide.
Tip: If you switch formats mid-season, nothing in your saved data changes — only how it's displayed. You can switch back at any time without affecting stored spec sheet values.
Related Sections
- 2.2.2 — Grip Type: Fingertip vs. Conventional as the Default
- 4.1 — Creating a New Spec Sheet
- 5.1 — Overview of the Oval Calculator
2.2.4 Oval Degree Increments — 1° vs. 5° increments
2.2.4 display
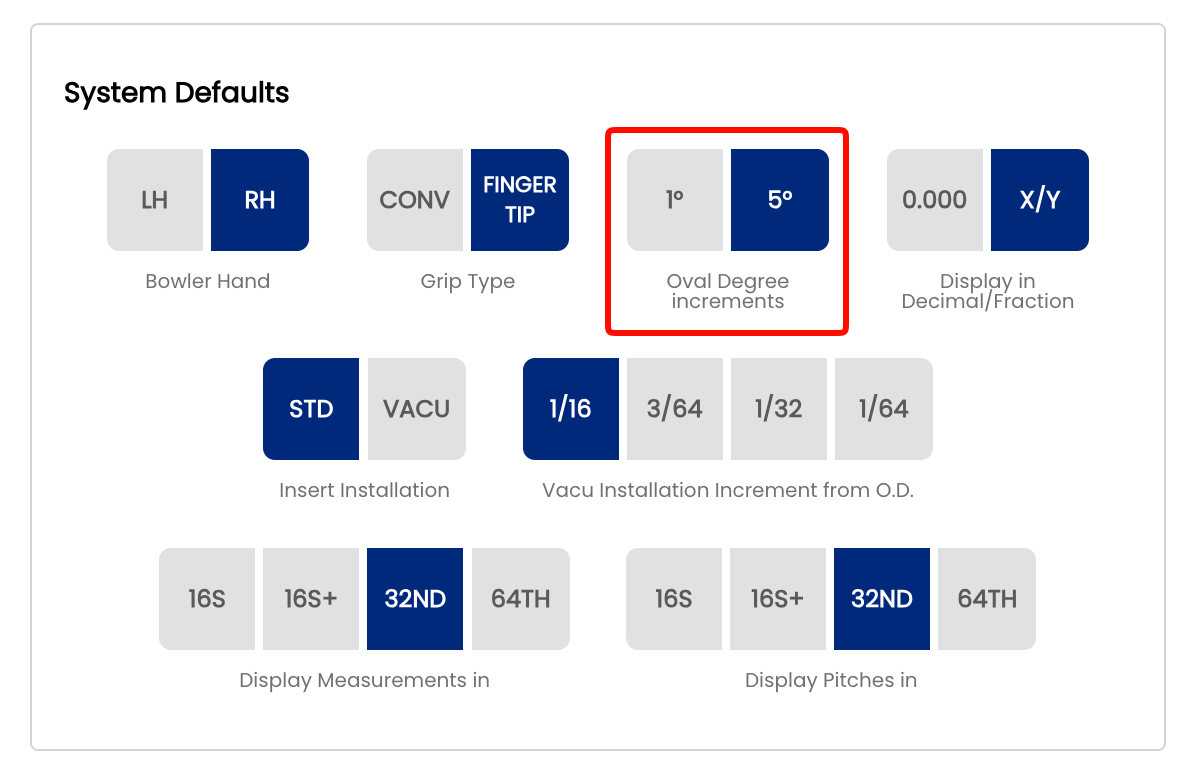
The Oval Degree Increments setting controls the step size of the degree selector in the Oval Calculator. You can choose between 1° increments for fine-grained precision, or 5° increments for faster, broader selections. The right choice depends on how precisely your shop fits oval thumb holes and how quickly your drillers need to move through the calculator.
🔵 What Are Oval Degree Increments?
When calculating an oval hole, Spectre Cloud asks for the oval angle — the rotational degree at which the oval is oriented relative to the center line. The degree selector steps through available angles one click (or tap) at a time. This setting determines the size of each step:
- ✅ 1° increments — the selector advances one degree at a time (e.g.
30°, 31°, 32°, 33°…). Gives maximum control over oval orientation, ideal for fitters who dial in angles precisely for each bowler. - ✅ 5° increments — the selector jumps five degrees at a time (e.g.
20°, 25°, 30°, 35°…). Faster to navigate and sufficient for shops where oval angles are rounded to the nearest 5° as standard practice.
Note: This setting only affects the degree selector in the Oval Calculator. It does not change how oval measurements are stored, calculated, or displayed on spec sheets.
⚙️ Changing the Oval Degree Increment
- Open Spectre Cloud at
cloud.spectrebowling.comand log in. - Select Settings from the menu.
- Navigate to the System Defaults section.
- Locate the Oval Degree Increments field and select either 1° or 5°.
- Changes are saved automatically.

🎳 Which Increment Should You Use?
| Situation | Recommended Setting | Reason |
|---|---|---|
| Precision fitting for competitive bowlers | 1° increments | Allows exact oval angles when bowler fit requires it |
| High-volume shop, recreational clientele | 5° increments | Speeds up entry — most recreational ovals land on a 5° boundary anyway |
| New driller learning the oval workflow | 5° increments | Fewer options reduces decision fatigue during training |
| Shop that copies angles from legacy paper sheets | 1° increments | Legacy sheets may record non-round angles that need exact matching |
Related Sections
- 2.2.3 — Display in Decimal vs. Fractional
- 5.1 — Overview of the Oval Calculator
- 5.2 — Using the Oval Calculator Step by Step
- 4.3 — Adding an Oval Span to a Spec Sheet
2.2.5 Insert Installation — STD vs. VACU grip default
2.2.5 default
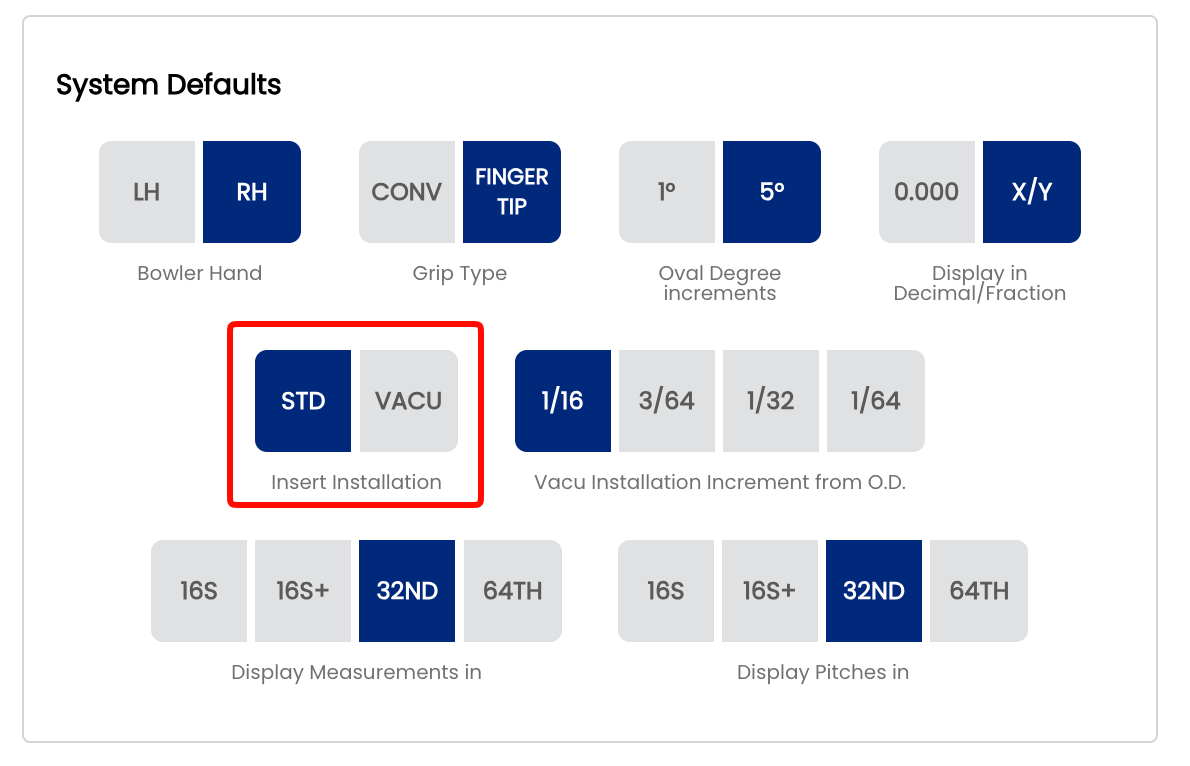
The Insert Installation default controls which installation method is pre-selected when creating a new spec sheet — either STD (standard glued) or VACU Grip (vacuum-style). Setting the correct default for your shop means your drillers spend less time adjusting this field on every new sheet.
🔩 STD vs. VACU Grip — What's the Difference?
Both methods describe how finger inserts are secured inside the drilled finger holes. The key distinction is in how the insert is held in place and how the finger hole is prepared:d
- ✅ STD (Standard) — the finger hole is drilled to a single diameter and the insert is glued directly into place using bowling ball insert adhesive. The most widely used installation method across pro shops worldwide.
- ✅ VACU Grip — a two-tier drilling technique where the finger hole is drilled in two stages: the upper portion is bored larger than the insert's outer diameter, and the lower portion is drilled tighter so the insert is glued in only at the base. Because the insert is only secured at the bottom, the rubber body is free to expand outward when the bowler inserts their finger, creating a snug, adaptive fit that accommodates finger swelling during play. The insert used must be several sizes smaller than the bowler's standard fingertip size to allow for this expansion.
Note: The VACU Grip method requires a specific two-stage drilling sequence at the press. See Mark Buffa's full walkthrough on the Spectre YouTube channel: How To Drill For A Vacu Fit!
⚙️ Changing the Insert Installation Default
- Open Spectre Cloud at
cloud.spectrebowling.comand log in. - Select Settings from the menu.
- Navigate to the System Defaults section.
- Locate the Insert Installation field and select either
STDorVACU. - Changes are saved automatically.
Note: This setting controls only the default pre-selection on new spec sheets. The installation method can always be changed on any individual spec sheet without affecting your shop default.
🎳 Which Default Should You Choose?
| Shop Situation | Recommended Default | Reason |
|---|---|---|
| Most pro shops — general clientele | STD | Standard glue installation is the industry norm for the majority of fittings |
| Shop specialising in VACU Grip fittings | VACU Grip | Saves time if VACU is your predominant installation method |
| Mixed clientele — both methods used regularly | STD | STD is more common; override to VACU on a per-sheet basis when needed |
📋 Important: Select Insert Type Before Insert Size
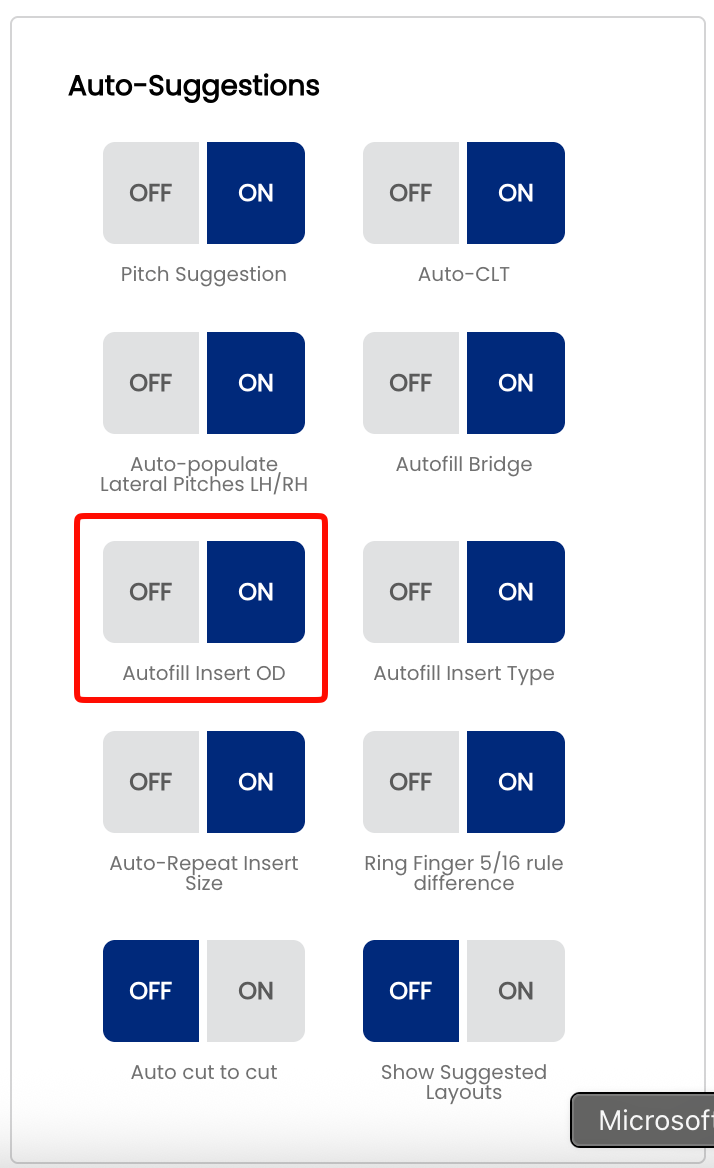
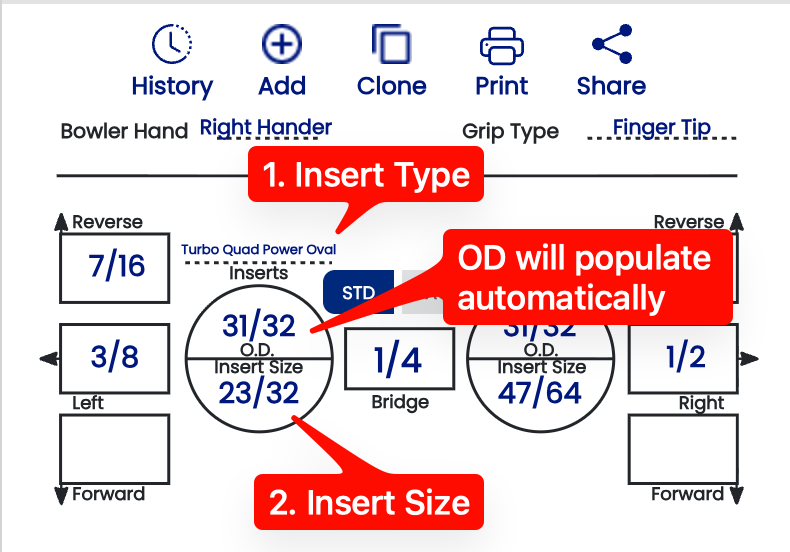
When entering insert details on a spec sheet, always select the Insert Type first, then the Insert Size. If the Auto Insert OD suggestion is enabled in your settings, Spectre will automatically populate the outer diameter field based on the insert type and size selected.
 |
|
🖨️ How It Appears on a Spec Sheet
The installation method is recorded on every spec sheet and appears in the insert details section. This ensures your shop's drilling history accurately reflects how each ball was fitted — useful when a bowler returns for an insert replacement or a re-drill.
- ✅ The installation method is saved with the spec sheet and visible in historical records.
- ✅ Printed and exported spec sheets include the installation method field.
- ❌ Changing the shop default does not retroactively update the installation method on existing spec sheets.
Tip: If you stock and sell VACU Grip inserts, noting the installation method clearly on printed spec sheets is good practice — bowlers who use VACU inserts often need to know their exact insert size when purchasing replacements.
Related Sections
2.2.6 Vacu Installation Increment from O.D. (1/32, 1/16…)
2.2.6 default
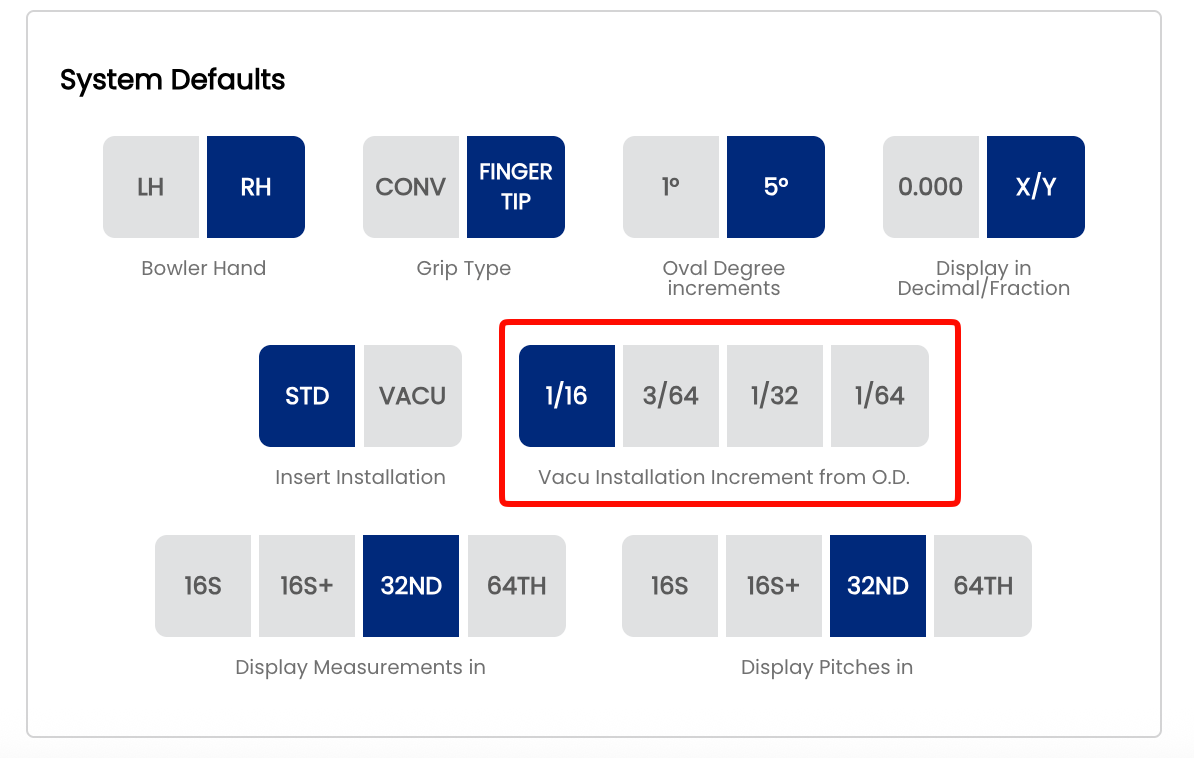
When fitting a bowler with VACU Grip inserts, Spectre Cloud calculates the two hole sizes required for the two-tier drill based on the insert's outer diameter (O.D.). The lower hole matches the insert O.D. so the insert seats and glues at the base. The upper hole is drilled larger than the insert O.D. — this is what gives the rubber room to expand when the bowler's finger is inserted. This setting controls the increment used when selecting how much larger that upper hole is drilled above the insert O.D.
Note: This setting only applies if your shop uses VACU Grip installation. If your shop drills exclusively STD (glued) inserts, this setting has no effect on your workflow.
Important: This setting requires the Auto Insert OD auto-suggestion to be enabled in order to work correctly. If Auto Insert OD is turned off, Spectre Cloud will not automatically calculate the upper hole size and this increment setting will have no effect. See Settings → Auto-Suggestions to confirm it is enabled.
📐 What Is the O.D. Increment?
The O.D. increment is the step size used when selecting how much larger the upper hole is drilled relative to the insert O.D. — the amount by which that value increases or decreases with each click or tap. Spectre Cloud offers four options:
- ✅ 1/16" — the standard increment for VACU installation. Gives the insert a full 1/16" of expansion room per side — for example, a
31/32"insert O.D. produces a1 1/32"upper hole. This is the correct starting point for most bowlers and the increment most shops will use day-to-day. - ✅ 3/64" — slightly less expansion room than the standard 1/16". Used for bowlers who want a more controlled feel with less rubber springiness.
- ✅ 1/32" — reduced expansion room. The insert rubber has less room to flex, producing a firmer, tighter feel when the finger is inserted.
- ✅ 1/64" — the tightest fit. Minimal expansion room — suited to bowlers who prefer very little springiness from their insert rubber.
⚙️ Changing the VACU O.D. Increment
- Open Spectre Cloud at
cloud.spectrebowling.comand log in. - Select Settings from the menu.
- Navigate to the System Defaults section.
- Locate the Vacu Installation Increment from O.D. field and select 1/16", 3/64", 1/32", or 1/64".
- Changes are saved automatically.
Note: Like all system defaults, this setting controls only the pre-selection on new spec sheets. The increment — and the resulting upper hole size — can always be adjusted on a per-bowler, per-sheet basis directly on the spec sheet, the same way auto-suggestion values can be overridden after they populate.
🎳 Which Increment Should You Choose?
| Situation | Recommended Increment | Reason |
|---|---|---|
| Most bowlers — standard VACU fitting | 1/16" | The industry standard for VACU installation — full expansion room, natural rubber feel |
| Bowler wants slightly less springiness | 3/64" | Marginally tighter fit with a more controlled feel |
| Bowler prefers a firmer insert feel | 1/32" | Reduced expansion room, noticeably less rubber flex |
| Bowler wants minimal rubber springiness | 1/64" | Tightest fit — the insert has very little room to expand |
📌 Important: O.D. vs. Hole Size
The insert O.D. and the two drilled hole sizes work together in a VACU fitting:
- The insert O.D. is the published outer diameter of the VACU insert — a fixed measurement from the manufacturer.
- The lower hole is drilled to match the insert O.D. — this is where the insert seats and is glued at the base.
- The upper hole is drilled larger than the insert O.D. by the selected increment — this gives the rubber body room to expand outward when the bowler's finger is inserted.
- The O.D. increment setting controls how finely you can step through that upper hole size in Spectre Cloud.
- ❌ Do not confuse the O.D. increment with the finger hole size itself — they are different measurements.
Tip: If you switch insert brands, check the new brand's recommended upper hole size specification. Some brands require more or less expansion room than others — switching brands is a good time to revisit this increment setting.
Related Sections
- 2.2.5 — Insert Installation: STD vs. VACU Grip as the Default
- 2.2.3 — Display in Decimal vs. Fractional
- 4.4 — Insert Fields on a Spec Sheet
- 6.1 — Drilling Your First Ball: Step-by-Step Overview
2.2.7 Display Measurements in your preferred denominator
2.2.7 display
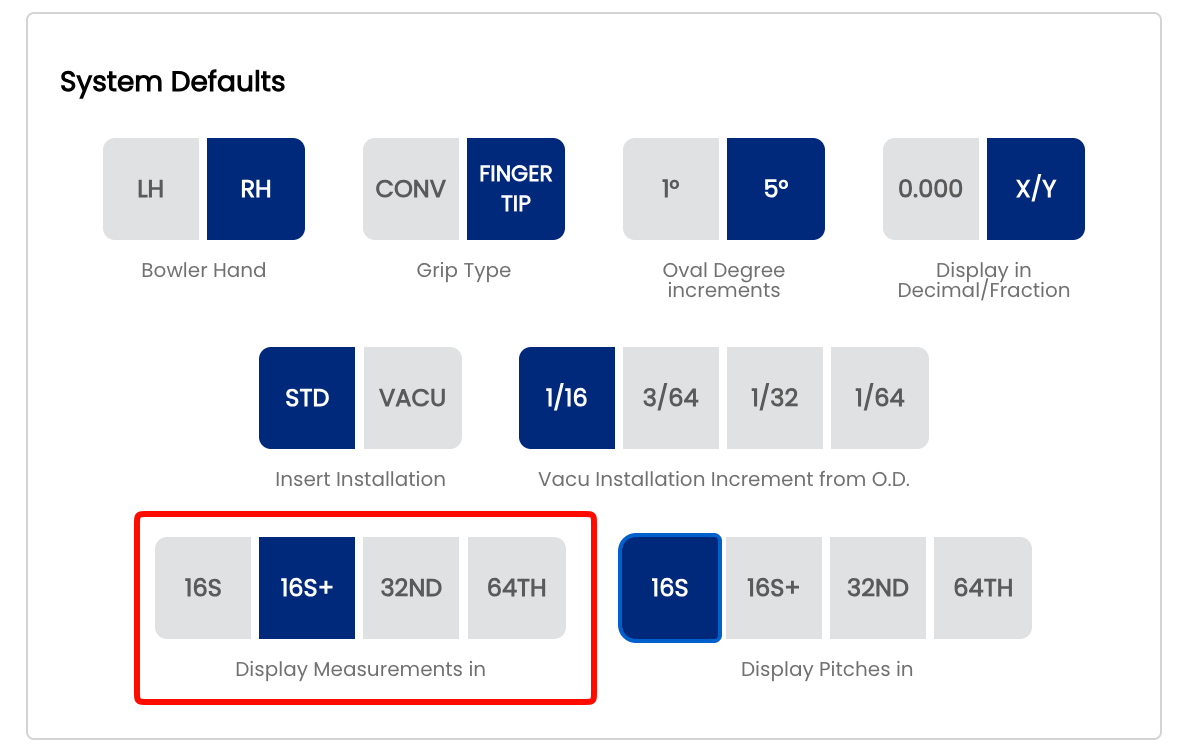
When entering a span measurement on a spec sheet, Spectre Cloud presents a dropdown list of selectable values. This setting controls the spacing and precision of the values in that list — coarser settings show fewer values and less scrolling, finer settings show more values with greater precision. The available options are 16S, 16S+, 32ND, and 64TH.
Note: This setting applies specifically to span measurements. It controls what appears in the span dropdown list on a spec sheet — it does not affect how other measurements such as bridge width, oval dimensions, or hole sizes are displayed.
📏 Understanding the Four Options
16S — Sixteenths
The dropdown lists span values spaced in sixteenth-inch increments (e.g. 4", 4 1/16", 4 1/8", 4 3/16", 4 1/4"…). Values are displayed as simplified fractions. The fewest values in the list — fastest to scroll through. Suitable for shops that measure and record spans to sixteenth precision.
16S+ — Sixteenths with half-sixteenth notation
The dropdown lists the same sixteenth-inch values as 16S, but adds a + value between each pair — representing a half-sixteenth (one thirty-second). For example: 4 1/16", 4 1/16+", 4 1/8" — where 4 1/16+ is a shorthand way of expressing 4 3/32". This gives 32nd-level precision in a format that is easier to read and say out loud than a thirty-second fraction.
32ND — Thirty-seconds
The dropdown lists pitch values spaced in thirty-second-inch increments — the same resolution as 16S+, but displayed as simplified fractions throughout rather than using the + shorthand notation. The list will contain the same number of values as 16S+, just expressed differently. Choose this option if your drillers prefer to read standard 32nd fractions over the + notation.
64TH — Sixty-fourths
The dropdown lists span values spaced in sixty-fourth-inch increments, again displayed as simplified fractions. The most values in the list, requiring the most scrolling. Best suited to shops that fit to sixty-fourth precision or work with bowlers who require very fine span adjustments.
⚙️ Changing the Span Display Format
- Open Spectre Cloud at
cloud.spectrebowling.comand log in. - Select Settings from the menu.
- Navigate to the System Defaults section.
- Locate the Display Measurements in field and select 16S, 16S+, 32ND, or 64TH.
- Changes are saved automatically.
🎳 Which Format Should You Use?
| Situation | Recommended Format | Reason |
|---|---|---|
| Shop measuring to sixteenth precision, minimal scrolling preferred | 16S | Fewest values in the list — fast to navigate |
| Shop wanting 32nd precision in a readable format | 16S+ | 32nd-level precision expressed in a shorthand that is easier to read and communicate than thirty-second fractions |
| Shop recording spans in thirty-seconds, prefer standard fractions | 32ND | 32nd increment with values shown as simplified fractions — familiar and clean |
| Precision fitting, competitive bowlers, very fine adjustments | 64TH | Maximum precision — use when sixty-fourth resolution is needed |
🔄 Relationship to the Global Measurement Format Setting
This setting works alongside the global Decimal vs. Fractional display preference set in 2.2.3. The option you choose here controls the spacing and values in the span dropdown list. If your global format in 2.2.3 is set to Decimal, span values will be shown in decimal form regardless of which option is selected here.
- ❌ There is no per-sheet override for this setting — it applies shop-wide to all span dropdowns.
- ✅ Changing this setting is non-destructive — stored span values do not change, only the dropdown list presentation.
Tip: If your drillers find the span dropdown list too long to scroll through comfortably, switch to a coarser setting. You can always fine-tune an individual span value on the spec sheet after selecting the nearest available value from the list.
Related Sections
2.2.8 Display Pitches by your preferred denominator
2.2.8 display
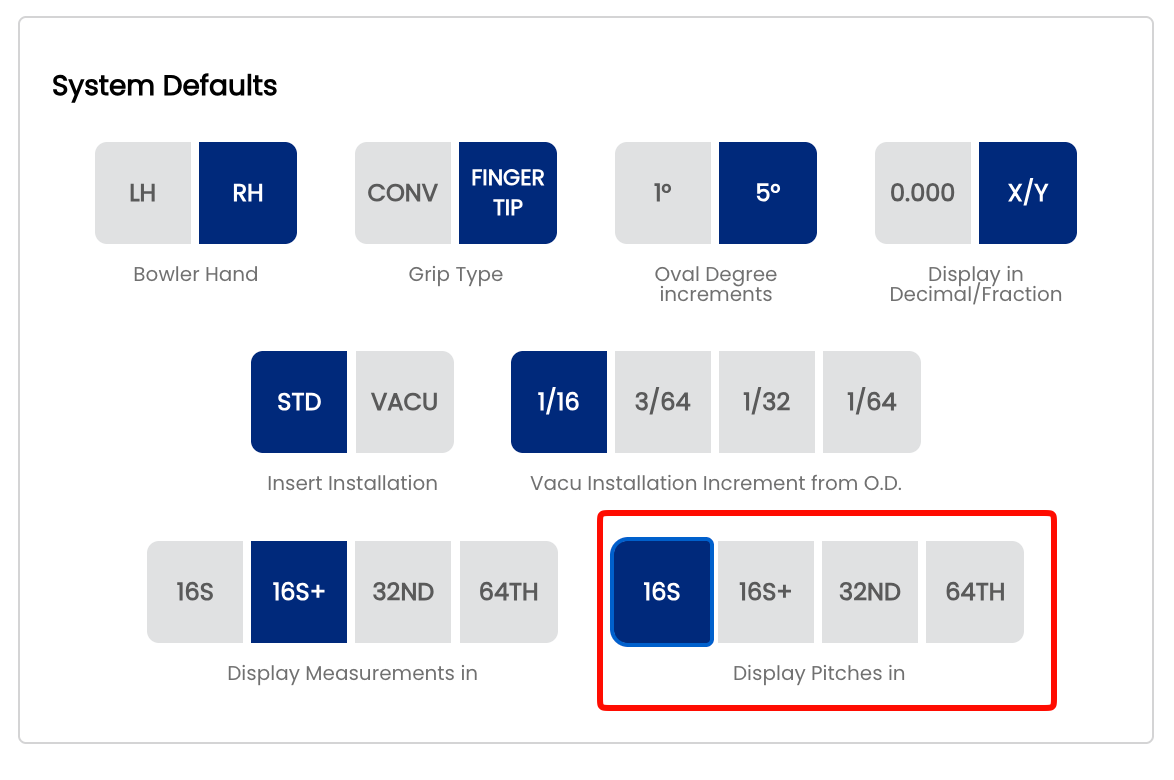
When entering a pitch value on a spec sheet, Spectre Cloud presents a dropdown list of selectable values. This setting controls the spacing and precision of the values in that list — coarser settings show fewer values and less scrolling, finer settings show more values with greater precision. The available options are 16TH, 16TH+, 32ND, 64TH.
Note: This setting applies specifically to pitch measurements on spec sheets (forward, reverse, lateral, and combination pitches for finger and thumb holes). It does not affect span measurements or any other values. Span measurements have their own display setting — see 2.2.7.
📐 What Is Pitch?
Pitch describes the angular tilt of a drilled hole relative to the centre of the bowling ball. It is expressed as a distance measurement — the amount of offset at the surface — rather than as a degree angle. Pitch values are typically small and must be recorded precisely, since even a small difference in pitch can noticeably affect a bowler's feel and release.
- Forward pitch — hole tilts toward the bowler's palm.
- Reverse pitch — hole tilts away from the bowler's palm.
- Lateral pitch — hole tilts left or right.
📏 Understanding the Four Options
16THS — Sixteenths
The dropdown lists pitch values spaced in sixteenth-inch increments. For example: 3/16", 1/4". Values are displayed as simplified fractions. This gives 16th level precision, which is standard practice for most proshops.
16S+ — Sixteenths with half-sixteenth notation
The dropdown lists pitch values spaced in sixteenth-inch increments, with a + value added between each pair representing a half-sixteenth (one thirty-second). For example: 3/16", 3/16+", 1/4" — where 3/16+ is a shorthand way of expressing 7/32". Values are displayed as simplified fractions. This gives 32nd-level precision in a format that is easier to read and say out loud than a thirty-second fraction.
32ND — Thirty-seconds
The dropdown lists pitch values spaced in thirty-second-inch increments — the same resolution as 16S+, but displayed as simplified fractions throughout rather than using the + shorthand notation. The list will contain the same number of values as 16S+, just expressed differently. Choose this option if your drillers prefer to read standard 32nd fractions over the + notation.
64TH — Sixty-fourths
The dropdown lists pitch values spaced in sixty-fourth-inch increments, displayed as simplified fractions. The most values in the list, requiring the most scrolling. Pitch tolerances are finer than span tolerances, which is why 64TH is available here but not for span measurements. Best suited to shops fitting high-performance or highly customised bowlers where small pitch differences are intentional and meaningful.
⚙️ Changing the Pitch Display Format
- Open Spectre Cloud at
cloud.spectrebowling.comand log in. - Select Settings from the menu.
- Navigate to the System Defaults section.
- Locate the Display Pitches in field and select 16S+, 32ND, 64TH, or Decimal.
- Changes are saved automatically.
🎳 Which Format Should You Use?
| Situation | Recommended Format | Reason |
|---|---|---|
| Standard 16th precision | 16ths | 16th-level precision, standard baseline for most proshops |
| Shop wanting 32nd precision in a readable format | 16S+ | 32nd-level precision expressed in a shorthand that is easier to read and communicate than thirty-second fractions |
| Shop recording pitches in thirty-seconds, prefer standard fractions | 32ND | 32nd increment with values shown as simplified fractions — familiar and clean |
| Precision fitting, competitive or high-performance bowlers | 64TH | Maximum fractional precision — captures intentional small pitch adjustments accurately |
| Shop using digital pitch gauges or calipers | Decimal | Enter and read the same format your measuring tool outputs — no conversion needed |
🔄 Relationship to Other Display Settings
This setting works alongside the other measurement display settings in Spectre Cloud but applies only to pitch values on spec sheets:
- ✅ 2.2.3 — sets the global Decimal vs. Fractional preference. If set to Decimal, pitches display in decimal regardless of what is selected here.
- ✅ 2.2.7 — controls span dropdown precision independently. Your pitch and span display formats do not need to match.
- ❌ There is no per-sheet override — this setting applies shop-wide to all pitch dropdowns.
- ✅ Changing this setting is non-destructive — stored pitch values do not change, only the dropdown list presentation.
Tip: If your drillers work from a printed pitch reference card or pitch gauge that uses a specific format, match this setting to that format. Eliminating the mental conversion between the card and the screen reduces errors during fitting.
Related Sections
2.3 — Thumb Hole Preferences
2.3.1 Default Hole Type — Round vs. Oval
2.3.1 KEY setting
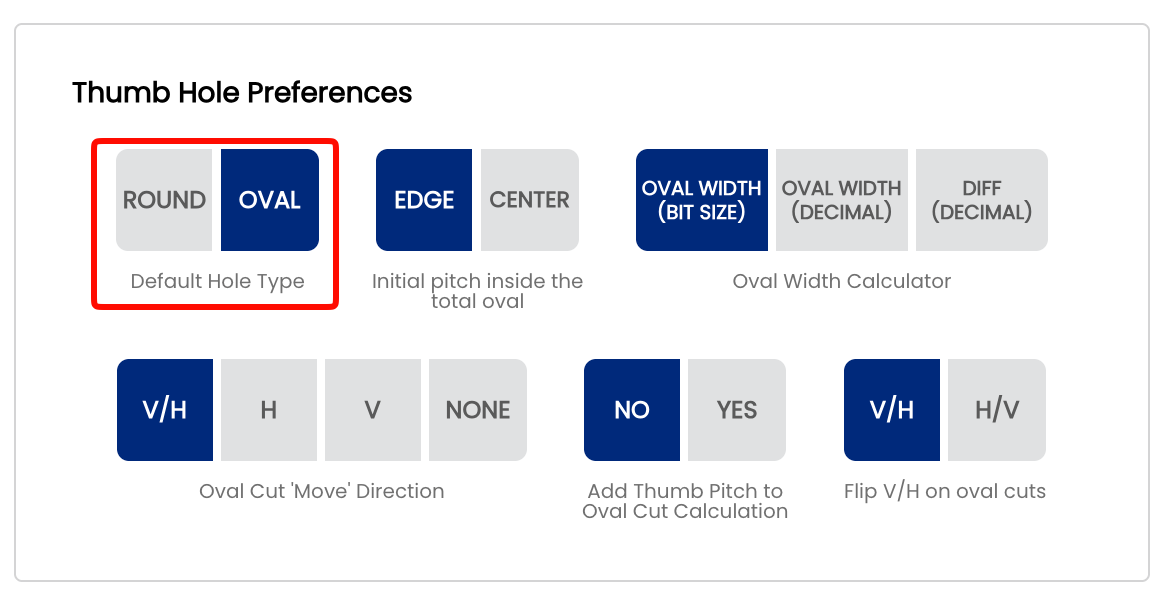
The Default Hole Type setting controls which hole type is pre-selected when you start a new spec sheet. Spectre Cloud supports two options: Round and Oval. Like all system defaults, this setting simply pre-populates the field — it can always be overridden on a per-sheet basis without affecting your shop default.
🕳️ Understanding Hole Types
Round Holes
Round holes are the standard hole type used in the majority of drilling layouts. Drilled at a fixed diameter with a standard bit, they are the most common choice for recreational and league bowlers.
- ✅ Used for most conventional and fingertip drilling styles
- ✅ Compatible with standard inserts and slugs
- ✅ Faster to drill and fit for most customers
Oval Holes
Oval holes are an elongated hole type used when a specific release technique, extra grip surface, or custom fit requires it. Spectre Cloud includes a dedicated Oval Calculator to determine the correct oval dimensions for each bowler — see Book 05 for full coverage.
- ✅ Provides additional contact area for better comfort
- ✅ Often used for bowlers with grip issues or specific fit requirements
- ✅ Oval dimensions are automatically calculated by the Oval Calculator
- ✅ Requires additional measurement steps compared to round holes
📋 Choosing Your Default
| Shop Type | Recommended Default | Reason |
|---|---|---|
| General / recreational pro shop | Round | Most customers receive standard round holes — saves time on every new sheet |
| Shop specialising in custom fitting | Oval | If the majority of your drilling involves oval holes, setting this as default reduces manual selection on every sheet |
⚙️ Changing the Default Hole Type
- Open Spectre Cloud at
cloud.spectrebowling.comand log in. - Select Settings from the menu.
- Navigate to the Thumb Hole Preferences section.
- Locate the Default Hole Type field and select either
RoundorOval. - Changes are saved automatically.
Note: Changing the default hole type only affects new spec sheets created after the setting is changed. Existing spec sheets are not modified.
Related Sections
Tip: Not sure which to pick? Start with Round — it's the right default for the vast majority of pro shops. You can always switch to Oval on a per-sheet basis for bowlers who need it, or update the default later as your shop's workflow evolves.
2.3.2 Initial pitch inside the total oval — Edge vs. Center & Pitch Included Yes/No
2.3.2 oval
When drilling an oval hole, Spectre Cloud needs a reference point from which to calculate the initial pitch of that hole. Because an oval opening has width — unlike a round hole, which has a single center point — there are two valid ways to define that reference. This page covers two related settings that work together: Initial pitch inside the total oval (Edge vs. Center) and Add Thumb Pitch to Oval Cut Calculation (Yes vs. No). The combination of these two settings determines how Spectre Cloud displays your oval cut values on screen.
Not sure which to pick? Ask yourself two questions before setting these up in Spectre: (1) When you cut an oval, is the intended pitch of the hole at the edge (top) of the total oval cut, or in the center? (2) Do you zero out your digital readouts when starting to cut your oval, or do you keep the desired pitch on the readout? Your answers will identify exactly which scenario applies to your shop.
📐 Setting 1 — Initial Pitch Inside the Total Oval
This setting defines the reference point Spectre Cloud uses when calculating the pitch offset for an oval hole.
Edge
The Edge method measures initial pitch from the near edge of the oval opening — the edge closest to the bowler's palm. Your starting point on the press is always the top of the oval hole, with digital readouts initialized to 0/0 at that position. This is the traditional approach that mirrors how most drillers learned to cut ovals using charts or ratios.
- ✅ Consistent with how round hole pitch has historically been measured
- ✅ Familiar to operators trained on conventional pitch measurement techniques
- ✅ Use this setting if you zero out your digital readouts each time you start an oval cut
- ❌ Can introduce slight inconsistency as oval width increases, since the near edge shifts further from the hole's geometric center
Center
The Center method measures initial pitch from the geometric center of the oval opening. Your starting point on the press is always the center of the oval hole, with digital readouts initialized to 0/0 at that position. This is a mathematically consistent reference point regardless of oval width, and makes it straightforward to properly center a slug or interchangeable.
- ✅ Consistent reference regardless of oval width
- ✅ The oval will always be perfectly geometrically centered — no need to touch the press to re-center
- ✅ The easiest method to teach a novice ball driller how to cut ovals
- ✅ Use this setting if you keep the desired pitch on the readout rather than zeroing out
- ❌ Less intuitive for operators accustomed to traditional edge-based measurement
Mark's preference: Center is Mark Buffa's preferred method for measuring and drilling oval holes. If you are following the Spectre drilling methodology or learning from the Spectre YouTube channel, Center is the recommended choice.
📋 Setting 2 — Add Thumb Pitch to Oval Cut Calculation
This setting controls whether the bowler's thumb pitch is included in the oval cut values that Spectre Cloud displays on screen, or whether the cut values are shown as raw oval geometry only with pitch applied separately at the press.
No — Pitch not included
Spectre Cloud displays the oval cut values based on geometry only. The pitch offset is not baked into the numbers. Use this setting if you prefer to zero out your digital readouts before starting each oval cut and set your pitch manually on the press.
- ✅ Clean, simple cut values — pitch handled separately
- ✅ Familiar to drillers who learned using charts or ratio tables
- ✅ Works for both Edge and Center reference methods
Yes — Pitch included
The bowler's thumb pitch is baked directly into every cut value that Spectre Cloud displays. There is no need to zero out the readouts or adjust the press for pitch between cuts — Spectre handles the math and the cuts already account for it. Use this setting if you prefer to keep the desired pitch on the readout throughout the oval cutting sequence.
- ✅ No manual pitch adjustment needed at the press
- ✅ Reduces steps during the oval cutting sequence
- ✅ Easier to teach and less prone to error for new drillers
Mark's preference: Mark Buffa recommends using Yes — pitch included — combined with the Center method. This combination (Scenario 4) is the most consistent and easiest to teach, and is what Mark uses in his own shop.
📊 The Four Scenarios
These two settings combine to produce four possible scenarios. All four result in the exact same oval hole — the difference is only in how the cuts are displayed on screen and how you set up your press. The examples below use a Starting Bit of 3/4", Oval Width of 7/8", and a degree of 45°.
Scenario 1 — Edge, No Pitch
Settings:
| Initial pitch inside the total oval | Add Thumb Pitch to Oval Cut Calculation |
|---|---|
Edge |
No |
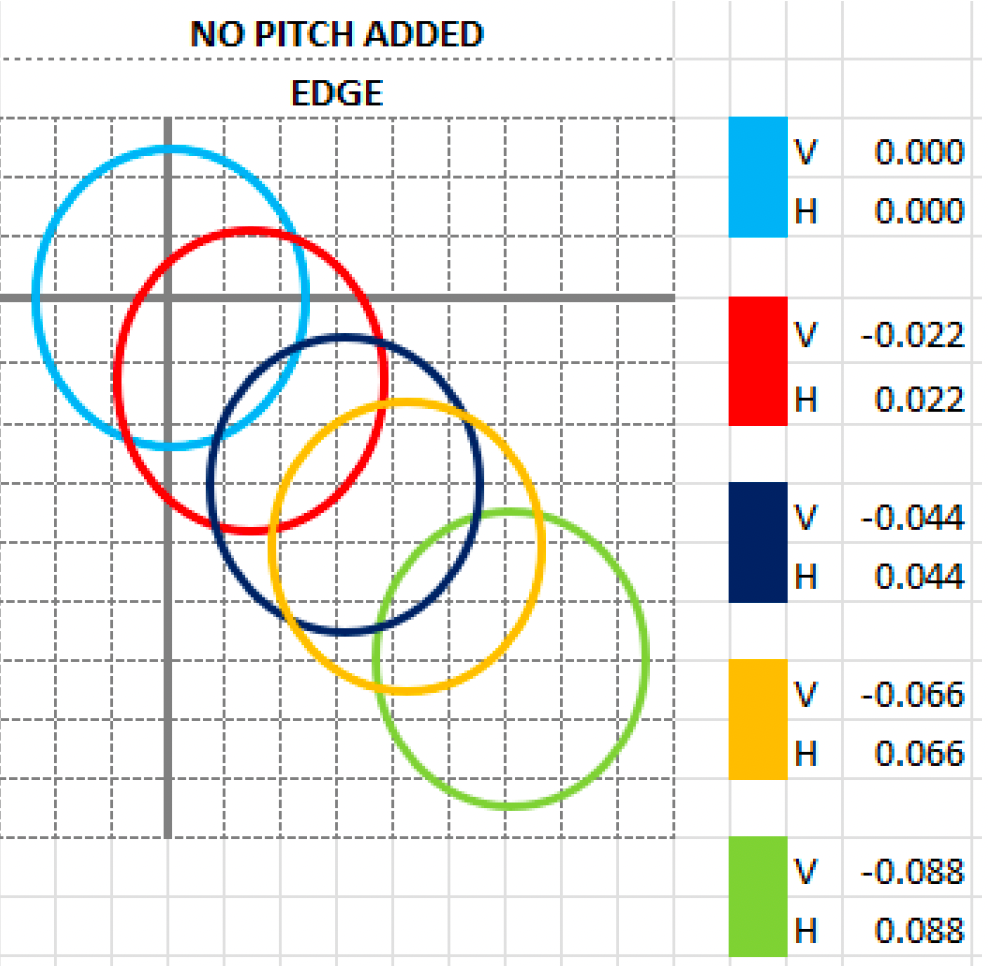
Your starting point is always the top of the oval hole at 0/0. This is the traditional method — how most drillers learned to cut ovals using charts or ratios. Zero out your readouts before every cut and set your pitch manually on the press.
- ✅ Traditional method — most familiar to experienced drillers
- ✅ Clean cut values with no pitch offset applied
- ✅ Best if you prefer to dial in pitch manually on the press
Scenario 2 — Center, No Pitch
Settings:
| Initial pitch inside the total oval | Add Thumb Pitch to Oval Cut Calculation |
|---|---|
Center |
No |
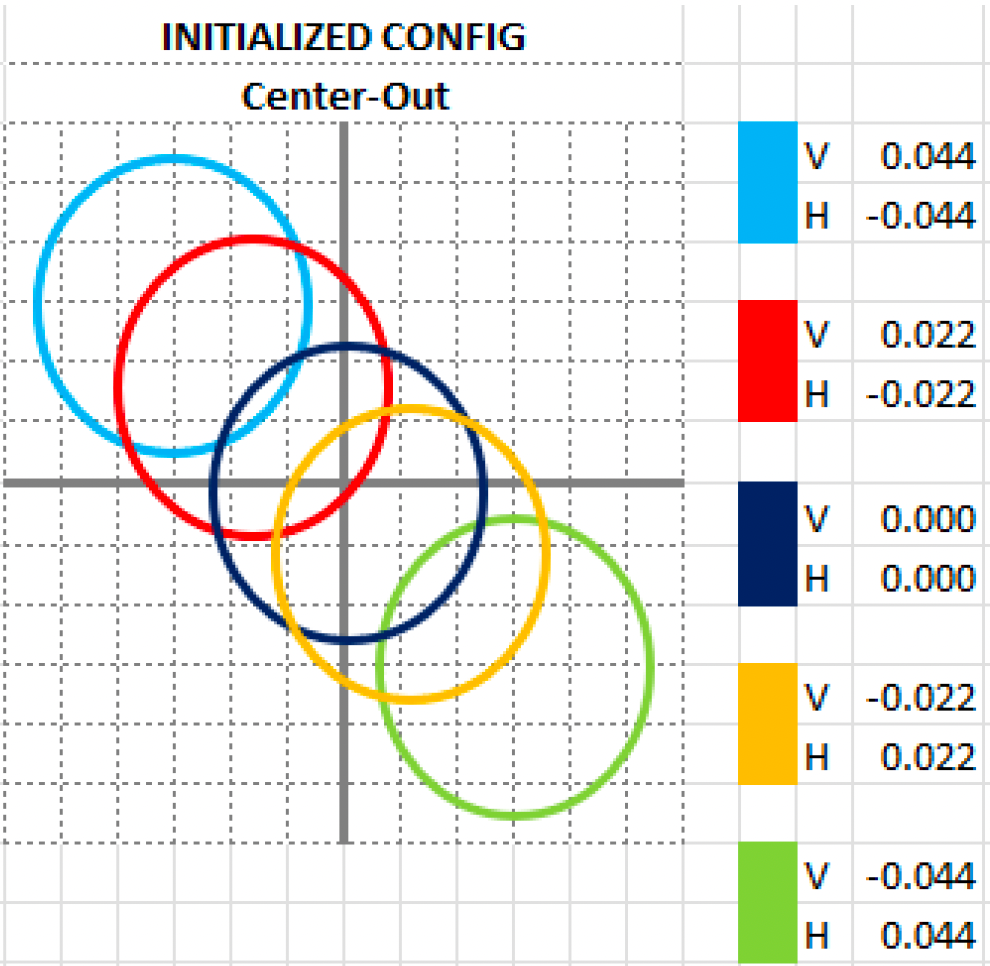
Your starting point is always the center of the oval hole at 0/0. The oval is always geometrically centered. Use this if you zero out your readouts at the center of the oval and prefer to set pitch manually on the press. A great method for learning to center slugs and interchangeables.
- ✅ Oval is always geometrically centered — consistent results every time
- ✅ Excellent for learning to center slugs and interchangeables
- ✅ Clean cut values — pitch handled separately on the press
Scenario 3 — Edge, Pitch Included
Settings:
| Initial pitch inside the total oval | Add Thumb Pitch to Oval Cut Calculation |
|---|---|
Edge |
Yes |
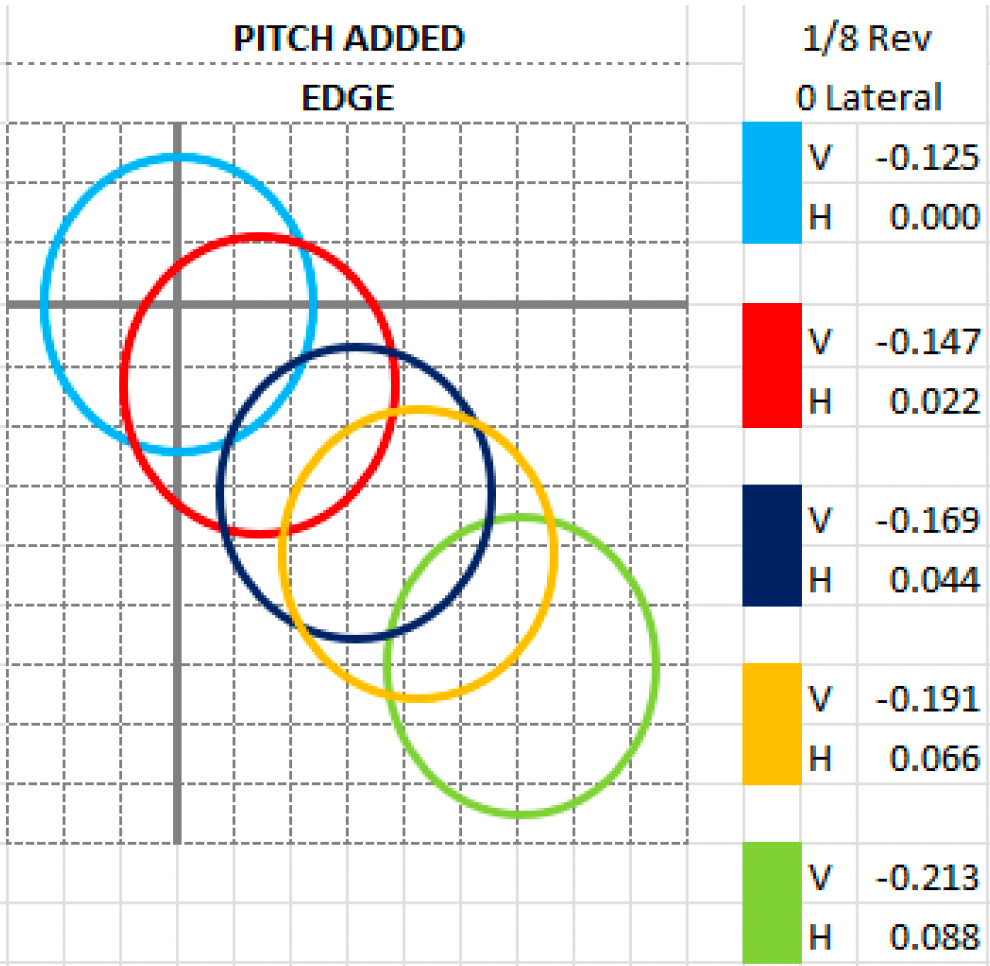
Same geometry as Scenario 1, but the bowler's thumb pitch is baked into the cut values from the first cut. In the example below, a pitch of 1/8" reverse / 0 lateral is included. Use this if you do not want to zero out your readouts — the pitch offset is already built into every value Spectre displays.
- ✅ No need to zero out readouts — pitch is included in every cut
- ✅ Familiar edge-based starting point for experienced drillers
- ✅ Reduces manual press adjustments during the oval cutting sequence
| Cut | V | H | Note |
|---|---|---|---|
| 1 | -0.125 |
0.000 |
Pitch offset applied at first cut |
| 2 | -0.147 |
0.022 |
|
| 3 | -0.169 |
0.044 |
|
| 4 | -0.191 |
0.066 |
|
| 5 | -0.213 |
0.088 |
Scenario 4 — Center, Pitch Included
Settings:
| Initial pitch inside the total oval | Add Thumb Pitch to Oval Cut Calculation |
|---|---|
Center |
Yes |
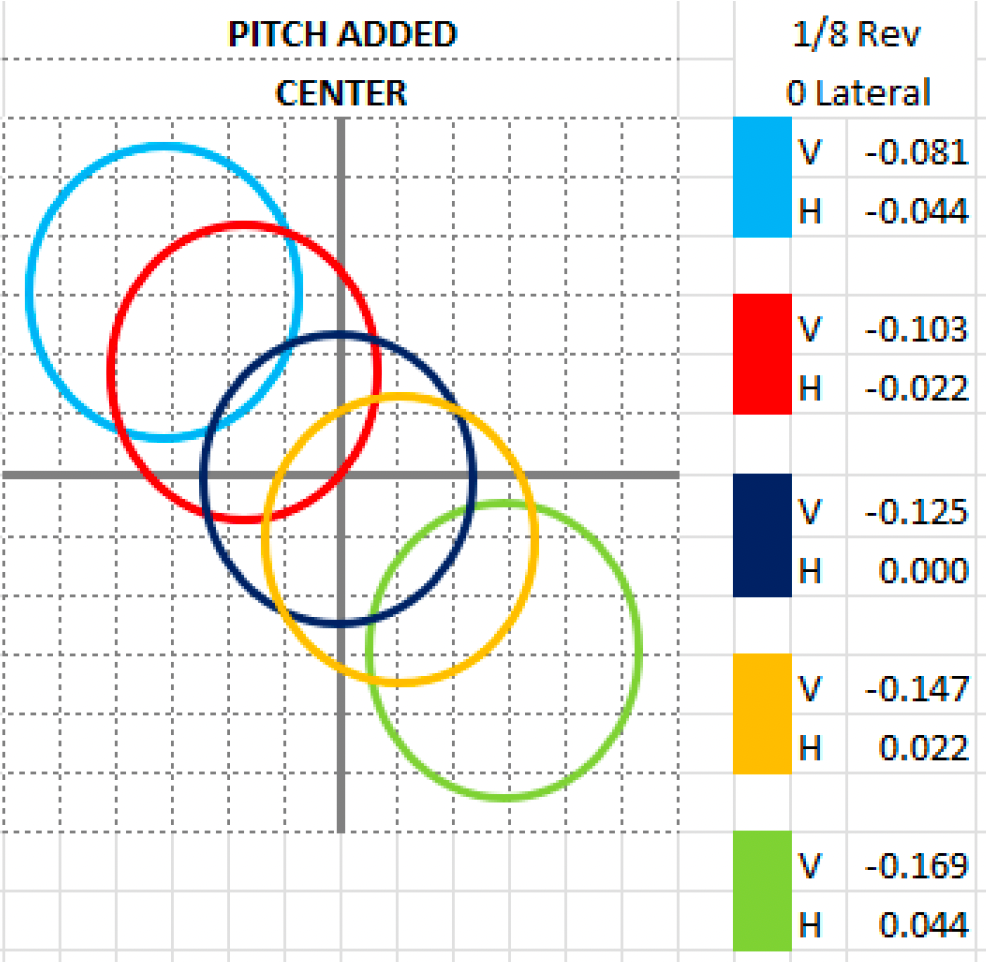
Your starting point is the center of the oval hole with pitch already included in every cut value. There is no need to touch the press at all between cuts — the oval will be perfectly geometrically centered and the pitch offset is built into everything Spectre displays. This is by far the easiest method to teach a novice ball driller how to cut ovals.
- ✅ No press adjustment needed — oval is perfectly geometrically centered automatically
- ✅ Pitch is baked in — no manual offset required at the press
- ✅ The easiest combination for training new drillers
- ✅ Produces a perfectly consistent oval every time with minimal room for error
| Cut | V | H | Note |
|---|---|---|---|
| 1 | -0.081 |
-0.044 |
Center + pitch offset combined |
| 2 | -0.103 |
-0.022 |
|
| 3 | -0.125 |
0.000 |
Center point — pitch only |
| 4 | -0.147 |
0.022 |
|
| 5 | -0.169 |
0.044 |
Mark's preference: Scenario 4 — Center + Pitch Included — is what Mark Buffa uses in his own shop and recommends above all others. The oval is always perfectly geometrically centered, pitch is handled automatically, and there is nothing to adjust on the press between cuts. This is the recommended starting point for any shop adopting the Spectre drilling methodology.
Note: All four scenarios above use the same base values (Starting Bit 3/4", Oval Width 7/8", Degree 45°) and produce the exact same physical oval hole. The only difference is the reference point and whether pitch is included in the displayed cut values.
📐 Quick Reference — Which Scenario Are You?
| Do you zero out readouts? | Is pitch at the edge or center? | Your Scenario |
|---|---|---|
| Yes — zero out at top of oval | Edge | Scenario 1 — Edge, No Pitch |
| Yes — zero out at center of oval | Center | Scenario 2 — Center, No Pitch |
| No — keep pitch on readout | Edge | Scenario 3 — Edge, Pitch Included |
| No — keep pitch on readout | Center | Scenario 4 — Center, Pitch Included ⭐ |
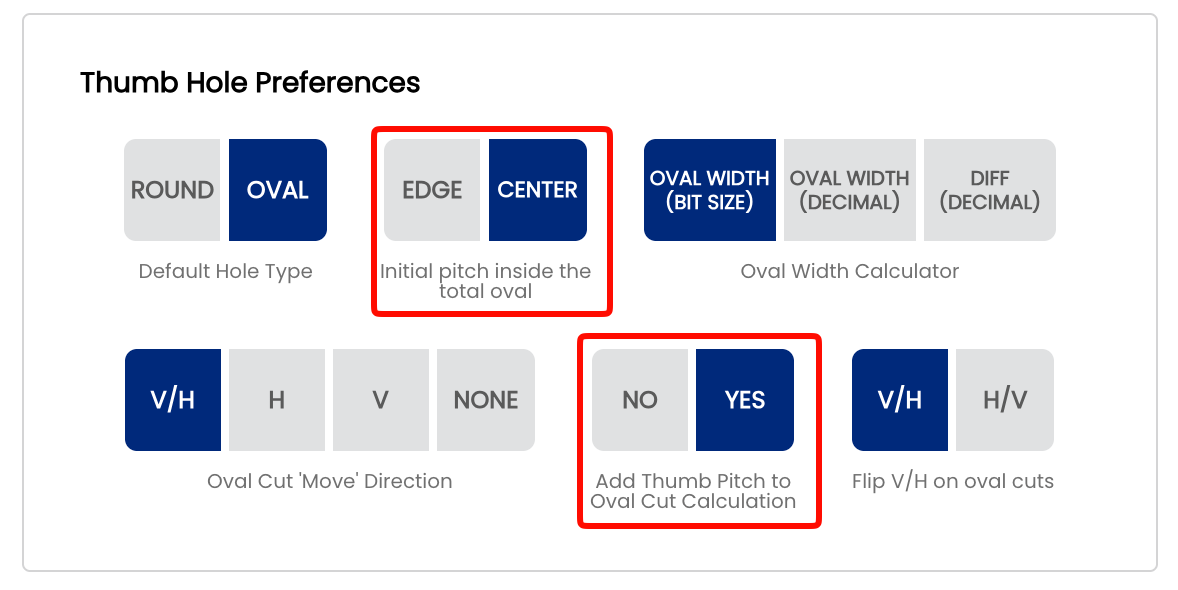
⚙️ Changing These Settings
- Open Spectre Cloud at
cloud.spectrebowling.comand log in. - Select Settings from the menu.
- Navigate to the Thumb Hole Preferences section.
- Locate the Initial pitch inside the total oval field and select either
EdgeorCenter. - Locate the Add Thumb Pitch to Oval Cut Calculation field and select either
NoorYes. - Changes are saved automatically.

Note: Like all system defaults, these settings control only the pre-selection on new spec sheets. They can always be changed on a per-sheet basis without affecting your shop defaults.
🎬 See It in Action
Watch Mark Buffa walk through the full oval thumb cutting process step by step using Spectre Pro Shop Software: How to Cut an Oval Thumb! | Full Pro Shop Tutorial!
For a deeper dive into the oval drilling process including the tapering method, watch Mark Buffa and Jacob Imoo from Jr Pro Shop walk through measuring for bit size, determining oval width and degree, and using the Spectre Oval Calculator step by step: Oval Calculator — Tapering Process
A full reference presentation covering all four scenarios, the math behind the oval calculator, and cut direction explanations is attached to this page: CUTTING OVALS.pdf
Related Sections
Tip: If you are new to oval drilling or setting up Spectre for the first time, select Center and Yes — Scenario 4. It is the most consistent, the most forgiving, and the method Mark Buffa recommends above all others.
2.3.3 Oval Width Calculator — Bit Size, Decimal, or Difference input method
2.3.3 oval
When calculating an oval thumb hole, Spectre Cloud needs to know the oval width — the final size of the opening the bowler's thumb will sit in. This setting controls how you input that measurement. There are three options: Oval Width (Bit Size), Oval Width (Decimal), and Diff (Decimal). All three produce the exact same oval hole — the difference is only in how you measure and enter the value.
The math behind it: Spectre calculates the oval cuts using the formula Oval Width – Starting Bit = Difference. The difference is the hypotenuse of the triangle that determines the V and H moves on your press. Depending on which input method you choose, Spectre either calculates this difference for you or accepts it directly.
📐 The Three Input Options
Oval Width (Bit Size)
You enter the oval width as a drill bit size — for example, 7/8". Spectre Cloud then subtracts the starting bit size from the oval width to calculate the difference internally. This is the most common method for shops that size oval widths using standard drill bits and do not own a caliper.
- ✅ The most widely used method in pro shops
- ✅ No caliper required — drill bits are the measuring tool
- ✅ Input matches the physical bit you used to determine the oval width
- ✅ Spectre calculates the difference automatically — no manual math needed
Example: Starting Bit 3/4", Oval Width 7/8" → Spectre calculates Difference as 0.125" and uses that to determine the V/H cut moves.
Oval Width (Decimal)
You enter the oval width as a decimal value measured directly with a caliper — for example, 0.875". Spectre Cloud then subtracts the starting bit from this decimal value to calculate the difference. This method is preferred by shops that measure oval widths using a digital caliper rather than sizing with drill bits.
- ✅ Precise — caliper measurements capture exact thumb dimensions
- ✅ No conversion needed between bit sizes and decimal values
- ✅ Spectre still calculates the difference automatically from the decimal oval width
Example: Starting Bit 3/4" (0.750"), Oval Width measured by caliper as 0.875" → Spectre calculates Difference as 0.125".
Diff (Decimal)
Instead of entering the oval width at all, you enter the difference directly as a decimal value in thousandths — for example, 0.125. This is equivalent to performing the subtraction Oval Width – Starting Bit yourself before entering anything into Spectre. This method is used by experienced drillers who measure the difference directly with a caliper rather than measuring the full oval width.
- ✅ Fastest input method for experienced drillers who already know their difference
- ✅ Useful when measuring the difference directly with a caliper at the thumb hole
- ❌ Less intuitive for newer drillers unfamiliar with the underlying math
Example: You measure directly with a caliper and determine the difference is 0.125". Enter 0.125 into Spectre — no oval width or starting bit calculation needed.
📊 Which Method Should You Use?
| Situation | Recommended Option | Reason |
|---|---|---|
| Shop sizes ovals using drill bits | Oval Width (Bit Size) | Enter the bit you used — Spectre does the math |
| Shop measures oval width with a digital caliper | Oval Width (Decimal) | Enter the caliper reading directly — no conversion needed |
| Experienced driller who measures the difference directly | Diff (Decimal) | Similar to Decimal Oval width, simply having to 0 your caliper once you have the starting bit. |
| New to oval drilling | Oval Width (Bit Size) | Most intuitive — matches the physical tool you use to size the hole |
🧮 Understanding the Math
Regardless of which input method you choose, Spectre Cloud always uses the same underlying calculation to determine the oval cut moves:
- Oval Width – Starting Bit = Difference — the difference is the hypotenuse of the triangle formed by the oval cut path.
- The oval degree is used as the angle of that triangle.
- Spectre applies trigonometry (
sinandcos) to the difference and degree to calculate the precise V and H displacement needed for each cut. - Cuts are displayed in 32nds at most — cutting in 32nds produces a smooth oval hole with minimal chatter.
Note: No matter which input method you use, all three options produce the exact same oval hole when the underlying values are equivalent. The choice is purely about how you prefer to measure and enter the data.
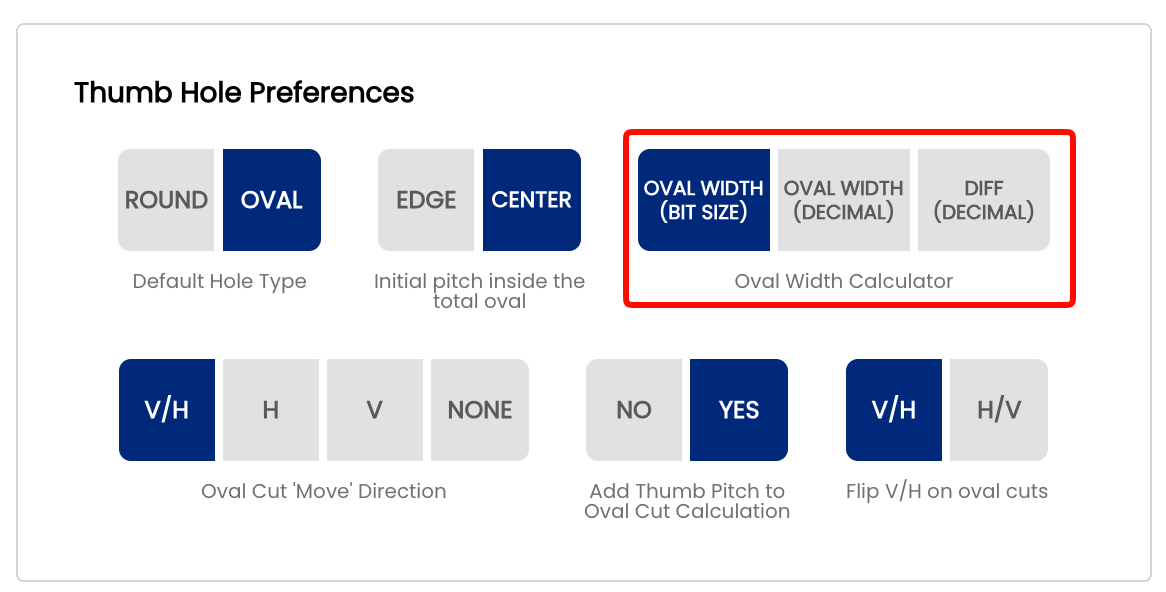
⚙️ Changing This Setting
- Open Spectre Cloud at
cloud.spectrebowling.comand log in. - Select Settings from the menu.
- Navigate to the Thumb Hole Preferences section.
- Locate the Oval Width Calculator field and select Oval Width (Bit Size), Oval Width (Decimal), or Diff (Decimal).
- Changes are saved automatically.
Note: Like all system defaults, this setting controls only the pre-selection on new spec sheets. It can always be changed on a per-sheet basis without affecting your shop default.
🎬 See It in Action
Watch Mark Buffa demonstrate the full oval measurement process using drill bits and Spectre Pro Shop Software: How to Measure Ovals | Bowling Pro Shop Tutorial
For the caliper method specifically, watch Mark Buffa walk through measuring an oval thumb using a digital caliper and entering the value directly into Spectre: How To Measure An Oval Thumb | Caliper Method
For the full oval cutting process including how these measurements feed into the Spectre Oval Calculator, see: How to Cut an Oval Thumb! | Full Pro Shop Tutorial!
A full reference presentation covering the oval calculator math, all four Edge/Center + Pitch scenarios, and cut direction explanations is attached to page 2.3.2: Cutting Ovals — Spectre Pro Shop Software.
Related Sections
Tip: If you are new to oval drilling, start with Oval Width (Bit Size) — it is the most intuitive method and matches the physical tool you use at the press. As your workflow develops and you start using a caliper for more precise measurements, switching to Oval Width (Decimal) or Diff (Decimal) is a natural progression.
2.3.5 Oval Cut 'Move' Direction — V/H, H only, V only, or None
2.3.5 oval
The Oval Cut Move Direction setting controls which directional components Spectre Cloud calculates and displays when outputting oval cut values. Depending on your drill press type and how you cut ovals, you may work with both vertical and horizontal movement, one direction only, or prefer to enter the values manually without the calculator's guidance. This setting ensures the oval calculator output matches exactly what your press needs.
🔄 The Four Options Explained
V/H — Vertical and Horizontal
Spectre Cloud calculates and displays both the vertical (V) and horizontal (H) movement values needed to cut the oval along the hypotenuse of the desired triangle. This is the standard method for most drill presses with independent X/Y axis digital readouts. The V and H values are the two sides of the right triangle formed by the oval cut path — together they define the full shape and direction of the cut.
- ✅ The most common setting for standard drill presses with digital readouts
- ✅ Full oval specification — both axes displayed for every cut
- ✅ Required when your press needs both figures to execute the cut sequence
- ✅ Matches the cut tables shown in the four scenarios on page 2.3.2
H — Horizontal only
Spectre Cloud calculates and displays both values, but only the horizontal (H) axis will have movement calculated. The vertical (V) value will display as 0.000 — or as the pitch value if Add Thumb Pitch to Oval Cut Calculation is set to Yes — since no vertical movement is needed. Used mostly when you have an Ovalmatic press, VISE Ferrari Jig or similar equipment where you can swing the ball to a desired degree on the vertical axis. From there, you cut in one direction only — horizontal — and the oval shape is achieved through the combination of the swing angle and the single-axis cut.
- ✅ Designed for Ovalmatic-style presses that swing the ball to set the vertical component
- ✅ V value still displays — shows
0.000or the pitch offset if pitch is included - ✅ No vertical movement is calculated — only horizontal cuts are needed at the press
V — Vertical only
Spectre Cloud calculates and displays both values, but only the vertical (V) axis will have movement calculated. The horizontal (H) value will display as 0.000 — or as the pitch value if Add Thumb Pitch to Oval Cut Calculation is set to Yes — since no horizontal movement is needed. The mirror of H only — used for presses that cut ovals on a single vertical axis where the horizontal component is handled by swinging or rotating the ball.
- ✅ For presses that cut ovals on a single vertical axis
- ✅ H value still displays — shows
0.000or the pitch offset if pitch is included - ✅ No horizontal movement is calculated — only vertical cuts are needed at the press
None — Manual input
No directional movement values are displayed by the oval calculator. This option allows you to manually input your cuts and bypass the oval calculator's directional output entirely. The oval width and degree are still used for reference, but Spectre Cloud does not output V or H values — you determine and enter the cuts yourself.
- ✅ For experienced drillers who prefer to work from their own calculated values
- ✅ Useful for shops using external reference charts or custom cut tables
- ❌ You do not benefit from Spectre's automatic V/H calculation in this mode
Note: Even if you calculate an oval, you can always add manual cuts to the calculated math by pressing the + button.
📊 Quick Reference
| Press Type / Workflow | Recommended Setting | Reason |
|---|---|---|
| Standard drill press with X/Y digital readouts | V/H | Both axes needed — Spectre calculates the full V and H move sequence |
| Ovalmatic or swing-style press | H or V | Ball is swung to set one axis — only one directional value needs movement calculated |
| Manual entry, external charts, or custom cut tables | None | Bypass the calculator output and enter your own values |
📐 The Math Behind the Cut Directions
Spectre Cloud uses the oval difference (Oval Width – Starting Bit) as the hypotenuse of a right triangle, and the oval degree as the angle. It then applies trigonometry to determine the precise V and H displacement for each cut:
- The V value is calculated using the
sinof the oval degree applied to the difference. - The H value is calculated using the
cosof the oval degree applied to the difference. - Spectre displays cuts in 32nds at most — cutting in 32nd increments produces a smooth oval hole with minimal chatter on the ball surface.
- No matter which direction setting you use, Spectre always cuts in a linear direction from the top of the oval moving toward the bottom, minimizing table movement for greater time savings and consistency.
Note: All four direction settings produce the exact same physical oval hole. The setting only controls what is displayed on screen — the underlying calculation is always performed in full.
⚙️ Changing This Setting
- Open Spectre Cloud at
cloud.spectrebowling.comand log in. - Select Settings from the menu.
- Navigate to the Thumb Hole Preferences section.
- Locate the Oval Cut 'Move' Direction field and select V/H, H, V, or None.
- Changes are saved automatically.
Note: Like all system defaults, this setting controls only the pre-selection on new spec sheets. It can always be changed on a per-sheet basis without affecting your shop default.
🎬 See It in Action
Watch Mark Buffa walk through the full oval cutting process including how V and H cut values are used at the press: How to Cut an Oval Thumb! | Full Pro Shop Tutorial!
For the complete tapering process and a deeper look at how the oval calculator generates cut values: Oval Calculator — Tapering Process
A full reference presentation covering all four oval cut scenarios, the math behind the calculator, and detailed cut direction diagrams is attached to page 2.3.2: Cutting Ovals — Spectre Pro Shop Software.
Related Sections
Tip: Not sure which option your press needs? Start with V/H — it gives you the full picture. Once you have confirmed which axis or axes your press uses for oval cuts, you can narrow the display to keep the calculator output clean and unambiguous at the press.
2.3.6 Flip V/H on oval cuts — matching your drill press DRO display order
2.3.6 oval
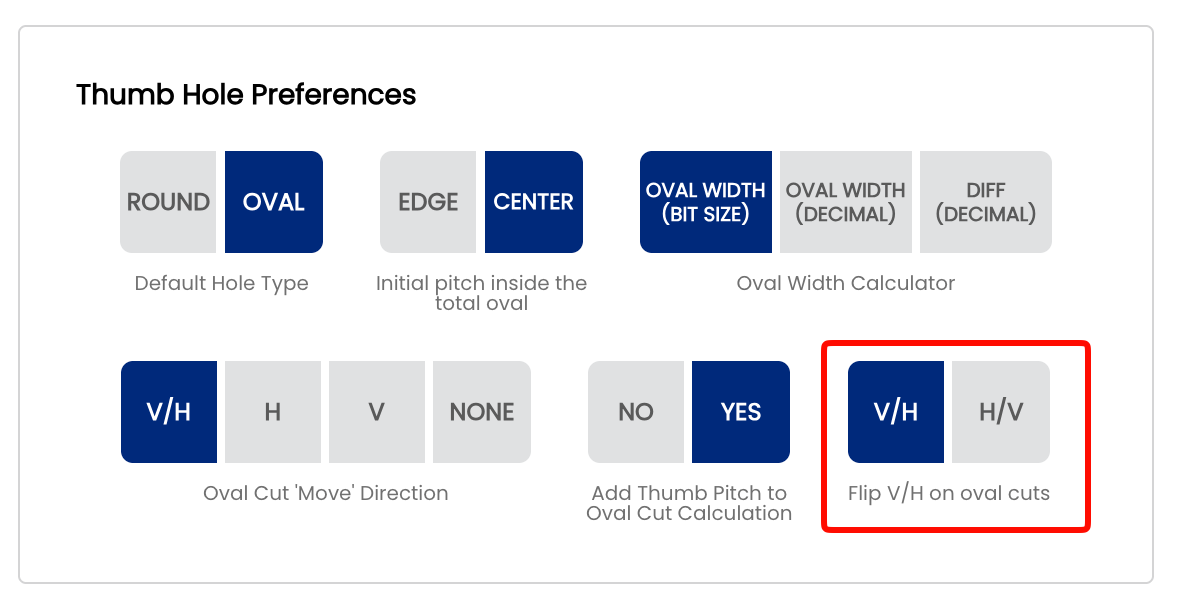
The Flip V/H on oval cuts setting controls the display order of the vertical and horizontal values in the oval cut cards shown by the Spectre Cloud oval calculator. This setting should match the order your drill press digital readout (DRO) displays its axes — so that what you read on screen matches exactly what you see on the press. This is a display-only preference — the underlying oval calculations, cut values, and spec sheet data are completely unaffected.
🖥️ What Changes
Each oval cut is displayed as a numbered card showing the V and H movement values for that step. This setting controls which value appears on top within each card:
- ✅ V/H — V on top of H. Use this if your DRO displays the vertical axis first.


- ✅ H/V — H on top of V. Use this if your DRO displays X on top of Y — the standard configuration for new DROs from Jayhawk and Innovative.


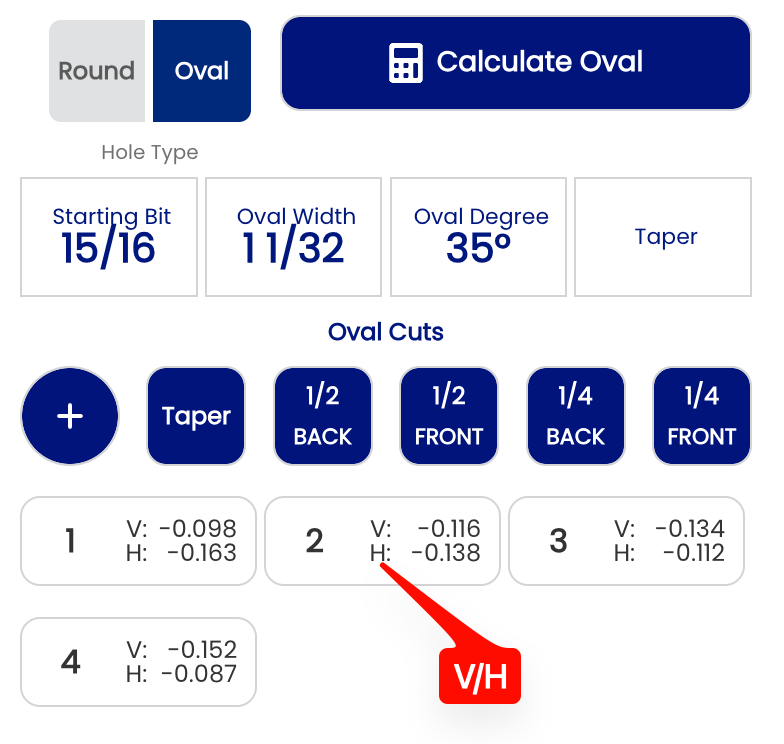
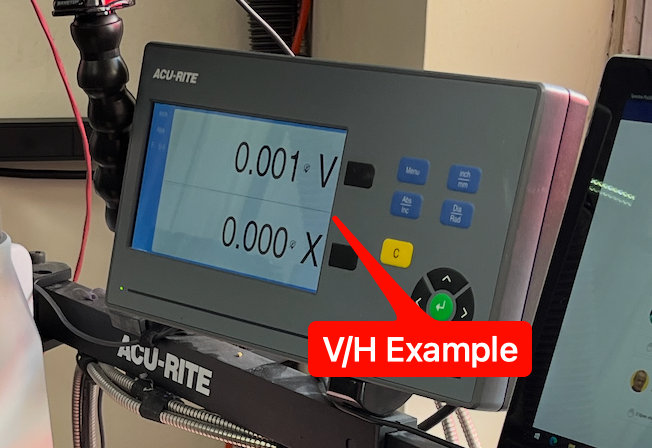
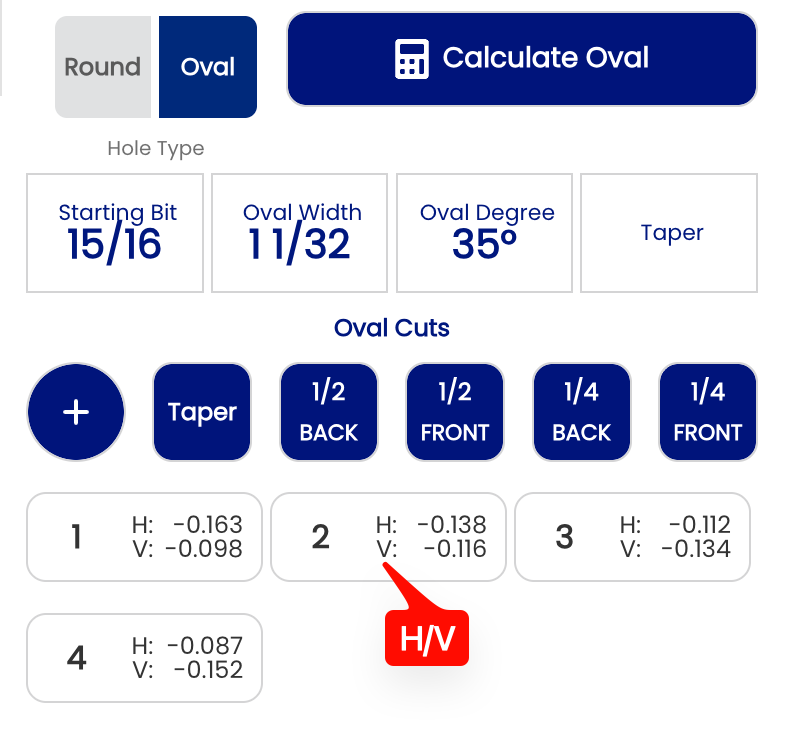
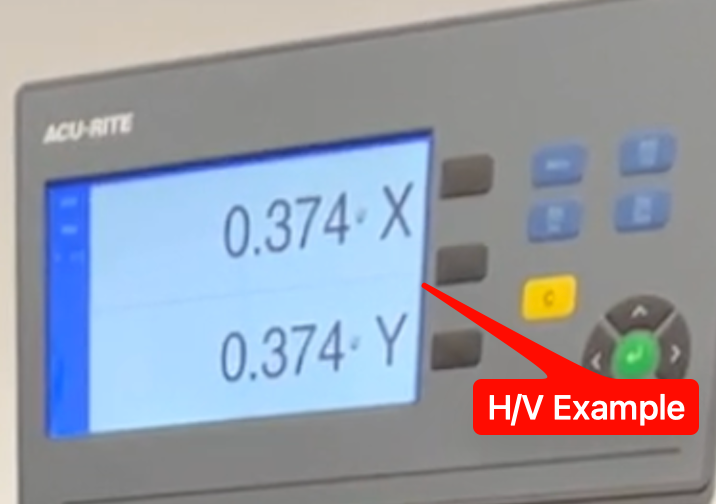
Note: This setting only changes the order in which V and H are displayed in the cut cards. The values themselves — and the oval hole they produce — are identical regardless of which option is selected.
⚙️ Changing This Setting
- Open Spectre Cloud at
cloud.spectrebowling.comand log in. - Select Settings from the menu.
- Navigate to the Thumb Hole Preferences section.
- Locate the Flip V/H on oval cuts field and select either V/H or H/V.
- Changes are saved automatically.
Related Sections
Tip: Match this setting to the axis order on your drill press DRO. If your readout displays X on top of Y — as is the case with new DROs from Jayhawk and Innovate — select H/V to keep the display consistent between Spectre and your press. Eliminating the mental transposition between screen and press reduces errors during the cutting sequence.
2.4 — Drill Press Calibration
2.4.1 Does your machine display Right Pitch Positive? (YES / NO)
2.4.1 calibration
Different drill presses use different sign conventions when displaying pitch values — some treat right pitch as positive, others treat it as negative. This setting tells Spectre Cloud how your machine reads pitch so that the values displayed in spec sheets and the oval calculator match what your press expects. Getting this right eliminates sign-reversal errors at the drill head.
📐 Why Sign Convention Matters
Pitch direction — whether a value is positive or negative — is not universal across drill press manufacturers. If Spectre Cloud and your press use opposite conventions, a spec sheet showing +1/8" right pitch would need to be mentally reversed to -1/8" before drilling. Over time, that kind of manual correction introduces risk. This setting removes it entirely.
- ✅ When set correctly, pitch values in Spectre Cloud match your press readout exactly — no sign reversal needed at the machine.
- ✅ Reduces drilling errors caused by misread or mentally inverted pitch values.
- ✅ Particularly important in multi-staff shops where not every driller may know to apply a sign correction.
- ❌ If set incorrectly, every pitch value displayed will be the inverse of what the press expects — check this setting first if your drilled pitch is consistently opposite to the spec.
Note: This setting affects how pitch values are displayed throughout Spectre Cloud — it does not change the physical pitch recorded during a bowler fitting. The underlying measurement is preserved; only the sign used to represent it on screen is adjusted to match your machine.
🛠️ Configuring the Right Pitch Sign Convention
📊 How the Setting Affects Displayed Pitch Values
| Physical Pitch Direction | Right Pitch as Positive: Yes | Right Pitch as Positive: No |
|---|---|---|
| Right pitch | +1/8" |
-1/8" |
| Left pitch | -1/8" |
+1/8" |
| No lateral pitch | 0 |
0 |
Note: Zero pitch is unaffected by this setting — a value of 0 is the same regardless of sign convention.
🔍 How to Determine Your Machine's Convention
If you are unsure how your press represents right pitch, the quickest way to confirm is to consult your press manual or run a known-pitch test drill and compare the readout to the spec. Common conventions by press type include:
- ✅ Many dedicated bowling drill presses (e.g. Jayhawk, Innovative) display right pitch as positive — but always verify with your specific model's documentation.
- ✅ Some general-purpose milling machines adapted for bowling use may follow a different convention depending on table orientation.
- ✅ When in doubt, drill a small test on a scrap plug with a known right pitch value and check the result against the spec before committing to a bowler's ball.
Tip: Check your press manual under "axis convention," "coordinate system," or "pitch direction" — these terms are commonly used in drill press documentation to describe sign behavior.
🏢 Multi-Press and Multi-Location Shops
If your shop runs more than one drill press, or manages multiple locations, different machines may use different sign conventions. ⚠️ Verify with your Spectre team: confirm whether this setting can be configured independently per device or location, or whether it applies account-wide — consistent with the open question raised in 2.3.6.
- ✅ Single-press shops: set once, leave alone.
- ✅ Multi-press shops: confirm each machine's convention and configure accordingly.
- ✅ Multi-location chains: coordinate with location managers before applying or changing this setting to avoid inconsistent pitch display across sites.
☁️ Scope of This Setting
This setting is stored at the account level and syncs across all devices. ⚠️ Verify with your Spectre team: confirm per-user vs. per-account/shop scope, and whether per-device overrides are possible for multi-press environments — consistent with findings from 2.3.5 and 2.3.6.
Related Sections
- 2.3.6 — Configuring your milling machine orientation: flipping H/V for oval cuts
- 2.3.5 — Oval cut movement direction: V & H, V only, H only, None
- 2.4.2 — Next setting in this chapter (if applicable)
- 4.x — Spec Sheet: entering and reviewing pitch values
- 5.x — Oval Calculator: pitch interaction with oval cuts
Tip: This is one of the first settings to configure when installing Spectre Cloud in a new shop. Get it right on day one and pitch values will be unambiguous for every driller on your team from the start.
```
2.4.2 Does your machine display Forward Thumb Pitch Positive? (YES / NO)
Does your machine display Forward Thumb Pitch Positive? (YES / NO)
2.4.2 calibration
Just as drill presses vary in how they represent lateral (right/left) pitch direction, they also differ in how they display forward and reverse thumb pitch. This setting tells Spectre Cloud whether your machine treats forward thumb pitch as a positive or negative value, ensuring that pitch figures on spec sheets match your press readout without any manual sign correction at the drill head.
📐 Why Forward Thumb Pitch Sign Convention Matters
Forward pitch tilts the thumb hole opening toward the fingers — it is one of the most commonly applied pitch adjustments in pro shop fitting. If Spectre Cloud and your press disagree on whether forward pitch is positive or negative, every thumb pitch value on every spec sheet will need to be mentally inverted before drilling. This setting eliminates that friction.
- ✅ When set correctly, forward and reverse thumb pitch values display exactly as your press expects — no sign conversion required.
- ✅ Reduces risk of drilling the wrong pitch direction, particularly for less experienced staff.
- ✅ Works in tandem with the right pitch sign setting (2.4.1) to give a fully consistent pitch sign convention across both axes.
- ❌ If set incorrectly, forward pitch will display as a negative value (or vice versa) — the first sign of a problem is drilled pitch that is consistently the mirror of the spec.
Note: This setting adjusts how forward/reverse thumb pitch is displayed throughout Spectre Cloud. The physical pitch value recorded during a bowler fitting is preserved — only the sign used to represent it on screen changes to match your machine's convention.
📊 How the Setting Affects Displayed Pitch Values
| Physical Pitch Direction | Forward as Positive: Yes | Forward as Positive: No |
|---|---|---|
| Forward pitch | +1/4" |
-1/4" |
| Reverse pitch | -1/4" |
+1/4" |
| Zero pitch | 0 |
0 |
Note: As with the right pitch setting, a value of 0 is unaffected — zero pitch is zero pitch regardless of sign convention.
🛠️ Configuring Forward Thumb Pitch Sign Convention
🔍 How to Determine Your Machine's Convention
If you are unsure how your press represents forward thumb pitch, consult your press manual or run a known-pitch test before drilling a bowler's ball:
- Set up a scrap ball or plug on the press.
- Dial in a small, known forward pitch value on the machine.
- Check the sign your press displays for that value.
- If the press shows a positive number — set this option to Yes.
- If the press shows a negative number — set this option to No.
Tip: If you have already confirmed your press convention for right pitch (2.4.1), check whether the same sign logic applies to your forward/reverse axis — many presses use a consistent coordinate system across all axes, meaning both settings will be the same. However, do not assume this without verifying.
⚙️ 2.4.1 and 2.4.2 Together — Full Pitch Sign Configuration
Settings 2.4.1 and 2.4.2 work as a pair to fully define the pitch sign convention for your machine across both axes:
| Setting | Axis Covered | Values Affected |
|---|---|---|
| 2.4.1 — Right pitch as positive | Lateral (left/right) | Right and left pitch on all spec sheets |
| 2.4.2 — Forward thumb pitch as positive | Forward/reverse | Forward and reverse thumb pitch on all spec sheets |
Configure both settings together when setting up Spectre Cloud for the first time, or whenever a new drill press is introduced to the shop. Once both are confirmed against your machine, pitch values throughout the app will be immediately usable at the press without translation.
🏢 Multi-Press and Multi-Location Shops
As raised in 2.4.1, different machines may use different sign conventions. The same considerations apply here — if this question is resolved for 2.4.1, apply the same answer to 2.4.2. ⚠️ Verify with your Spectre team: confirm whether this setting can be configured independently per device or location, or whether it applies account-wide.
- ✅ Single-press shops: configure both 2.4.1 and 2.4.2 once during initial setup.
- ✅ Multi-press shops: verify both axes on each machine before drilling.
- ✅ Multi-location chains: treat this as part of the new-location onboarding checklist alongside 2.4.1.
☁️ Scope of This Setting
This setting is stored at the account level and syncs across all devices, consistent with 2.4.1 and other settings in this chapter. ⚠️ Verify with your Spectre team: confirm per-user vs. per-account/shop scope and whether per-device overrides are possible.
Related Sections
- 2.4.1 — Does your machine display right pitch as positive? Y/N
- 2.4.3 — Next setting in this chapter (if applicable)
- 2.3.6 — Configuring your milling machine orientation: flipping H/V for oval cuts
- 4.x — Spec Sheet: entering and reviewing pitch values
- 5.x — Oval Calculator: pitch interaction with oval cuts
Tip: Make 2.4.1 and 2.4.2 part of your new-staff onboarding checklist. A driller who understands the shop's pitch sign convention — and knows where to find these settings — will produce consistent results from day one rather than discovering a sign mismatch after a ball has already been drilled.
```
2.4.3 Display +/- in pitch tiles — showing polarity to match DRO's to avoid errors
2.4.3 calibration
Even with sign conventions correctly configured in 2.4.1 and 2.4.2, a raw + or - symbol on a pitch tile can be easy to miss at a glance — especially under shop lighting or on a small screen. The Display +/- in Pitch Tiles setting adds a visible directional indicator to each pitch tile, making forward, reverse, right, and left pitch unmistakable without requiring the driller to interpret a sign.
🔍 What Are Pitch Tiles?
Pitch tiles are the individual display blocks within a spec sheet that show each pitch value — thumb forward/reverse, thumb lateral, and finger pitch. When this setting is enabled, each tile gains a directional arrow or symbol alongside the numeric value, giving the driller an immediate visual cue about pitch direction rather than relying on the + or - sign alone.
- ✅ Directional indicators are especially helpful for less experienced drillers who may not yet have sign conventions fully internalized.
- ✅ Useful in high-volume shops where spec sheets are read quickly under pressure.
- ✅ Reduces the risk of a misread sign causing a pitch to be drilled in the wrong direction.
- ❌ Experienced drillers who are fully comfortable with sign notation may prefer to leave this off for a cleaner spec sheet display.
Note: This is a display preference only — enabling or disabling it has no effect on the pitch values stored in spec sheets or transmitted to a tethered drill press. ⚠️ Verify with your Spectre team: confirm the exact visual form of the directional indicator — whether it is an arrow (e.g. ↑ ↓ ← →), a word label (e.g. "Forward," "Right"), or a combined symbol+label.
📋 How Pitch Tiles Appear With and Without This Setting
| Display Off | Display On |
|---|---|
|
|
|
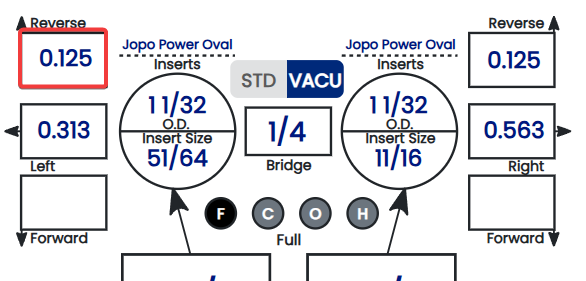
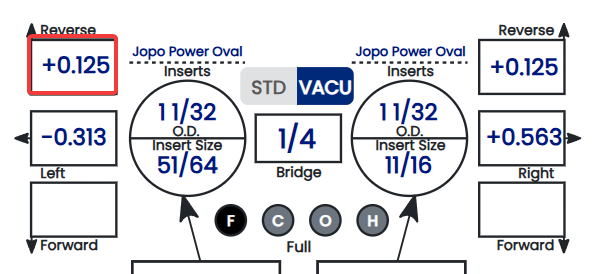
Note: The examples above illustrate the concept — the exact arrow style and label wording may differ in the app. ⚠️ Verify with your Spectre team: confirm the precise visual format and whether zero pitch tiles display any indicator at all.
🛠️ Enabling or Disabling Direction Indicators
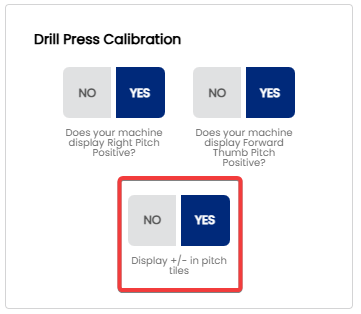
⚙️ How This Setting Relates to 2.4.1 and 2.4.2
Settings 2.4.1, 2.4.2, and 2.4.3 form a complete pitch display configuration set. Each addresses a different layer of how pitch values are communicated to the driller:
| Setting | What It Controls | Primary Benefit |
|---|---|---|
| 2.4.1 — Right pitch as positive | Sign convention for lateral pitch | Matches press readout on the lateral axis |
| 2.4.2 — Forward thumb pitch as positive | Sign convention for forward/reverse pitch | Matches press readout on the forward/reverse axis |
| 2.4.3 — Display +/- in pitch tiles | Visual directional indicator on each tile | Makes direction unmistakable at a glance |
Configure all three together during initial shop setup for the most consistent and error-resistant pitch display experience.
☁️ Scope of This Setting
This setting is stored at the account level and syncs across all devices, consistent with 2.4.1, 2.4.2, and other settings in this chapter. ⚠️ Verify with your Spectre team: confirm per-user vs. per-account/shop scope, consistent with the open question carried across all 2.4.x pages.
Related Sections
- 2.4.2 — Does your machine display forward thumb pitch as positive? Y/N
- 2.4.1 — Does your machine display right pitch as positive? Y/N
- 2.4.4 — Next setting in this chapter (if applicable)
- 4.x — Spec Sheet: entering and reviewing pitch values
- 1.x — Getting Started: initial shop setup checklist
Tip: If your shop trains new drillers regularly, leave this setting enabled by default. The directional indicators act as a built-in reminder of pitch direction until sign conventions become second nature — and they cost nothing for experienced drillers who already know what the signs mean.
2.5 — Layout Preferences
2.5.1 Default Layout Type — VLS, 2LS, PAL, or NONE
Default Layout Type — VLS, 2LS, PAL, or NONE
2.5.1 layout
The Default Layout Type setting controls which layout system Spectre Cloud pre-selects when a new spec sheet is created. Rather than choosing a layout method from scratch every time, your preferred system is ready to go from the moment a sheet is opened. This setting can be changed at any time and overridden on individual spec sheets without affecting the default.
🎳 The Four Layout Types
Spectre Cloud supports three active layout systems plus a no-layout option. Each system represents a different method for determining where a bowling ball's pin and mass bias are positioned relative to the bowler's track and grip center.
📐 Dual Angle
The Dual Angle layout system defines ball position using three values: drilling angle, pin distance, and VAL angle. It offers the most granular control over ball motion and is favored by advanced fitters and coaches who want to fine-tune skid, flip, and continuation independently.
- ✅ Most common layout system.
- 🛠️ Tools required: Pro Sect, Grease pencil.
The 3 variables for Dual Angle are
- Drilling Angle (controls track flare)
- Pin to PAP Distance (controls track flare)
- VAL Angle (controls breakpoint shape)
📐 VLS — Vector Layout System
The Vector Layout System will use measurements in inches for all it's variables.
- ✅ Simple, widely understood.
- ✅ Uses distances for all it's measurements.
- 🛠️ Tools required: Pro Sect, Storm ARC Ruler, Grease pencil.
The 3 variables for VLS are
- Pin to PAP Distance (controls track flare)
- MB to PAP Distance (controls breakpoint distance)
- Pin Buffer (Pin to VAL tangeant, controls breakpoint shape)
📐 2LS — Two-Layout System
The Two-Layout System is based off the VLS system.
- ✅ Most popular layout system for thumbless or two-handed bowlers.
- 🛠️ Tools required: Pro Sect, Storm ARC Ruler, Grease pencil.
The 3 variables for 2LS are
- Pin to PAP Distance (controls track flare)
- MB to PAP Distance (controls breakpoint distance)
- Pin to CoG (Pin to Center of Grip, controls breakpoint shape)
Other numbers that will be needed for steps 4 and 5.
- Lightning Line (hypotenuse of the PAP measurement from the grip center - displayed in the Layout section of the ball in Spectre)
- PAP Vertical distance
📐 PAL — Pin Above the Line
The Pin Above the Line system uses similar principles to the 2LS system, however it will use the perpendicular measurement from the hypotenuse of the PAP triangle. This system is much more complex than the others and will require some practice.
- 🛠️ Tools required: Pro Sect, Storm ARC Ruler, Grease pencil.
The 3 variables for PAL are
- Pin to PAP Distance (controls track flare)
- MB to PAP Distance (controls breakpoint distance)
- Pin to Line (Line is from the PAP to the middle of the ring finger)
📐 None
Selecting None means no layout system is pre-selected when a new spec sheet is created. The layout section of the spec sheet is left blank until the driller chooses a method manually.
- ✅ Used when a bowler DOESN'T HAVE A PAP.
- ✅ Text input for you to put a note in the layout section. Ex: 60 degree standard layout
Note: NONE will be your only option if the bowler does not have a PAP measurement on file. Since all layout systems are drawn based off the bowlers PAP, if there is none, therefore you can't layout the ball...
🛠️ Setting the Default Layout Type
Note: Changing the default layout type does not affect any existing spec sheets — previously saved layouts remain exactly as they were recorded. This will simply change the default selected layout type when you create a new ball. It can always be overwritten.
🔄 Overriding the Default on Individual Spec Sheets
The default layout type is a convenience setting — it does not lock every spec sheet to that method. On any individual ball, the layout type can be changed freely before or during the fitting without affecting the account default.
- ✅ Change the layout type on a spec sheet at any time before saving.
- ✅ The account default remains unchanged — the override applies to that ball only.
🔌 Arsenal Plus Plugin
Users with the Arsenal Plus plugin have access to additional layout features including suggested layouts, layout conversion, and 3D layout rendering.
Layout Convension will need to be turned on in your plugin settings. When selected and you bounce between layout types in a selected bowling ball, it will automatically calculate it for your to the selected layout type. This is a great tool for anyone who struggles with a type of layout. A good example of this, would be the 2LS layout system. A client asks you for a 4 x 5 x 3 2LS layout, but you struggle with the steps to draw it correctly, however, you are very familiar with Dual Angle.
- Select 2LS as the layout type for that balls.
- Input the 2LS layout (ex: 4 x 5 x 3)
- Click Dual Angle
- Confirm that you want to convert from 2LS to Dual Angle
- It will now display the correct Dual Angle equivalent for you to draw in your prefered method.
☁️ Scope of This Setting
This setting is stored at the account level and applies to all new spec sheets created on any device.
Related Sections
- 2.5.2 — Next setting in this chapter (if applicable)
- 4.x — Spec Sheet: selecting and entering a layout
- 7.x — Arsenal: layouts and ball motion
- 7.x — Arsenal Plus: suggested layouts and layout conversion
- 1.x — Getting Started: initial shop setup checklist
2.5.2 Default Dual Angle Degree Increments — 1° vs. 5°
2.5.2 layout
When entering drilling angle and VAL angle values in a Dual Angle layout, Spectre Cloud lets you choose the degree increment used when adjusting angle inputs — either 1° for fine-grained control or 5° for faster, coarser adjustment. This setting determines the default step size applied across all Dual Angle spec sheets, saving you from changing it manually every session.
🔄 The Two Increment Options
| Increment | Adjustment Step | Best For |
|---|---|---|
| 1° | Each step changes the angle by one degree | Competitive and coaching environments where fine layout adjustments matter; experienced fitters working with precise PAP data |
| 5° | Each step changes the angle by five degrees | General pro shop use; shops where Dual Angle is used but high-precision tuning is not the primary goal; faster data entry |
🛠️ Setting the Default Degree Increment
Note: Changing this setting does not alter angle values already saved on existing spec sheets. It only affects the step size used when adjusting angles on new or in-progress sheets going forward.
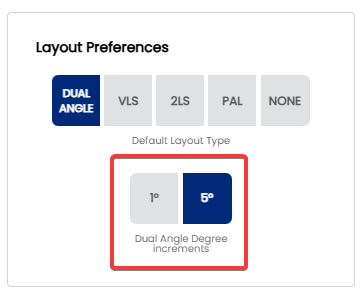
Related Sections
- 2.5.1.3 — PAL / Dual Angle system
- 2.5.1 — Default layout type: VLS, 2LS, Dual Angle, None
- 2.5.3 — Next setting in this chapter (if applicable)
- 4.x — Spec Sheet: selecting and entering a layout
- 7.x — Arsenal Plus: suggested layouts and layout conversion
2.6 — Auto-Suggestions
2.6.1 Overview — why leaving all Auto-Suggestions ON saves time
2.6.1 TIP auto
Spectre Cloud includes a suite of auto-suggestion features that automatically populate recommended values across spec sheets as you work — finger and thumb sizes, pitches, spans, surface finishes, and more. These suggestions are grounded in IBPSIA standards and the bowler's own fitting history. This page explains what the auto-suggestion system does, why it is designed to be left on by default, and when manual override makes sense.
✨ What Auto-Suggestions Do
As a spec sheet is filled in, Spectre Cloud's auto-suggestion engine monitors the values entered and surfaces recommended figures for fields that haven't been completed yet.
Auto-suggestions are particularly more effective on a new spec sheet. The auto-populated fields make the data entry process that much more simple and save you time not having to look-up certain values in charts on your wall.
🛡️ Auto-Suggestions Are Starting Points, Not Locks
Every auto-suggested value in Spectre Cloud can be overridden manually at any time. The suggestion engine is designed to do the heavy lifting on values that are likely to be correct, so the fitter's attention can focus on the values that require judgment.
- ✅ Accept a suggestion by leaving the field as populated — no extra step needed.
- ✅ Override a suggestion by simply typing or selecting a different value — the system does not resist or warn against overrides.
- ✅ Overridden values are saved to the bowler's history and inform future suggestions — the engine learns from actual drilled values, not just IBPSIA defaults.
- ❌ Auto-suggestions are not a substitute for a physical fitting — always verify suggested values against the bowler's hand before drilling.
Note: A suggestion appearing in a field does not mean it has been confirmed or saved. Always review every field on a spec sheet before saving, regardless of whether the value was suggested or entered manually.
Related Sections
- 2.6.2 — Auto-suggestion settings: finger hole sizes
- 2.6.3 — Auto-suggestion settings: thumb hole size (if applicable)
- 2.6.x — Individual auto-suggestion toggle pages
- 4.x — Spec Sheet: reviewing and confirming auto-suggested values
- 9.x — Tips and Troubleshooting: auto-suggestions not appearing
Tip: Think of auto-suggestions as a well-trained assistant who has read every spec sheet your shop has ever produced. They will pre-fill the form based on what has worked before — but you are always the fitter, and the final call is always yours.
2.6.2 Pitch Suggestion — auto forward pitch based on hand flexibility
2.6.2 auto
The Pitch Suggestion setting controls whether Spectre Cloud automatically recommends a forward thumb pitch value based on the bowler's recorded hand flexibility. When enabled, the auto-suggestion engine uses the flexibility measurement taken during the bowler's fitting to propose a starting forward pitch — saving the fitter from consulting a reference chart manually and reducing the risk of applying an out-of-range pitch for a bowler's hand type.
📐 How Hand Flexibility Informs Forward Pitch
Forward pitch is one of the most directly comfort-driven measurements in a bowling fitting. Too much forward pitch restricts the thumb's exit from the ball; too little — or reverse pitch applied without justification — can cause the thumb to hang or the ball to drop early. Hand flexibility is a reliable proxy for where to start the forward pitch conversation:
- ✅ Less flexible hands — typically benefit from more forward pitch to accommodate the thumb's natural resting angle and ease insertion and extraction.
- ✅ More flexible hands — can comfortably tolerate less forward pitch or even mild reverse pitch, supporting a cleaner, faster release.
- ✅ Spectre Cloud's suggestion uses the flexibility value already recorded in the bowler's profile or spec sheet to calculate a recommended starting pitch — no separate lookup required.
- ❌ Flexibility-based suggestions are a starting point only — always verify with a physical fitting before drilling. Other factors including thumb shape, knuckle size, skin condition, and personal preference all influence the final pitch decision.
🛠️ Enabling or Disabling Pitch Suggestion
📊 What the Suggestion Looks Like in Practice
In order for this auto-suggestion to work, there needs to be a middle finger full span and a thumb flexibility selected. The fitter can accept it, adjust it, or clear it entirely. Below is the reference chart that is used in the software.
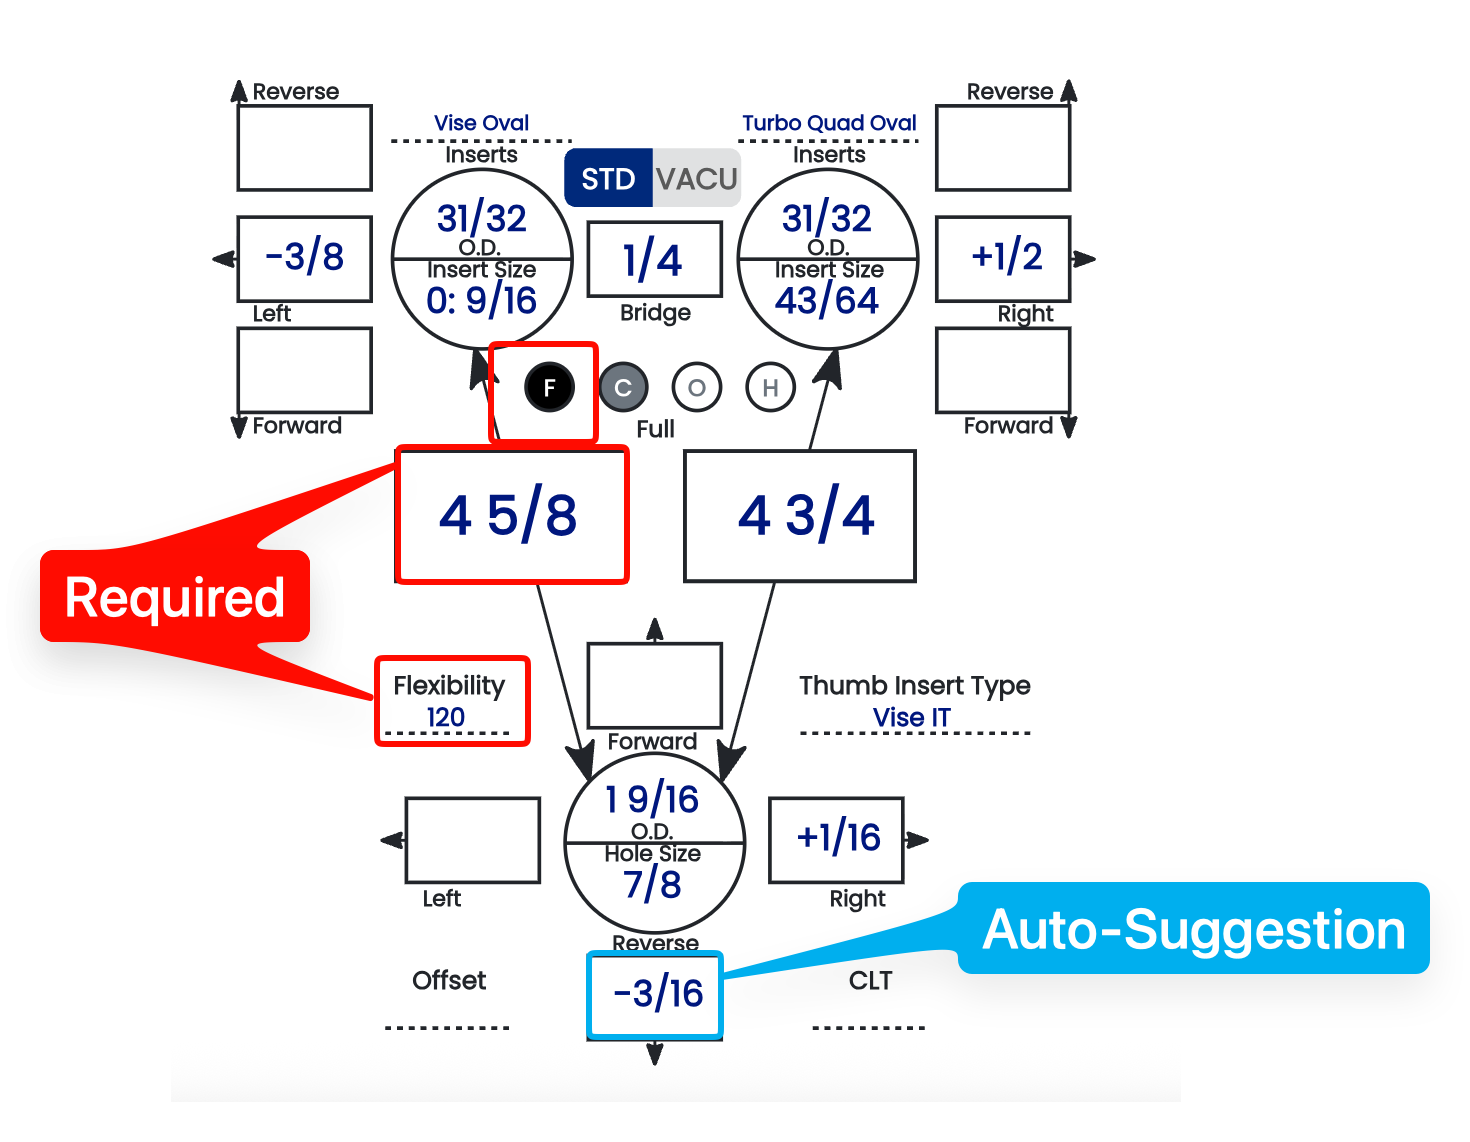
The PRO column is suggested for more experienced bowlers. This is where the matrix is 4 1/2 span = 0 pitch. Everything is relative to that and will suggest more forward pitch compared to other values.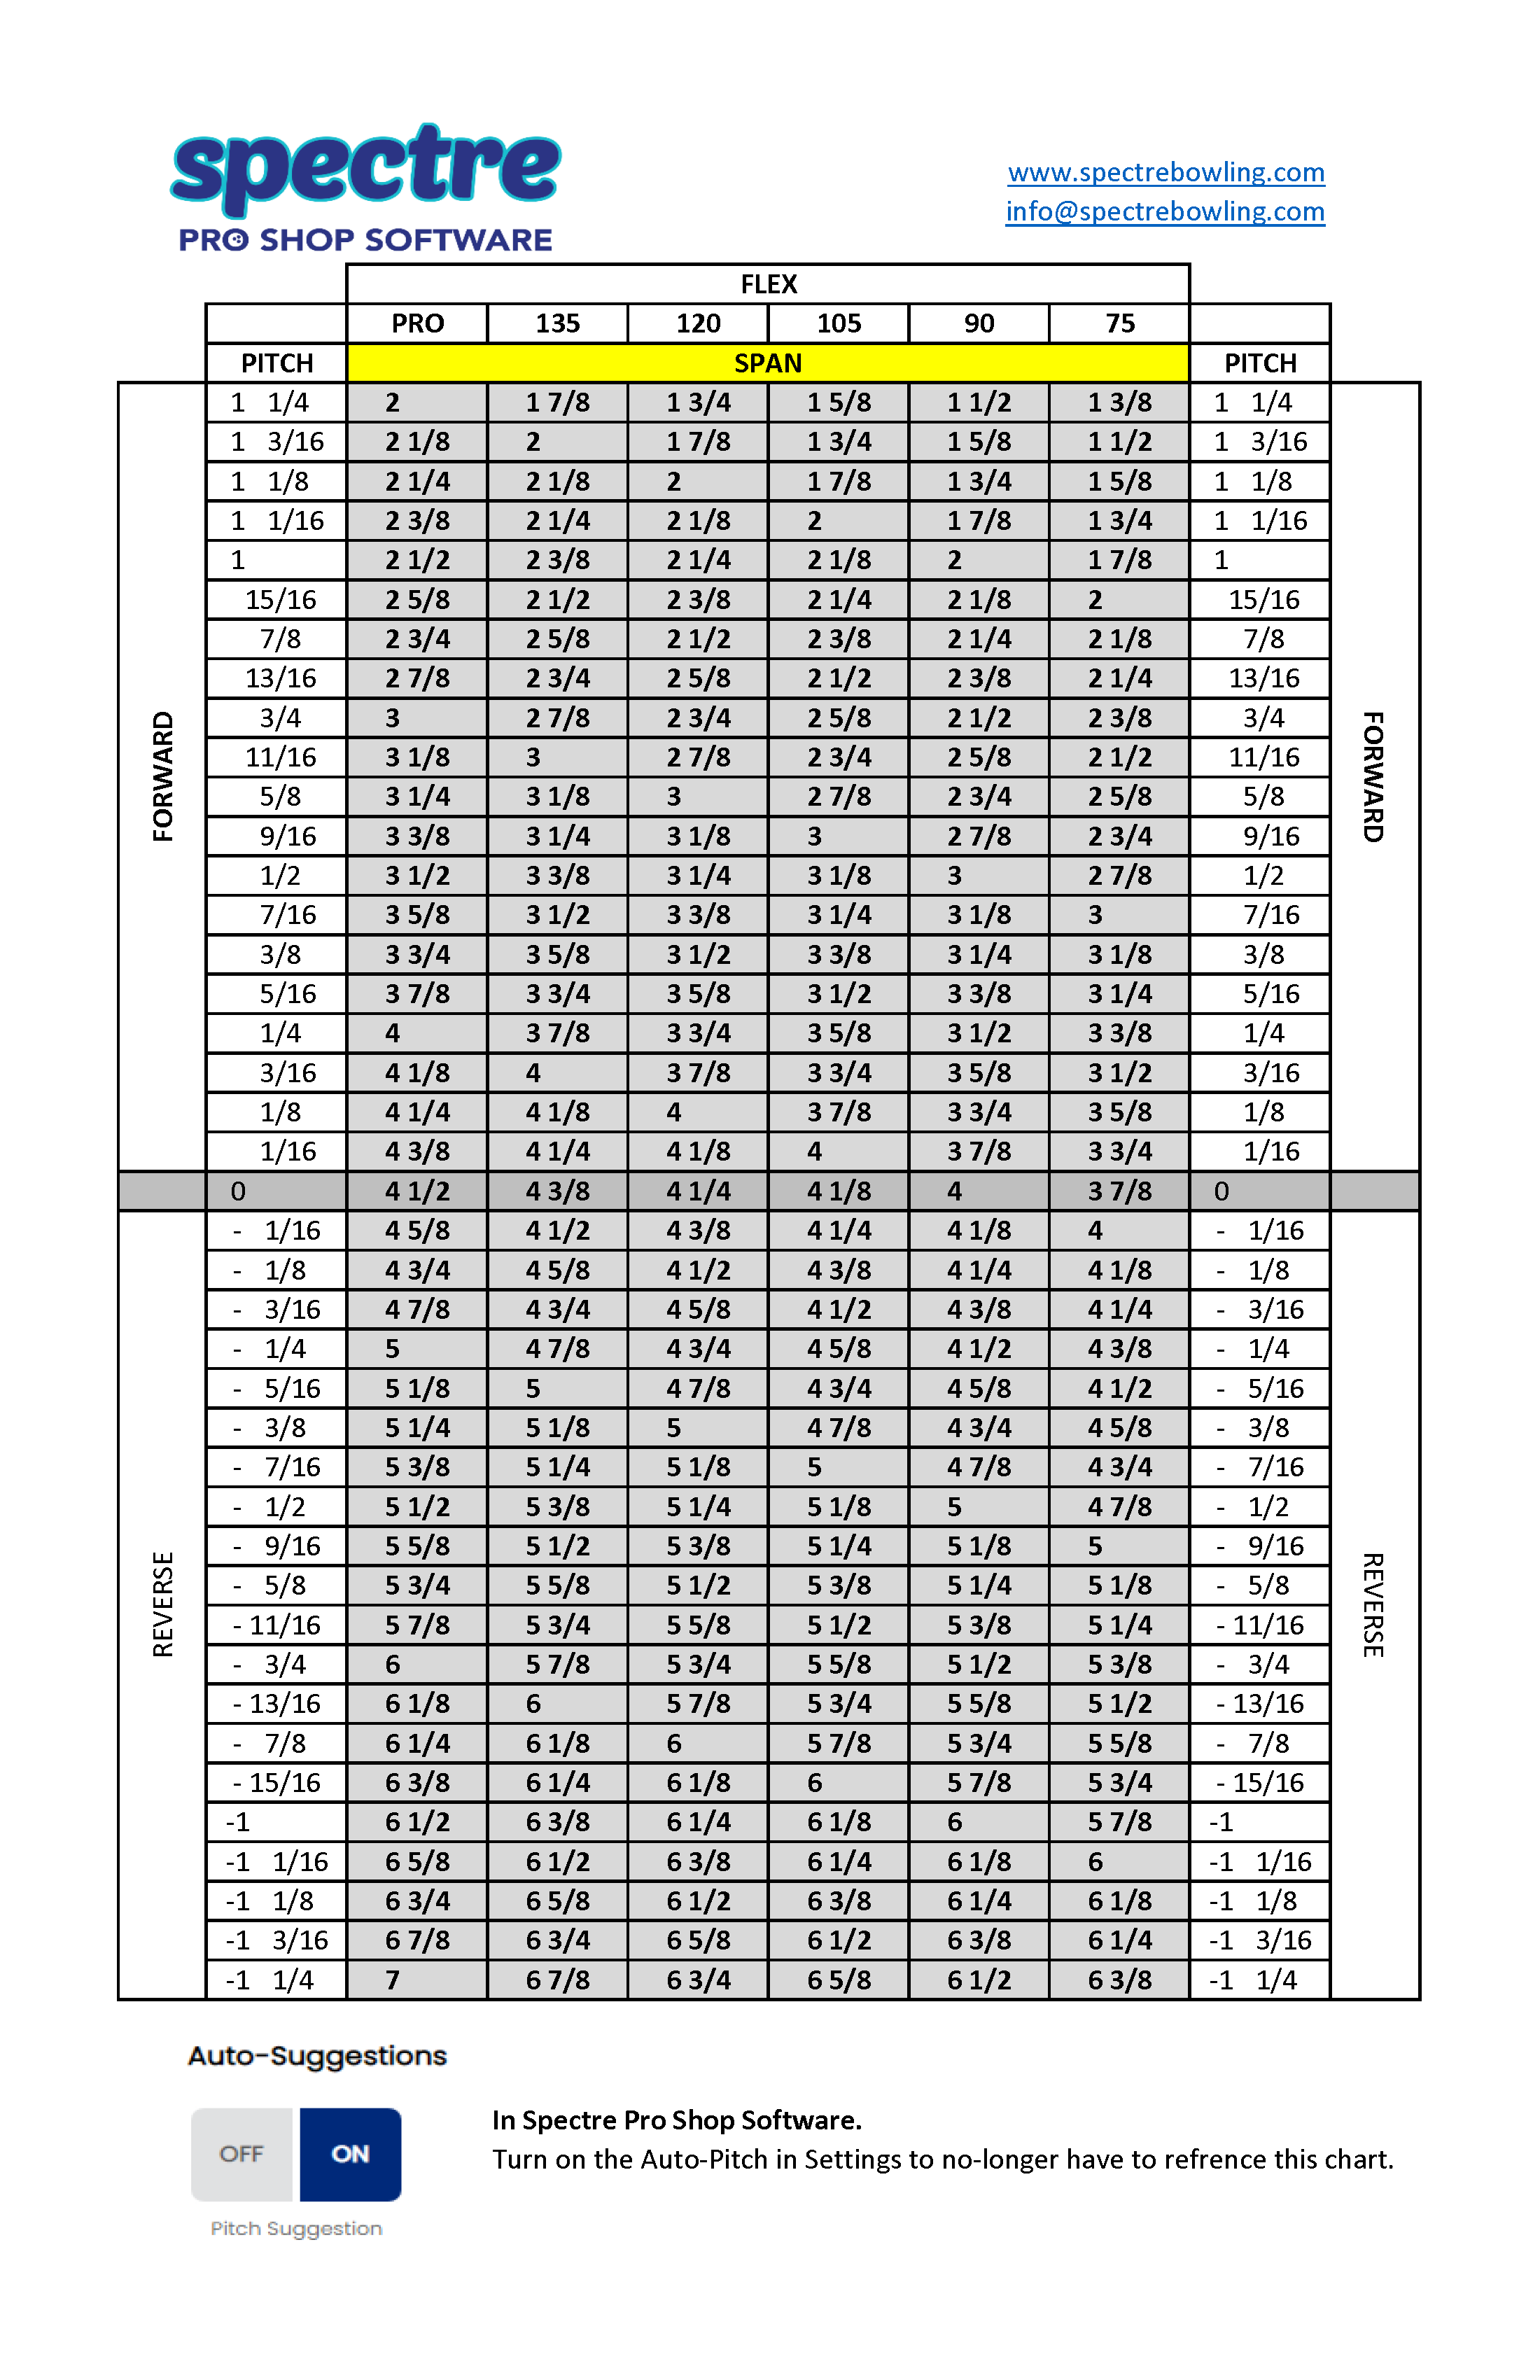
Related Sections
- 2.6.1 — Overview: why leaving all auto-suggestions on saves time
- 2.6.3 — Next auto-suggestion setting (if applicable)
- 2.4.2 — Does your machine display forward thumb pitch as positive? Y/N
- 2.4.3 — Display +/- in pitch tiles: showing direction arrows to avoid errors
- 4.x — Spec Sheet: entering and reviewing pitch values
- 3.x — Bowlers: recording hand flexibility in a bowler profile
Tip: Hand flexibility changes over time — particularly for older bowlers or those managing arthritis or injury. If a returning bowler's pitch suggestion seems off, check whether their flexibility measurement in Spectre Cloud is current before overriding the suggestion manually. Updating the flexibility value will recalibrate the suggestion for all future spec sheets.
2.6.3 Auto-CLT — lateral pitch of fingers based on CLT chart
2.6.3 auto
Center Line Tilt (CLT) is the reference chart Spectre uses to set the lateral pitch of the middle and ring fingers when a bowler's fingers naturally angle away from the grip's center line. This page explains what CLT is, how to read the chart, and how Spectre's Auto-CLT setting applies it for you.
🎯 What Center Line Tilt Is
Most hands don't hold the ball with the middle and ring fingers running perfectly parallel to the grip's center line. Instead, the fingers fan out from the center line at an angle. Center Line Tilt is that angle — measured in degrees — and it determines how much lateral (left/right) pitch each finger needs so the holes follow the natural line of the fingers.
- ✅ A larger tilt angle means the fingers splay more from the center line.
- ✅ The middle finger and ring finger each get their own lateral pitch, in opposite directions, so the grip matches the hand.
- ✅ Getting CLT right improves comfort, release consistency, and reduces grip fatigue.
📐 Reading Diagram #1 (The CLT Chart)
The CLT chart maps five tilt lines — A through E — to their tilt angle and the resulting lateral pitch for each finger. As the angle increases from 8° to 40°, the middle finger and ring finger pitches shift in opposite directions.
🎳 For Right-Hand Bowlers
| Line | Tilt Angle | Middle Finger | Ring Finger |
|---|---|---|---|
| A | 8° |
3/8" Left | 1/2" Right |
| B | 16° |
5/16" Left | 9/16" Right |
| C | 24° |
1/4" Left | 5/8" Right |
| D | 32° |
3/16" Left | 11/16" Right |
| E | 40° |
1/8" Left | 3/4" Right |
🎳 For Left-Hand Bowlers
The left-hand chart mirrors the right-hand values — the directions flip, and the ring/middle columns swap.
| Line | Tilt Angle | Ring Finger | Middle Finger |
|---|---|---|---|
| A | 8° |
1/2" Left | 3/8" Right |
| B | 16° |
9/16" Left | 5/16" Right |
| C | 24° |
5/8" Left | 1/4" Right |
| D | 32° |
11/16" Left | 3/16" Right |
| E | 40° |
3/4" Left | 1/8" Right |
Tip: If your Spectre Flip Lateral Pitches RH/LH setting is ON, switching a bowler's hand automatically inverts these lateral pitches for you — no need to look up the opposite chart by hand.
🛠️ How Spectre Applies CLT — Auto-CLT
Rather than looking these values up manually, Spectre's Auto-CLT setting reads the tilt angle you enter for a bowler and fills in the suggested lateral pitch for each finger straight from this chart.
- ✅ Auto-CLT ON — Spectre suggests the middle- and ring-finger lateral pitches automatically from the CLT chart, saving lookup time.
- ❌ Auto-CLT OFF — no lateral pitch is suggested; you enter each finger's pitch manually from the chart above.
Worked Example — 24° Tilt (Line C)
A right-hand bowler with a 24° center line tilt falls on Line C. From the chart, Spectre suggests:
- Middle finger: 1/4" Left
- Ring finger: 5/8" Right
With Auto-CLT ON, those two values are filled in automatically the moment the tilt is set.
Related Sections
- Settings → Auto-Suggestions → Auto-CLT (section 2.6.3)
- Settings → Auto-Suggestions → Pitch Suggestion
- Settings → Auto-Suggestions → Flip Lateral Pitches RH/LH
Note: CLT sets lateral finger pitch only. Forward/reverse pitch and span are handled separately by the Pitch Suggestion and span rules.
2.6.4 Auto-Populate Lateral Pitches
2.6.4 auto
The Auto-Populate Lateral Pitches is another time saving auto-suggestion for Spectre Cloud. Pre-requisites for this to work will be Bowler Hand and Grip Type, both of which are System Defaults that you can setup in your settings.
📐 What values are populated
Lateral pitches will be auto-populated based on the header of the spec sheet.
- ✅ Bowler Hand: RH or LH will dictate the proper direction of the lateral pitches in the fingers.
- ✅ Grip Type: will determine which values are used.
- ✅ Will flip values or change values if one of those two values are changed during the data-entry process.
Defaults
| Right Handed | Left Handed | |||
|---|---|---|---|---|
| Finger | Middle | Ring | Middle | Ring |
| Conventional | 1/4 L | 5/8 R | 1/4 R | 5/8 L |
| Finger Tip | 3/8 L | 1/2 R | 3/8 R | 1/2 L |
🛠️ Enabling or Disabling Auto-Populate Laterals
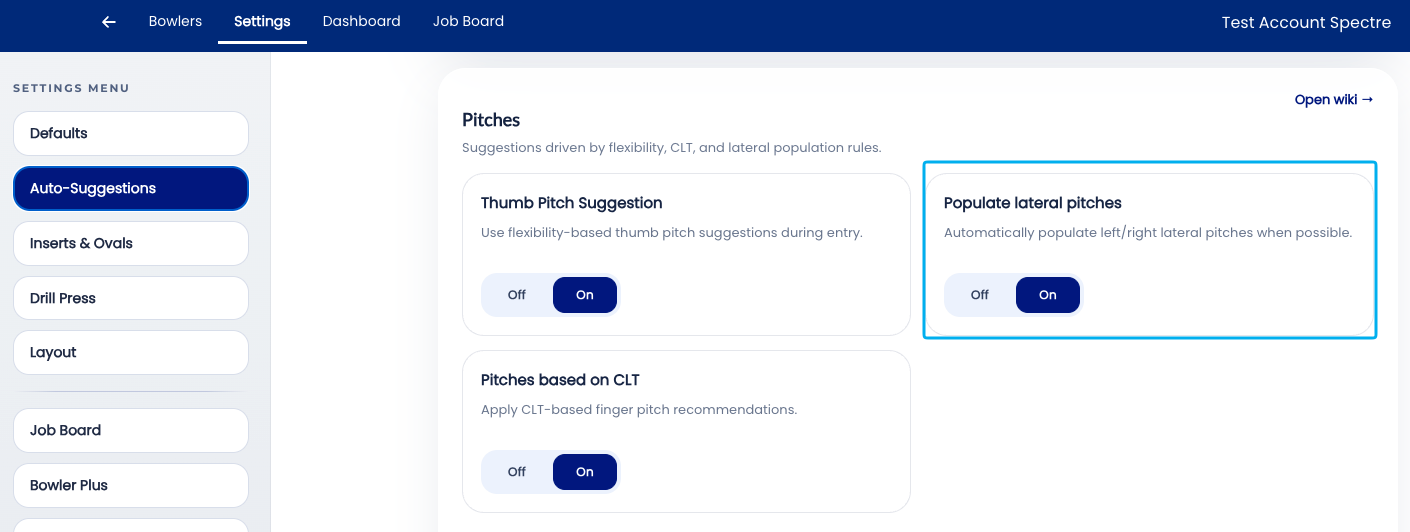
Related Sections
- 2.6.3 — Auto-CLT: lateral pitch of fingers based on CLT chart
- 2.6.2 — Pitch suggestion: auto forward pitch based on hand flexibility
- 2.6.1 — Overview: why leaving all auto-suggestions on saves time
- 2.6.5 — Next auto-suggestion setting (if applicable)
- 2.4.1 — Does your machine display right pitch as positive? Y/N
- 3.x — Bowlers: recording handedness in a bowler profile
- 4.x — Spec Sheet: cloning and applying templates
2.6.5 Autofill Bridge
2.6.5 auto
The Autofill Bridge setting controls whether Spectre Cloud automatically populates the bridge measurement field on a new spec sheet based on the bowler's grip style. When enabled, the engine applies the industry-standard bridge width for the detected grip type — 1/4" for fingertip grips and 3/8" for conventional grips — without the fitter needing to enter the value manually. For the vast majority of bowlers whose bridge falls at the standard width, this eliminates a repetitive data entry step on every spec sheet. This setting will simplify the data-entry process.
🎳 What Is the Bridge?
The bridge is the distance between the edge of the middle finger hole and the edge of the ring finger hole. It is one of the smallest measurements on a spec sheet but one of the most consistently standardised — most bowlers use the industry-standard width for their grip type, and deviations from standard are the exception rather than the rule.
- ✅ Fingertip grip standard:
1/4"— the narrower bridge suits the extended finger position used in fingertip grips. - ✅ Conventional grip standard:
3/8"— the slightly wider bridge accommodates the deeper finger insertion of a conventional grip. - ✅ Both values are industry standards and represent the correct starting point for the overwhelming majority of bowlers in each grip category.
- ⚠️ Both values are manufacturer minimum requirements for warranty purposes. If a ball cracks and does not meet these requirements, it is possible the ball is void of warranty.
- ⚠️ The bridge is the most fragile spot on the bowling ball and these defaults are STRONGLY SUGGESTED. It is not recommended to go shorter than what is suggested in Spectre Proshop Software.
🛠️ Enabling or Disabling Autofill Bridge
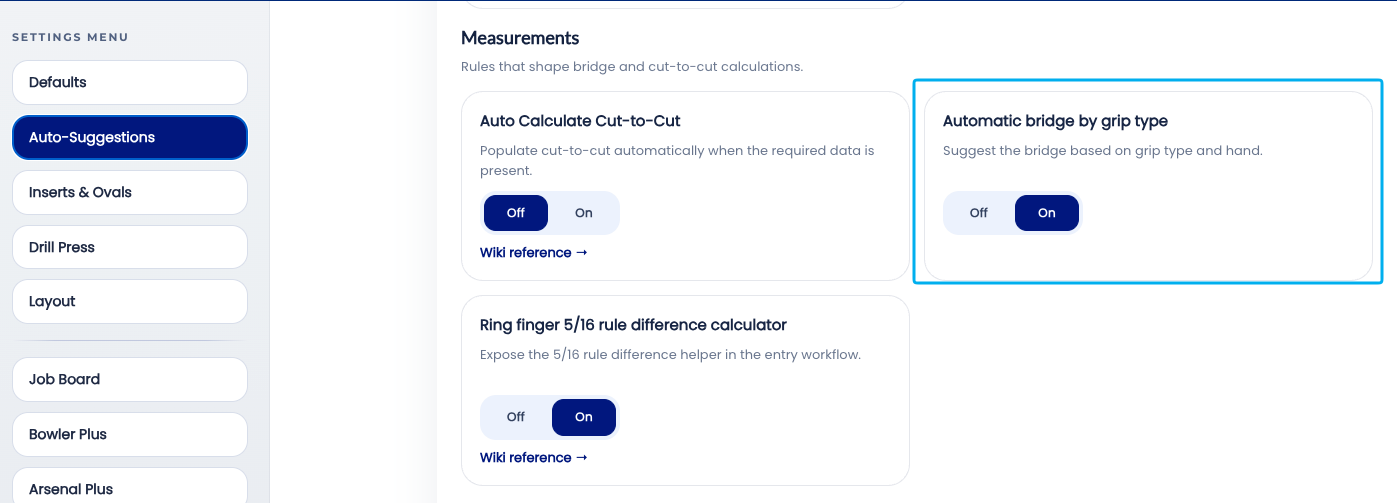
📊 Autofill Bridge Values by Grip Type
| Grip Type | Autofill Bridge Value | Notes |
|---|---|---|
| Fingertip | 1/4" |
Standard for fingertip grip; suits the majority of fingertip bowlers |
| Conventional | 3/8" |
Standard for conventional grip; suits the majority of conventional bowlers |
Note: Autofill Bridge requires the bowler's grip type to be recorded in Spectre Cloud in order to apply the correct value. If no grip type is on record, the field will remain blank pending manual entry.
Related Sections
- 2.6.4 — Auto-invert standard lateral pitches when changing from RH bowler to LH
- 2.6.3 — Auto-CLT: lateral pitch of fingers based on CLT chart
- 2.6.2 — Pitch suggestion: auto forward pitch based on hand flexibility
- 2.6.1 — Overview: why leaving all auto-suggestions on saves time
- 2.6.6 — Next auto-suggestion setting (if applicable)
- 3.x — Bowlers: recording grip type in a bowler profile
- 4.x — Spec Sheet: entering and reviewing bridge measurements
Tip: Bridge is one of the most consistently standard measurements in pro shop fitting — the IBPSIA values hold for the vast majority of bowlers. Autofill Bridge is the auto-suggestion setting with the highest acceptance rate and the lowest override frequency. Leave it on and let it do its job.
2.6.6 Autofill Insert OD
2.6.6 auto
The Autofill Insert OD setting controls whether Spectre Cloud automatically suggests the correct drill bit size for a bowler's finger holes based on their insert type and grip style. Insert OD (Outside Diameter) refers to the outer diameter of the finger insert being used — the drill bit must match this diameter precisely to achieve the correct fit. When enabled, Spectre Cloud pre-populates the drill bit size field as soon as insert type and grip are recorded, eliminating a manual lookup step and reducing the risk of drilling a hole sized for the wrong insert.
🎳 What Is Insert OD?
Finger inserts are small gripping devices — typically made from urethane or similar materials — that are fitted into the finger holes of a bowling ball to provide a consistent, cushioned grip surface. Each insert has a specific Outside Diameter (OD), which is the measurement the drill bit must match when cutting the hole. Using the wrong bit size produces a hole that is either too tight (requiring force to seat the insert, risking cracking) or too loose (causing the insert to slip or fall out).
- ✅ Insert OD varies by insert brand, model, and size — there is no universal drill bit size for all inserts.
- ✅ Grip style also influences the correct OD — fingertip and conventional grips use different insert seating depths, which can affect the effective fit.
- ✅ Autofill Insert OD removes the need to consult a per-brand reference chart on every spec sheet where inserts are used.
📊 How Insert OD Is Determined
When Autofill Insert OD is enabled, Spectre Cloud cross-references two pieces of information already on the spec sheet to derive the correct drill bit size:
| Input | Why It Matters |
|---|---|
| Insert type / brand / model | Each manufacturer of grips will have different OD's per grip size. |
| Insert size | The size inside the insert will correspond to a OD size of that style insert. Ex: Turbo Quad Oval Mesh, in 7/8 Insert size, will give a 1 1/32 OD. Where a 11/16 of the same insert will give you a 31/32 OD. |
🛠️ Enabling or Disabling Autofill Insert OD
Related Sections
- 2.6.5 — Autofill Bridge: auto standard bridge (1/4" fingertip, 3/8" conventional)
- 2.6.4 — Auto-invert standard lateral pitches when changing from RH bowler to LH
- 2.6.1 — Overview: why leaving all auto-suggestions on saves time
- 2.6.7 — Next auto-suggestion setting (if applicable)
- 3.x — Bowlers: recording grip style in a bowler profile
- 4.x — Spec Sheet: entering insert type and OD
- 7.x — Arsenal Plus: ball drilling history and insert records
Tip: Insert OD is one of the most brand-specific measurements in the spec sheet — a value that is correct for one insert line may be wrong for another from the same manufacturer. If your shop switches insert brands or adds a new product line, check whether the new inserts are in Spectre Cloud's database before relying on Autofill Insert OD. A quick test sheet before the first fitting with a new insert type is cheap insurance.
```
2.6.7 Auto-Repeat Insert Type and Size
2.6.7 auto
These two auto-suggestions are simply to speed up the data-entry process.
Typically, bowlers will use the same insert type on both fingers, therefore the "Auto-Repeart Insert Type" will populate both fingers with the selected insert type from the middle finger.
Second, by turning on the "Auto-Repeart Insert Size", once you select the middle finger insert size, it will duplicate it on the ring finger. This is nice since most ring fingers are only a size or two smaller than the middle finger. Ex: Middle finger = 11/16, Ring might be 21/32, which is right below the list in the dropdown. This removes unnecessary scrolling and helps save you some time.
🛠️ Enabling or Disabling Auto-Repeat Insert Type
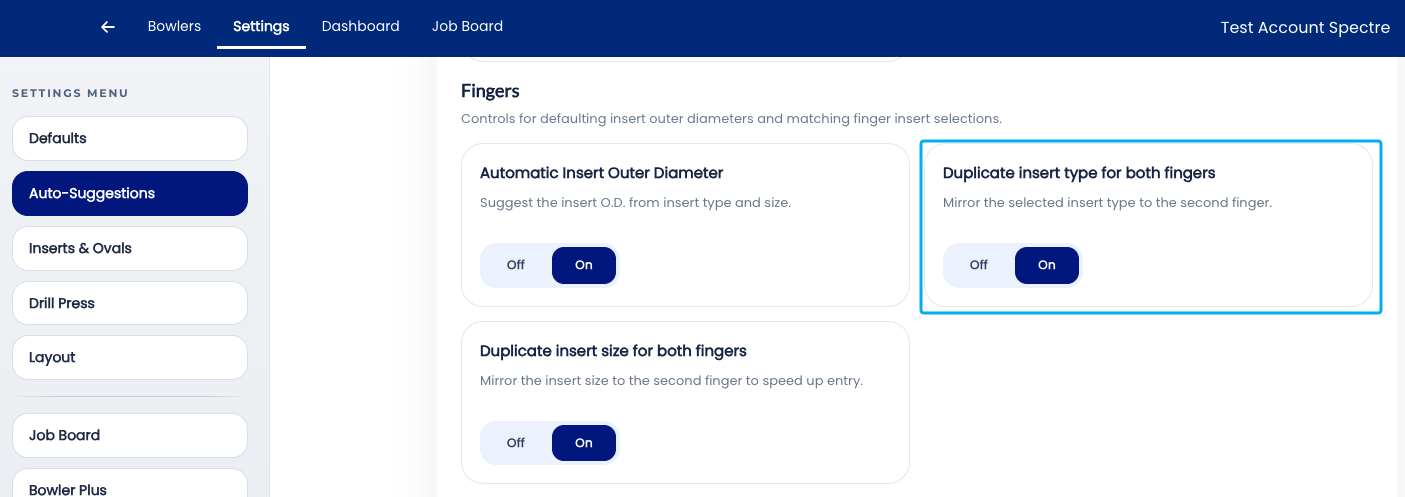
🛠️ Enabling or Disabling Auto-Repeat Insert Size
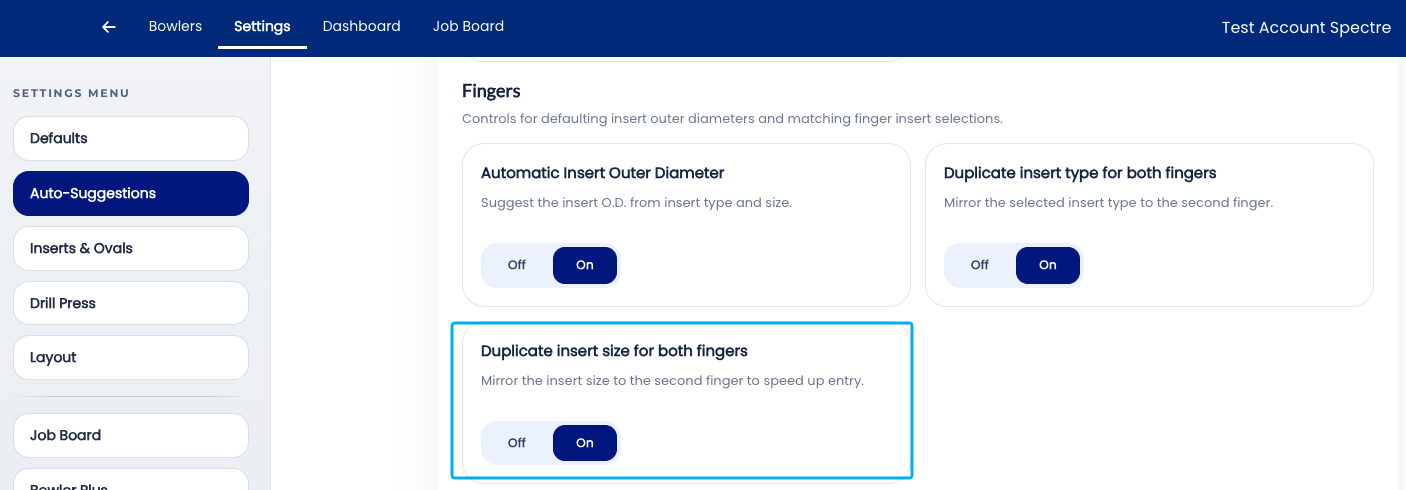
Related Sections
- 2.6.6 — Autofill Insert OD: auto drill bit size per insert type and grip
- 2.6.5 — Autofill Bridge: auto standard bridge (1/4" fingertip, 3/8" conventional)
- 2.6.1 — Overview: why leaving all auto-suggestions on saves time
- 2.6.8 — Next auto-suggestion setting (if applicable)
- 3.x — Bowlers: recording finger measurements in a bowler profile
- 4.x — Spec Sheet: entering insert sizes and OD
Tip: Auto-Repeat Insert Size is one of those settings that is invisible when it is working correctly — the middle finger field is simply already filled in when the fitter gets to it. Its value becomes obvious the first time it is turned off and a fitter submits a spec sheet with the middle finger field blank. Leave it on.
2.6.8 Ring finger 5/16 rule difference calculator
2.6.8 auto
The Ring finger 5/16 rule difference calculator setting controls whether Spectre Cloud will display an extended pop-up window when populating the RING FINGER.
The 5/16th rule is something that was taught by Bill Taylor and is a common measurement used if you are fitting with a BT Ball Fitter.
📐 What Is the 5/16" Rule?
The 5/16" rule is an IBPSIA-recognised fitting convention that defines the standard offset between the middle and ring finger spans. It reflects the natural length difference between the two fingers.
To get the base measurement required for the 5/16 rule, first start by measuring the difference between both fingers. Draw the Middle Finger crease, on the Ring Finger. Measure the difference.
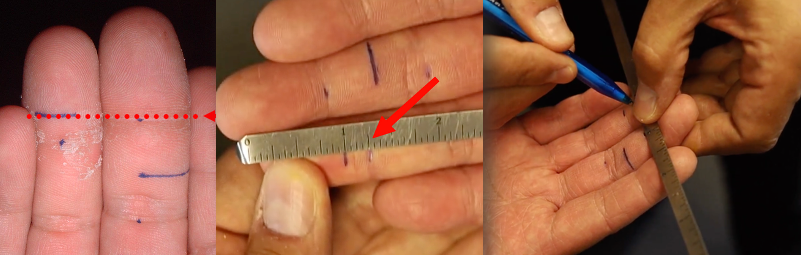
📊 How the Calculation Works
The auto-calculation is straightforward: Spectre Cloud subtracts 5/16" from the difference measured above.
| Middle Finger Span | Difference Measured | Formula | Ring Finger Span |
|---|---|---|---|
4" |
5/16" |
5/16 - 5/16 = 0 | 4" |
4" |
3/16" |
5/16 - 3/16 = 1/8 | 4 1/8" |
4" |
7/16" |
5/16 - 3/16 = -1/8 | 3 7/8" |
🛠️ Enabling or Disabling 5/16 calculator
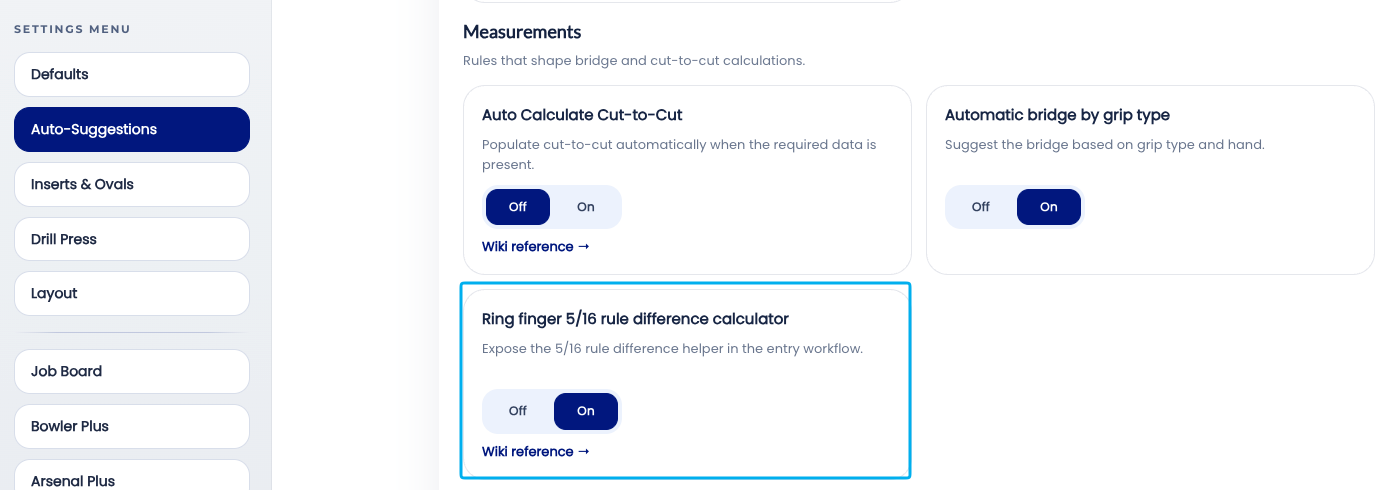
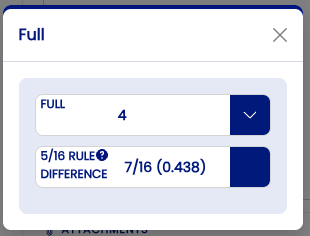
🔄 Overriding the Auto-Calculated Value
The auto-calculated ring span is a suggestion, not a lock. It can be overridden manually on any individual spec sheet without affecting the account setting.
- ✅ Select a different ring span value — the override is saved to the spec sheet as entered.
- ✅ Select a different 5/16 rule value to calculate the span
Both drop downs are related to one-another. Either select the measurement or the difference.
Related Sections
- 2.6.7 — Auto-Repeat Insert Size: mirror size from ring to middle finger
- 2.6.6 — Autofill Insert OD: auto drill bit size per insert type and grip
- 2.6.5 — Autofill Bridge: auto standard bridge (1/4" fingertip, 3/8" conventional)
- 2.6.1 — Overview: why leaving all auto-suggestions on saves time
- 2.6.9 — Next auto-suggestion setting (if applicable)
- 2.3.2 — Span type configuration: Full Span, Edge, Center
- 4.x — Spec Sheet: entering span measurements
- 3.x — Bowlers: recording finger measurements in a bowler profile
Tip: The 5/16" rule has been a pro shop standard for decades because it works for the overwhelming majority of bowlers. Auto-Calculate Ring Span turns that standard into a zero-effort step — the ring span is simply there when the fitter reaches that field. For the small number of bowlers where the standard offset doesn't apply, the override takes seconds. The math is always done; the question is only whether Spectre Cloud does it or the fitter does.
```
2.6.9 Autofill Cut to Cut measurement based on insert type/size
2.6.9 setting
The Autofill Cut to Cut auto-suggestion calculates a spec sheet's Cut to Cut (C) span for you, so you don't have to measure it separately or subtract the insert thickness by hand. It derives the value directly from the Full Span already on the sheet — but it only runs when every input it depends on is present.
Note: This page covers the auto-suggestion setting. For what the Cut to Cut span type is and how it differs from Full Span, Outer to Cut, and Hole to Hole, see 4.1.2. For the span type acronyms (F, C, O, H), see 4.1.1.
🛠️ What This Setting Does
Cut to Cut is the Full Span minus the thickness of the insert — the span measured to the actual drilled cut of the finger hole, before the grips are accounted for. Instead of measuring that value at the bench or doing the subtraction mentally, Autofill Cut to Cut computes it from information already on the spec sheet.
- ✅ Removes the mental math when drilling thumb-first — the Cut to Cut value is ready to work from at the press.
- ✅ Keeps Full Span and Cut to Cut consistent with each other, since one is derived from the other.
- ✅ Reduces measurement error — the value is calculated, not re-measured.
📐 How the Calculation Works
Autofill Cut to Cut uses the insert type and insert size to determine the wall thickness of each finger's insert, then subtracts that thickness from the Full Span:
Full Span − insert wall thickness = Cut to Cut
The insert type and size are what tell Spectre Cloud how thick the insert wall is. Without them, there is no wall thickness to subtract, and the calculation cannot complete.
📋 Requirements — What Must Be Present
The calculation runs per finger, and it needs complete information for both the middle and ring fingers. If any single input below is missing on either finger, Cut to Cut will not auto-calculate.
| Required input | Middle finger | Ring finger |
|---|---|---|
| Full Span measurement | ✅ Required | ✅ Required |
| Insert type | ✅ Required | ✅ Required |
| Insert size | ✅ Required | ✅ Required |
Important: All three inputs must be present on both fingers. If even one finger is missing its Full Span, insert type, or insert size, the Cut to Cut value will not populate.
🗓️ Enabling Autofill Cut to Cut
- Open Spectre Cloud at
cloud.spectrebowling.comand log in. - Select Settings from the menu.
- Locate the Autofill Cut to Cut auto-suggestion and enable it.
- Changes are saved automatically.
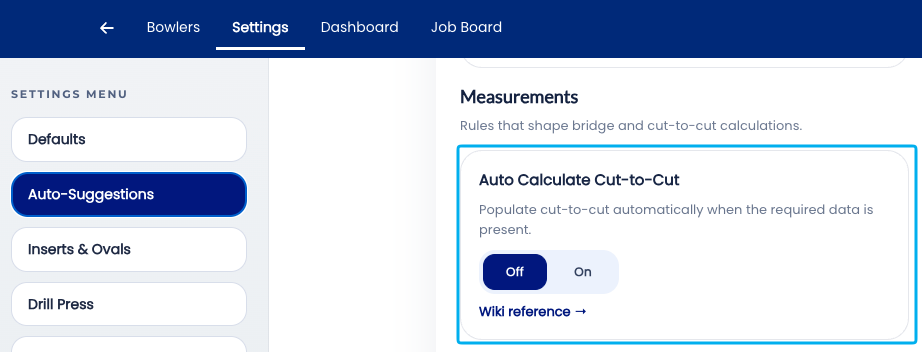
❄️ Troubleshooting — Cut to Cut Isn't Filling In
If the Cut to Cut value stays blank, the cause is almost always a missing input. Check, for both the middle and ring fingers:
- ✅ Is the Full Span entered on both fingers?
- ✅ Is the insert type selected on both fingers?
- ✅ Is the insert size selected on both fingers?
- ❌ If any one of these is blank on either finger, the calculation will not run until it's filled in.
Related Sections
- 4.1.2 — Span types: Full Span, Cut to Cut, Outer to Cut, Hole to Hole
- 4.1.1 — Understanding acronyms: F, C, O, H
- 2.6.8 — Auto-Calculate Ring Span: based on the 5/16" rule
- 2.6.6 — Autofill Insert OD: drill bit size per insert type and grip
Tip: Enter your Full Span and both inserts (type and size) before reaching for the Cut to Cut field — as soon as all six inputs are in place, the value fills itself in. If you drill thumb-first, this setting is one of the biggest time-savers in your workflow, since it hands you a ready-to-use Cut to Cut number with no bench measurement and no mental subtraction.
2.6.10 Layout Suggestions
2.6.10 auto
The Auto-Suggest Layouts will display an additional input in the Arsenal page. A "Suggested Layout" dropdown will now appear over the layout input fields. These layout suggestions are the manufacturer suggested layouts, based on the layout style you had selected.
📊 Layout suggestions
There is no AI built into this tool. It is as simple as the suggested layouts per manufacturer on their website. This setting is simply a time saver based on general knowledge of what is required from the bowler.
| Layout Type | Suggestions | Link |
|---|---|---|
| Dual Angle | Brunswick suggested standard layouts | Brunswick Universal Drilling Instructions |
| VLS | Storm suggested standard layouts | Storm Downloads |
| 2LS | Storm suggested standard layouts for 2 handed bowlers. | Storm Downloads |
| PAL | Bowling Science standard suggested layouts. | PAL YouTube Video |
Note: ⚠️ These suggestions are widely available online on the manufacturer websites.
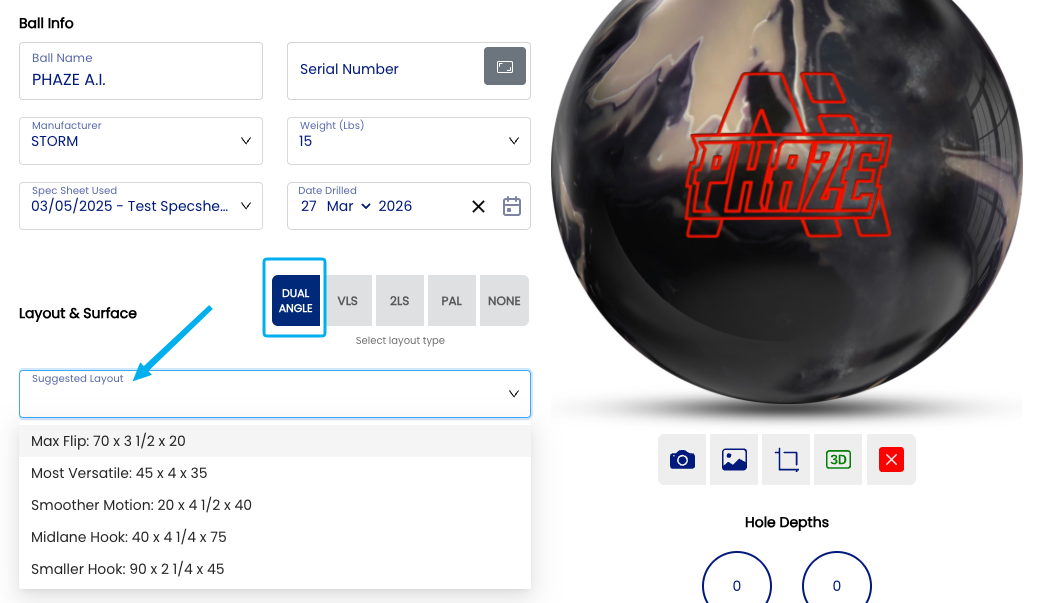
🛠️ Enabling or Disabling Auto-Suggest Layouts
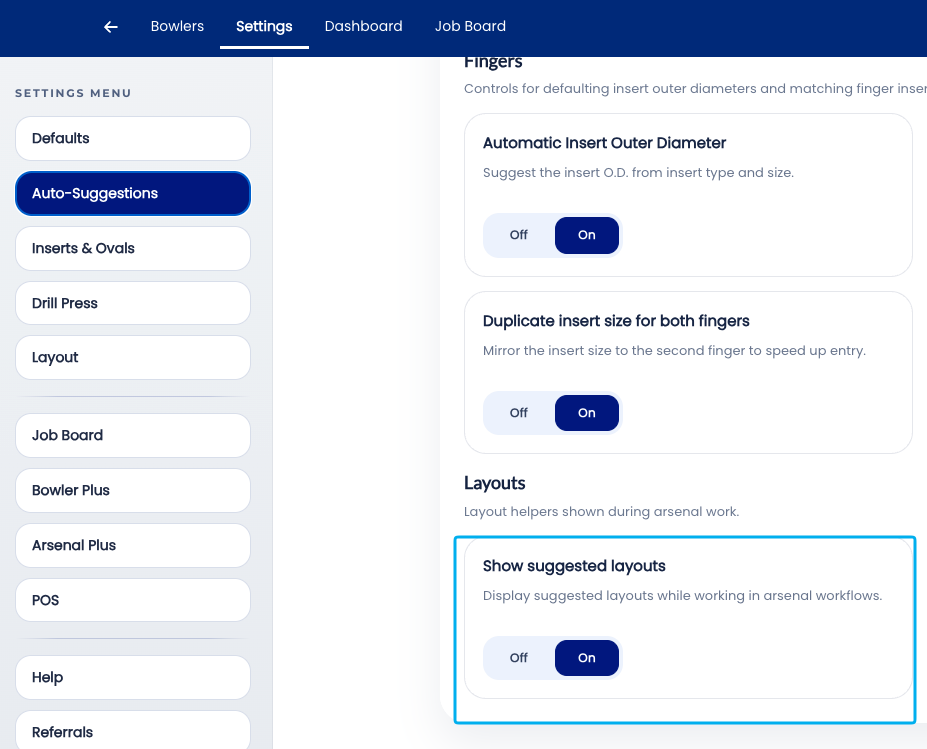
Related Sections
- 2.6.9 — Autofill Cut to Cut: based on insert type/size
- 2.6.1 — Overview: why leaving all auto-suggestions on saves time
- 2.5.1 — Default layout type: VLS, 2LS, Dual Angle, None
- 2.5.1.3 — PAL / Dual Angle system
- 2.6.11 — Next auto-suggestion setting (if applicable)
- 3.x — Bowlers: completing a full bowler profile
- 4.x — Spec Sheet: reviewing and accepting a layout suggestion
- 7.x — Arsenal Plus: suggested layouts and layout conversion
Tip: Auto-Suggest Layouts gets better the more you use Spectre Cloud. Every spec sheet saved — whether the suggested layout was accepted, adjusted, or overridden — contributes to the bowler's history that informs the next suggestion. The engine is not static; it reflects the accumulated record of what has been drilled for each bowler. The sooner it is turned on, the sooner it starts building that record.