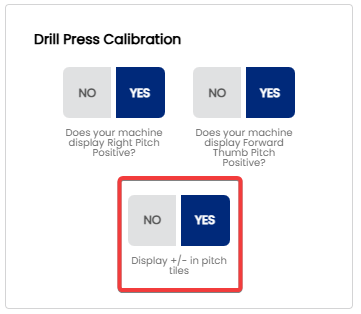
2.4 — Drill Press Calibration
- 2.4.1 Does your machine display Right Pitch Positive? (YES / NO)
- 2.4.2 Does your machine display Forward Thumb Pitch Positive? (YES / NO)
- 2.4.3 Display +/- in pitch tiles — showing polarity to match DRO's to avoid errors
2.4.1 Does your machine display Right Pitch Positive? (YES / NO)
2.4.1 calibration
Different drill presses use different sign conventions when displaying pitch values — some treat right pitch as positive, others treat it as negative. This setting tells Spectre Cloud how your machine reads pitch so that the values displayed in spec sheets and the oval calculator match what your press expects. Getting this right eliminates sign-reversal errors at the drill head.
📐 Why Sign Convention Matters
Pitch direction — whether a value is positive or negative — is not universal across drill press manufacturers. If Spectre Cloud and your press use opposite conventions, a spec sheet showing +1/8" right pitch would need to be mentally reversed to -1/8" before drilling. Over time, that kind of manual correction introduces risk. This setting removes it entirely.
- ✅ When set correctly, pitch values in Spectre Cloud match your press readout exactly — no sign reversal needed at the machine.
- ✅ Reduces drilling errors caused by misread or mentally inverted pitch values.
- ✅ Particularly important in multi-staff shops where not every driller may know to apply a sign correction.
- ❌ If set incorrectly, every pitch value displayed will be the inverse of what the press expects — check this setting first if your drilled pitch is consistently opposite to the spec.
Note: This setting affects how pitch values are displayed throughout Spectre Cloud — it does not change the physical pitch recorded during a bowler fitting. The underlying measurement is preserved; only the sign used to represent it on screen is adjusted to match your machine.
🛠️ Configuring the Right Pitch Sign Convention
📊 How the Setting Affects Displayed Pitch Values
| Physical Pitch Direction | Right Pitch as Positive: Yes | Right Pitch as Positive: No |
|---|---|---|
| Right pitch | +1/8" |
-1/8" |
| Left pitch | -1/8" |
+1/8" |
| No lateral pitch | 0 |
0 |
Note: Zero pitch is unaffected by this setting — a value of 0 is the same regardless of sign convention.
🔍 How to Determine Your Machine's Convention
If you are unsure how your press represents right pitch, the quickest way to confirm is to consult your press manual or run a known-pitch test drill and compare the readout to the spec. Common conventions by press type include:
- ✅ Many dedicated bowling drill presses (e.g. Jayhawk, Innovative) display right pitch as positive — but always verify with your specific model's documentation.
- ✅ Some general-purpose milling machines adapted for bowling use may follow a different convention depending on table orientation.
- ✅ When in doubt, drill a small test on a scrap plug with a known right pitch value and check the result against the spec before committing to a bowler's ball.
Tip: Check your press manual under "axis convention," "coordinate system," or "pitch direction" — these terms are commonly used in drill press documentation to describe sign behavior.
🏢 Multi-Press and Multi-Location Shops
If your shop runs more than one drill press, or manages multiple locations, different machines may use different sign conventions. ⚠️ Verify with your Spectre team: confirm whether this setting can be configured independently per device or location, or whether it applies account-wide — consistent with the open question raised in 2.3.6.
- ✅ Single-press shops: set once, leave alone.
- ✅ Multi-press shops: confirm each machine's convention and configure accordingly.
- ✅ Multi-location chains: coordinate with location managers before applying or changing this setting to avoid inconsistent pitch display across sites.
☁️ Scope of This Setting
This setting is stored at the account level and syncs across all devices. ⚠️ Verify with your Spectre team: confirm per-user vs. per-account/shop scope, and whether per-device overrides are possible for multi-press environments — consistent with findings from 2.3.5 and 2.3.6.
Related Sections
- 2.3.6 — Configuring your milling machine orientation: flipping H/V for oval cuts
- 2.3.5 — Oval cut movement direction: V & H, V only, H only, None
- 2.4.2 — Next setting in this chapter (if applicable)
- 4.x — Spec Sheet: entering and reviewing pitch values
- 5.x — Oval Calculator: pitch interaction with oval cuts
Tip: This is one of the first settings to configure when installing Spectre Cloud in a new shop. Get it right on day one and pitch values will be unambiguous for every driller on your team from the start.
```
2.4.2 Does your machine display Forward Thumb Pitch Positive? (YES / NO)
Does your machine display Forward Thumb Pitch Positive? (YES / NO)
2.4.2 calibration
Just as drill presses vary in how they represent lateral (right/left) pitch direction, they also differ in how they display forward and reverse thumb pitch. This setting tells Spectre Cloud whether your machine treats forward thumb pitch as a positive or negative value, ensuring that pitch figures on spec sheets match your press readout without any manual sign correction at the drill head.
📐 Why Forward Thumb Pitch Sign Convention Matters
Forward pitch tilts the thumb hole opening toward the fingers — it is one of the most commonly applied pitch adjustments in pro shop fitting. If Spectre Cloud and your press disagree on whether forward pitch is positive or negative, every thumb pitch value on every spec sheet will need to be mentally inverted before drilling. This setting eliminates that friction.
- ✅ When set correctly, forward and reverse thumb pitch values display exactly as your press expects — no sign conversion required.
- ✅ Reduces risk of drilling the wrong pitch direction, particularly for less experienced staff.
- ✅ Works in tandem with the right pitch sign setting (2.4.1) to give a fully consistent pitch sign convention across both axes.
- ❌ If set incorrectly, forward pitch will display as a negative value (or vice versa) — the first sign of a problem is drilled pitch that is consistently the mirror of the spec.
Note: This setting adjusts how forward/reverse thumb pitch is displayed throughout Spectre Cloud. The physical pitch value recorded during a bowler fitting is preserved — only the sign used to represent it on screen changes to match your machine's convention.
📊 How the Setting Affects Displayed Pitch Values
| Physical Pitch Direction | Forward as Positive: Yes | Forward as Positive: No |
|---|---|---|
| Forward pitch | +1/4" |
-1/4" |
| Reverse pitch | -1/4" |
+1/4" |
| Zero pitch | 0 |
0 |
Note: As with the right pitch setting, a value of 0 is unaffected — zero pitch is zero pitch regardless of sign convention.
🛠️ Configuring Forward Thumb Pitch Sign Convention
🔍 How to Determine Your Machine's Convention
If you are unsure how your press represents forward thumb pitch, consult your press manual or run a known-pitch test before drilling a bowler's ball:
- Set up a scrap ball or plug on the press.
- Dial in a small, known forward pitch value on the machine.
- Check the sign your press displays for that value.
- If the press shows a positive number — set this option to Yes.
- If the press shows a negative number — set this option to No.
Tip: If you have already confirmed your press convention for right pitch (2.4.1), check whether the same sign logic applies to your forward/reverse axis — many presses use a consistent coordinate system across all axes, meaning both settings will be the same. However, do not assume this without verifying.
⚙️ 2.4.1 and 2.4.2 Together — Full Pitch Sign Configuration
Settings 2.4.1 and 2.4.2 work as a pair to fully define the pitch sign convention for your machine across both axes:
| Setting | Axis Covered | Values Affected |
|---|---|---|
| 2.4.1 — Right pitch as positive | Lateral (left/right) | Right and left pitch on all spec sheets |
| 2.4.2 — Forward thumb pitch as positive | Forward/reverse | Forward and reverse thumb pitch on all spec sheets |
Configure both settings together when setting up Spectre Cloud for the first time, or whenever a new drill press is introduced to the shop. Once both are confirmed against your machine, pitch values throughout the app will be immediately usable at the press without translation.
🏢 Multi-Press and Multi-Location Shops
As raised in 2.4.1, different machines may use different sign conventions. The same considerations apply here — if this question is resolved for 2.4.1, apply the same answer to 2.4.2. ⚠️ Verify with your Spectre team: confirm whether this setting can be configured independently per device or location, or whether it applies account-wide.
- ✅ Single-press shops: configure both 2.4.1 and 2.4.2 once during initial setup.
- ✅ Multi-press shops: verify both axes on each machine before drilling.
- ✅ Multi-location chains: treat this as part of the new-location onboarding checklist alongside 2.4.1.
☁️ Scope of This Setting
This setting is stored at the account level and syncs across all devices, consistent with 2.4.1 and other settings in this chapter. ⚠️ Verify with your Spectre team: confirm per-user vs. per-account/shop scope and whether per-device overrides are possible.
Related Sections
- 2.4.1 — Does your machine display right pitch as positive? Y/N
- 2.4.3 — Next setting in this chapter (if applicable)
- 2.3.6 — Configuring your milling machine orientation: flipping H/V for oval cuts
- 4.x — Spec Sheet: entering and reviewing pitch values
- 5.x — Oval Calculator: pitch interaction with oval cuts
Tip: Make 2.4.1 and 2.4.2 part of your new-staff onboarding checklist. A driller who understands the shop's pitch sign convention — and knows where to find these settings — will produce consistent results from day one rather than discovering a sign mismatch after a ball has already been drilled.
```
2.4.3 Display +/- in pitch tiles — showing polarity to match DRO's to avoid errors
2.4.3 calibration
Even with sign conventions correctly configured in 2.4.1 and 2.4.2, a raw + or - symbol on a pitch tile can be easy to miss at a glance — especially under shop lighting or on a small screen. The Display +/- in Pitch Tiles setting adds a visible directional indicator to each pitch tile, making forward, reverse, right, and left pitch unmistakable without requiring the driller to interpret a sign.
🔍 What Are Pitch Tiles?
Pitch tiles are the individual display blocks within a spec sheet that show each pitch value — thumb forward/reverse, thumb lateral, and finger pitch. When this setting is enabled, each tile gains a directional arrow or symbol alongside the numeric value, giving the driller an immediate visual cue about pitch direction rather than relying on the + or - sign alone.
- ✅ Directional indicators are especially helpful for less experienced drillers who may not yet have sign conventions fully internalized.
- ✅ Useful in high-volume shops where spec sheets are read quickly under pressure.
- ✅ Reduces the risk of a misread sign causing a pitch to be drilled in the wrong direction.
- ❌ Experienced drillers who are fully comfortable with sign notation may prefer to leave this off for a cleaner spec sheet display.
Note: This is a display preference only — enabling or disabling it has no effect on the pitch values stored in spec sheets or transmitted to a tethered drill press. ⚠️ Verify with your Spectre team: confirm the exact visual form of the directional indicator — whether it is an arrow (e.g. ↑ ↓ ← →), a word label (e.g. "Forward," "Right"), or a combined symbol+label.
📋 How Pitch Tiles Appear With and Without This Setting
| Display Off | Display On |
|---|---|
|
|
|
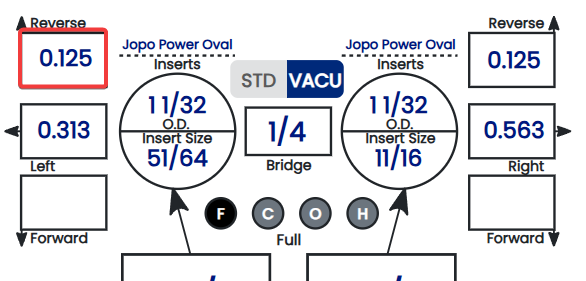
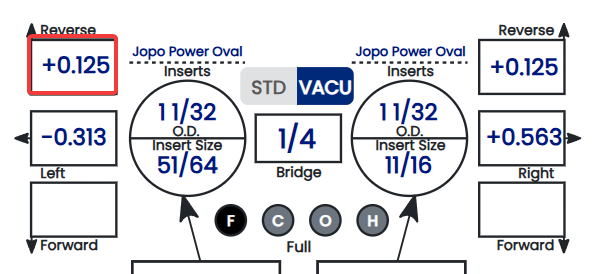
Note: The examples above illustrate the concept — the exact arrow style and label wording may differ in the app. ⚠️ Verify with your Spectre team: confirm the precise visual format and whether zero pitch tiles display any indicator at all.
🛠️ Enabling or Disabling Direction Indicators
⚙️ How This Setting Relates to 2.4.1 and 2.4.2
Settings 2.4.1, 2.4.2, and 2.4.3 form a complete pitch display configuration set. Each addresses a different layer of how pitch values are communicated to the driller:
| Setting | What It Controls | Primary Benefit |
|---|---|---|
| 2.4.1 — Right pitch as positive | Sign convention for lateral pitch | Matches press readout on the lateral axis |
| 2.4.2 — Forward thumb pitch as positive | Sign convention for forward/reverse pitch | Matches press readout on the forward/reverse axis |
| 2.4.3 — Display +/- in pitch tiles | Visual directional indicator on each tile | Makes direction unmistakable at a glance |
Configure all three together during initial shop setup for the most consistent and error-resistant pitch display experience.
☁️ Scope of This Setting
This setting is stored at the account level and syncs across all devices, consistent with 2.4.1, 2.4.2, and other settings in this chapter. ⚠️ Verify with your Spectre team: confirm per-user vs. per-account/shop scope, consistent with the open question carried across all 2.4.x pages.
Related Sections
- 2.4.2 — Does your machine display forward thumb pitch as positive? Y/N
- 2.4.1 — Does your machine display right pitch as positive? Y/N
- 2.4.4 — Next setting in this chapter (if applicable)
- 4.x — Spec Sheet: entering and reviewing pitch values
- 1.x — Getting Started: initial shop setup checklist
Tip: If your shop trains new drillers regularly, leave this setting enabled by default. The directional indicators act as a built-in reminder of pitch direction until sign conventions become second nature — and they cost nothing for experienced drillers who already know what the signs mean.