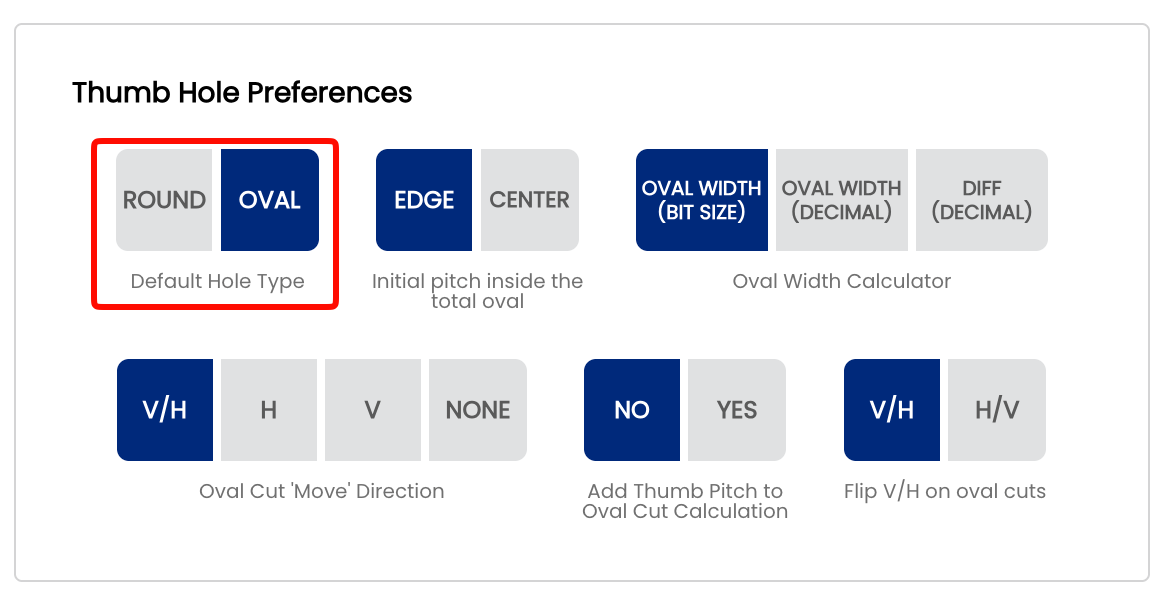
2.3 — Thumb Hole Preferences
- 2.3.1 Default Hole Type — Round vs. Oval
- 2.3.2 Initial pitch inside the total oval — Edge vs. Center & Pitch Included Yes/No
- 2.3.3 Oval Width Calculator — Bit Size, Decimal, or Difference input method
- 2.3.5 Oval Cut 'Move' Direction — V/H, H only, V only, or None
- 2.3.6 Flip V/H on oval cuts — matching your drill press DRO display order
2.3.1 Default Hole Type — Round vs. Oval
2.3.1 KEY setting
The Default Hole Type setting controls which hole type is pre-selected when you start a new spec sheet. Spectre Cloud supports two options: Round and Oval. Like all system defaults, this setting simply pre-populates the field — it can always be overridden on a per-sheet basis without affecting your shop default.
🕳️ Understanding Hole Types
Round Holes
Round holes are the standard hole type used in the majority of drilling layouts. Drilled at a fixed diameter with a standard bit, they are the most common choice for recreational and league bowlers.
- ✅ Used for most conventional and fingertip drilling styles
- ✅ Compatible with standard inserts and slugs
- ✅ Faster to drill and fit for most customers
Oval Holes
Oval holes are an elongated hole type used when a specific release technique, extra grip surface, or custom fit requires it. Spectre Cloud includes a dedicated Oval Calculator to determine the correct oval dimensions for each bowler — see Book 05 for full coverage.
- ✅ Provides additional contact area for better comfort
- ✅ Often used for bowlers with grip issues or specific fit requirements
- ✅ Oval dimensions are automatically calculated by the Oval Calculator
- ✅ Requires additional measurement steps compared to round holes
📋 Choosing Your Default
| Shop Type | Recommended Default | Reason |
|---|---|---|
| General / recreational pro shop | Round | Most customers receive standard round holes — saves time on every new sheet |
| Shop specialising in custom fitting | Oval | If the majority of your drilling involves oval holes, setting this as default reduces manual selection on every sheet |
⚙️ Changing the Default Hole Type
- Open Spectre Cloud at
cloud.spectrebowling.comand log in. - Select Settings from the menu.
- Navigate to the Thumb Hole Preferences section.
- Locate the Default Hole Type field and select either
RoundorOval. - Changes are saved automatically.
Note: Changing the default hole type only affects new spec sheets created after the setting is changed. Existing spec sheets are not modified.
Related Sections
Tip: Not sure which to pick? Start with Round — it's the right default for the vast majority of pro shops. You can always switch to Oval on a per-sheet basis for bowlers who need it, or update the default later as your shop's workflow evolves.
2.3.2 Initial pitch inside the total oval — Edge vs. Center & Pitch Included Yes/No
2.3.2 oval
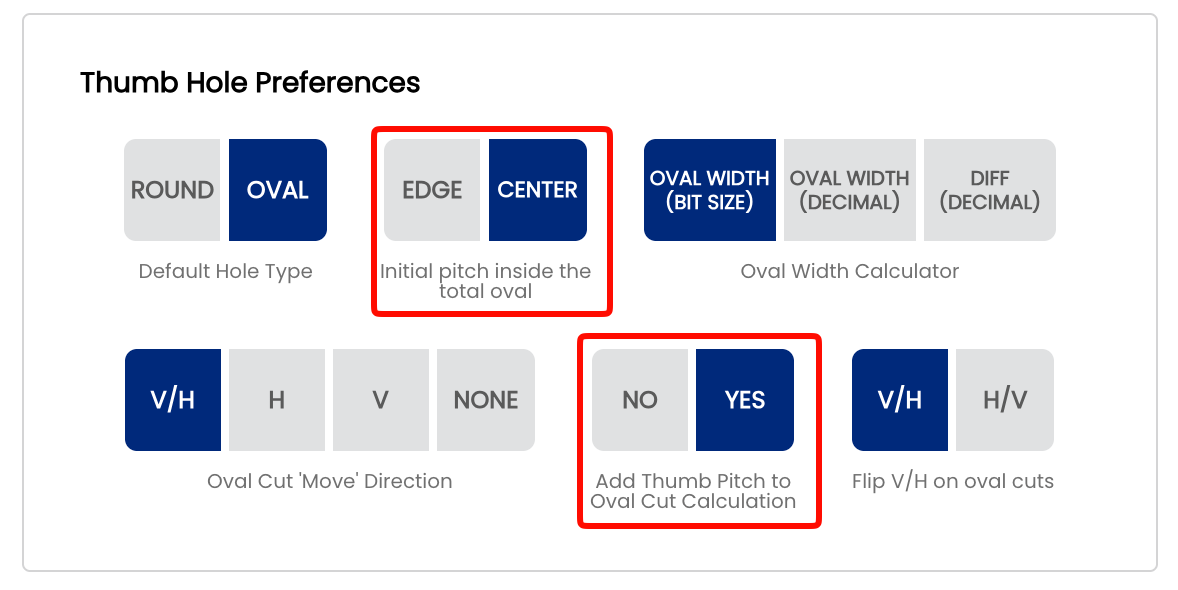
When drilling an oval hole, Spectre Cloud needs a reference point from which to calculate the initial pitch of that hole. Because an oval opening has width — unlike a round hole, which has a single center point — there are two valid ways to define that reference. This page covers two related settings that work together: Initial pitch inside the total oval (Edge vs. Center) and Add Thumb Pitch to Oval Cut Calculation (Yes vs. No). The combination of these two settings determines how Spectre Cloud displays your oval cut values on screen.
Not sure which to pick? Ask yourself two questions before setting these up in Spectre: (1) When you cut an oval, is the intended pitch of the hole at the edge (top) of the total oval cut, or in the center? (2) Do you zero out your digital readouts when starting to cut your oval, or do you keep the desired pitch on the readout? Your answers will identify exactly which scenario applies to your shop.
📐 Setting 1 — Initial Pitch Inside the Total Oval
This setting defines the reference point Spectre Cloud uses when calculating the pitch offset for an oval hole.
Edge
The Edge method measures initial pitch from the near edge of the oval opening — the edge closest to the bowler's palm. Your starting point on the press is always the top of the oval hole, with digital readouts initialized to 0/0 at that position. This is the traditional approach that mirrors how most drillers learned to cut ovals using charts or ratios.
- ✅ Consistent with how round hole pitch has historically been measured
- ✅ Familiar to operators trained on conventional pitch measurement techniques
- ✅ Use this setting if you zero out your digital readouts each time you start an oval cut
- ❌ Can introduce slight inconsistency as oval width increases, since the near edge shifts further from the hole's geometric center
Center
The Center method measures initial pitch from the geometric center of the oval opening. Your starting point on the press is always the center of the oval hole, with digital readouts initialized to 0/0 at that position. This is a mathematically consistent reference point regardless of oval width, and makes it straightforward to properly center a slug or interchangeable.
- ✅ Consistent reference regardless of oval width
- ✅ The oval will always be perfectly geometrically centered — no need to touch the press to re-center
- ✅ The easiest method to teach a novice ball driller how to cut ovals
- ✅ Use this setting if you keep the desired pitch on the readout rather than zeroing out
- ❌ Less intuitive for operators accustomed to traditional edge-based measurement
Mark's preference: Center is Mark Buffa's preferred method for measuring and drilling oval holes. If you are following the Spectre drilling methodology or learning from the Spectre YouTube channel, Center is the recommended choice.
📋 Setting 2 — Add Thumb Pitch to Oval Cut Calculation
This setting controls whether the bowler's thumb pitch is included in the oval cut values that Spectre Cloud displays on screen, or whether the cut values are shown as raw oval geometry only with pitch applied separately at the press.
No — Pitch not included
Spectre Cloud displays the oval cut values based on geometry only. The pitch offset is not baked into the numbers. Use this setting if you prefer to zero out your digital readouts before starting each oval cut and set your pitch manually on the press.
- ✅ Clean, simple cut values — pitch handled separately
- ✅ Familiar to drillers who learned using charts or ratio tables
- ✅ Works for both Edge and Center reference methods
Yes — Pitch included
The bowler's thumb pitch is baked directly into every cut value that Spectre Cloud displays. There is no need to zero out the readouts or adjust the press for pitch between cuts — Spectre handles the math and the cuts already account for it. Use this setting if you prefer to keep the desired pitch on the readout throughout the oval cutting sequence.
- ✅ No manual pitch adjustment needed at the press
- ✅ Reduces steps during the oval cutting sequence
- ✅ Easier to teach and less prone to error for new drillers
Mark's preference: Mark Buffa recommends using Yes — pitch included — combined with the Center method. This combination (Scenario 4) is the most consistent and easiest to teach, and is what Mark uses in his own shop.
📊 The Four Scenarios
These two settings combine to produce four possible scenarios. All four result in the exact same oval hole — the difference is only in how the cuts are displayed on screen and how you set up your press. The examples below use a Starting Bit of 3/4", Oval Width of 7/8", and a degree of 45°.
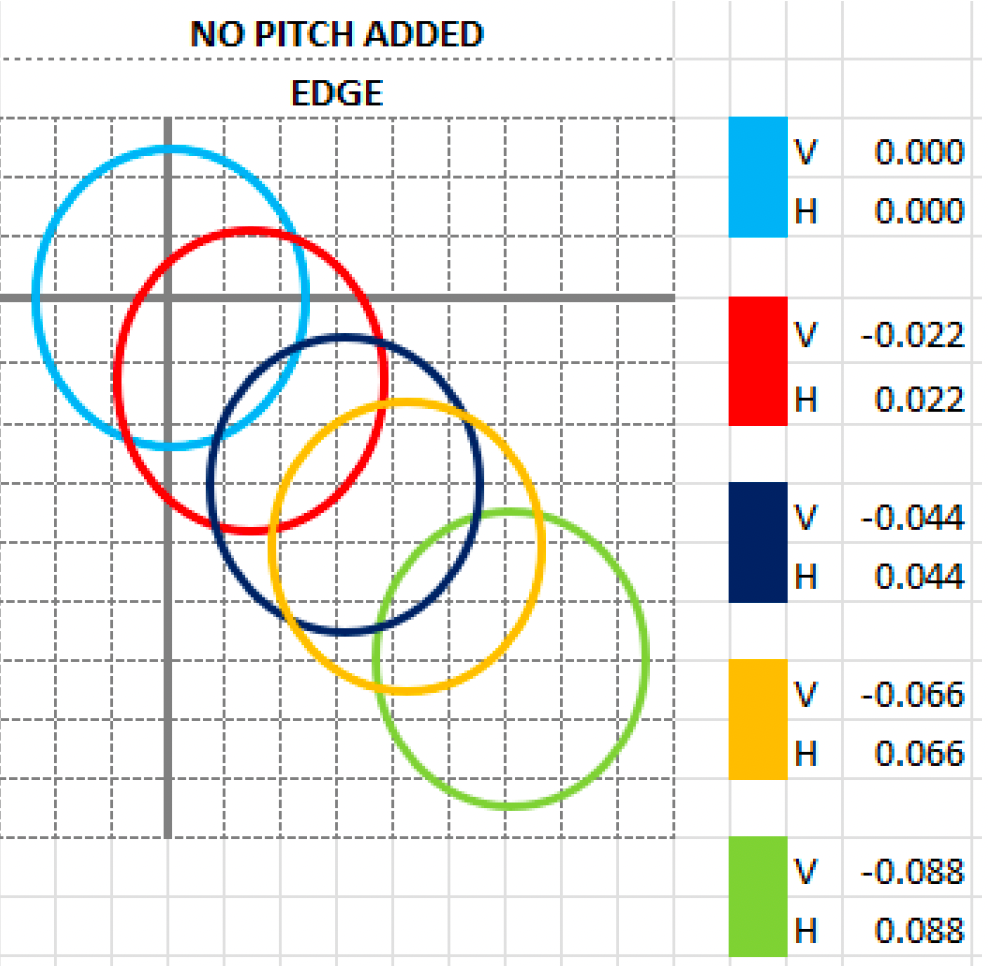
Scenario 1 — Edge, No Pitch
Settings:
| Initial pitch inside the total oval | Add Thumb Pitch to Oval Cut Calculation |
|---|---|
Edge |
No |
Your starting point is always the top of the oval hole at 0/0. This is the traditional method — how most drillers learned to cut ovals using charts or ratios. Zero out your readouts before every cut and set your pitch manually on the press.
- ✅ Traditional method — most familiar to experienced drillers
- ✅ Clean cut values with no pitch offset applied
- ✅ Best if you prefer to dial in pitch manually on the press
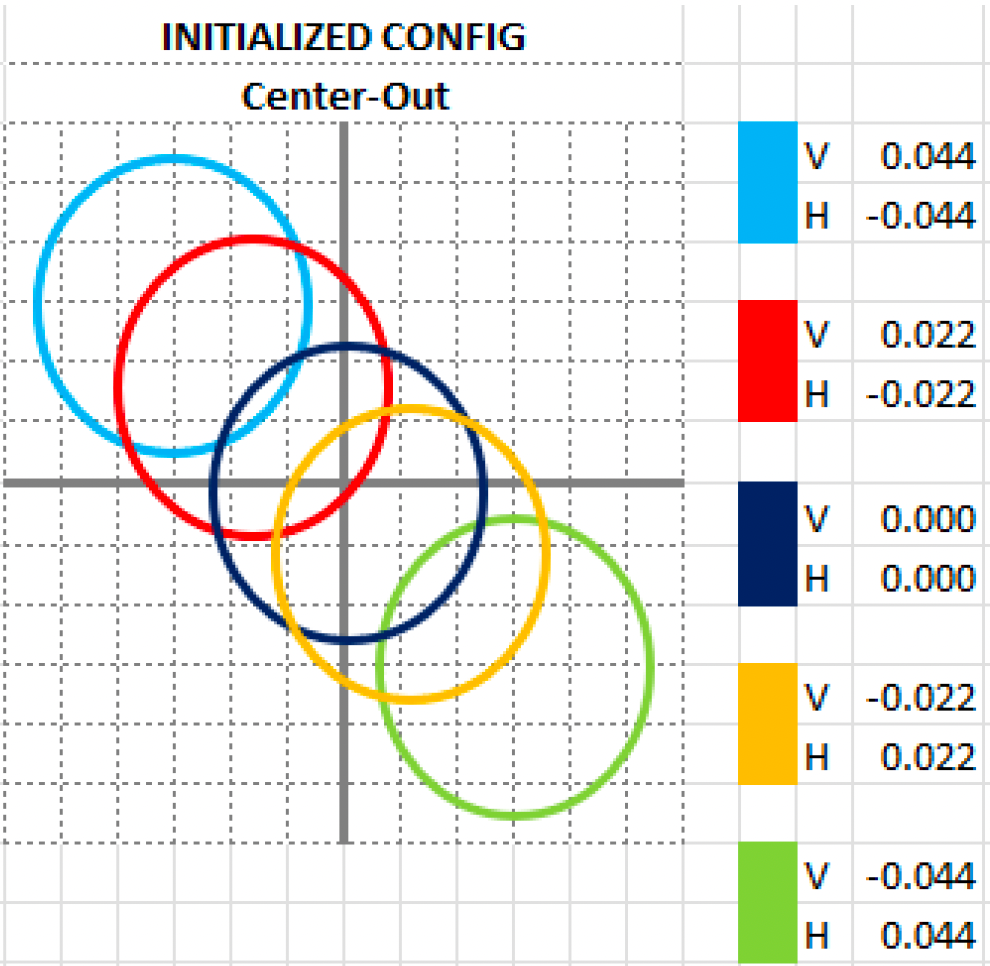
Scenario 2 — Center, No Pitch
Settings:
| Initial pitch inside the total oval | Add Thumb Pitch to Oval Cut Calculation |
|---|---|
Center |
No |
Your starting point is always the center of the oval hole at 0/0. The oval is always geometrically centered. Use this if you zero out your readouts at the center of the oval and prefer to set pitch manually on the press. A great method for learning to center slugs and interchangeables.
- ✅ Oval is always geometrically centered — consistent results every time
- ✅ Excellent for learning to center slugs and interchangeables
- ✅ Clean cut values — pitch handled separately on the press
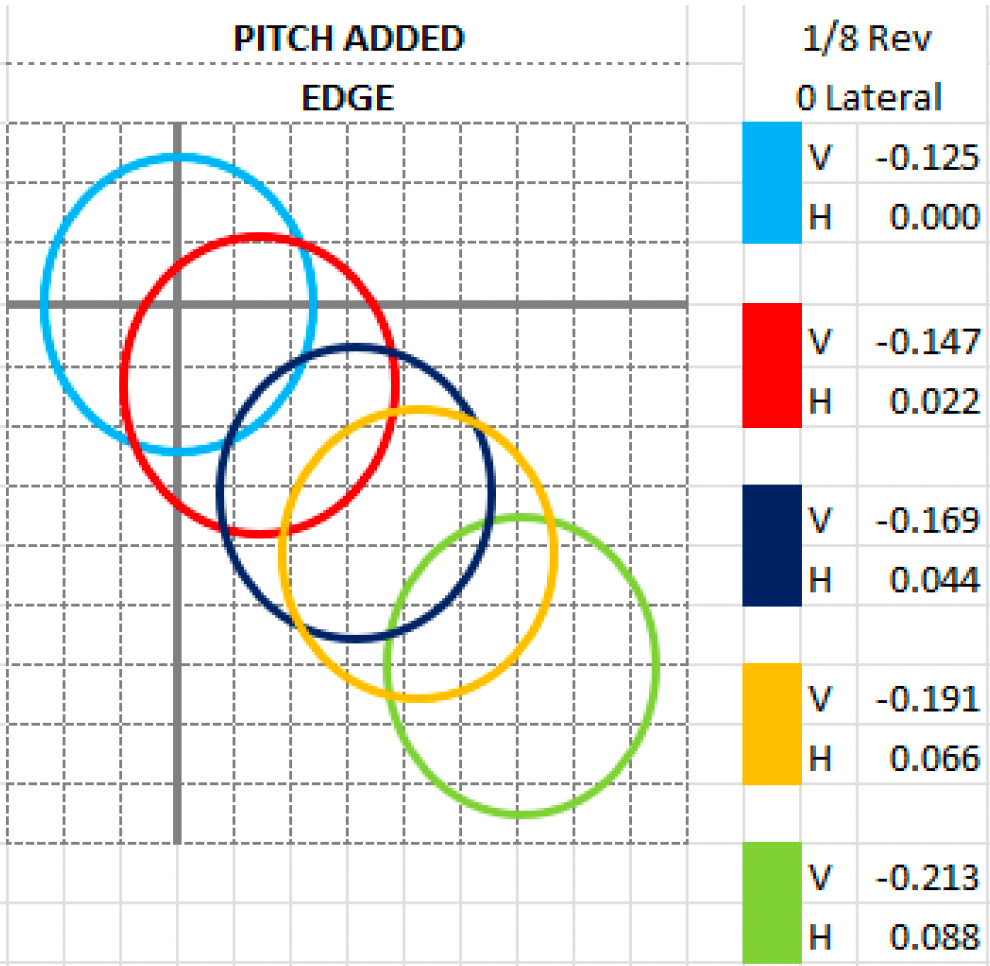
Scenario 3 — Edge, Pitch Included
Settings:
| Initial pitch inside the total oval | Add Thumb Pitch to Oval Cut Calculation |
|---|---|
Edge |
Yes |
Same geometry as Scenario 1, but the bowler's thumb pitch is baked into the cut values from the first cut. In the example below, a pitch of 1/8" reverse / 0 lateral is included. Use this if you do not want to zero out your readouts — the pitch offset is already built into every value Spectre displays.
- ✅ No need to zero out readouts — pitch is included in every cut
- ✅ Familiar edge-based starting point for experienced drillers
- ✅ Reduces manual press adjustments during the oval cutting sequence
| Cut | V | H | Note |
|---|---|---|---|
| 1 | -0.125 |
0.000 |
Pitch offset applied at first cut |
| 2 | -0.147 |
0.022 |
|
| 3 | -0.169 |
0.044 |
|
| 4 | -0.191 |
0.066 |
|
| 5 | -0.213 |
0.088 |
Scenario 4 — Center, Pitch Included
Settings:
| Initial pitch inside the total oval | Add Thumb Pitch to Oval Cut Calculation |
|---|---|
Center |
Yes |
Your starting point is the center of the oval hole with pitch already included in every cut value. There is no need to touch the press at all between cuts — the oval will be perfectly geometrically centered and the pitch offset is built into everything Spectre displays. This is by far the easiest method to teach a novice ball driller how to cut ovals.
- ✅ No press adjustment needed — oval is perfectly geometrically centered automatically
- ✅ Pitch is baked in — no manual offset required at the press
- ✅ The easiest combination for training new drillers
- ✅ Produces a perfectly consistent oval every time with minimal room for error
| Cut | V | H | Note |
|---|---|---|---|
| 1 | -0.081 |
-0.044 |
Center + pitch offset combined |
| 2 | -0.103 |
-0.022 |
|
| 3 | -0.125 |
0.000 |
Center point — pitch only |
| 4 | -0.147 |
0.022 |
|
| 5 | -0.169 |
0.044 |
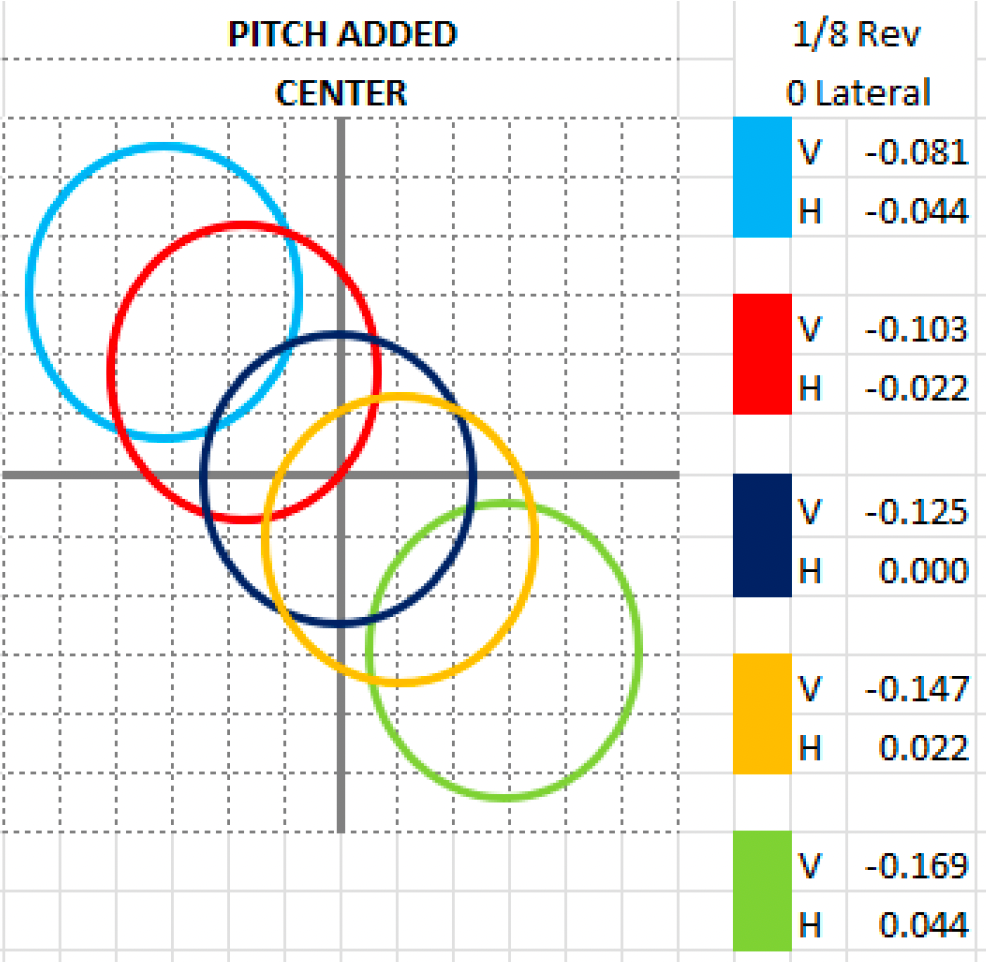
Mark's preference: Scenario 4 — Center + Pitch Included — is what Mark Buffa uses in his own shop and recommends above all others. The oval is always perfectly geometrically centered, pitch is handled automatically, and there is nothing to adjust on the press between cuts. This is the recommended starting point for any shop adopting the Spectre drilling methodology.
Note: All four scenarios above use the same base values (Starting Bit 3/4", Oval Width 7/8", Degree 45°) and produce the exact same physical oval hole. The only difference is the reference point and whether pitch is included in the displayed cut values.
📐 Quick Reference — Which Scenario Are You?
| Do you zero out readouts? | Is pitch at the edge or center? | Your Scenario |
|---|---|---|
| Yes — zero out at top of oval | Edge | Scenario 1 — Edge, No Pitch |
| Yes — zero out at center of oval | Center | Scenario 2 — Center, No Pitch |
| No — keep pitch on readout | Edge | Scenario 3 — Edge, Pitch Included |
| No — keep pitch on readout | Center | Scenario 4 — Center, Pitch Included ⭐ |
⚙️ Changing These Settings
- Open Spectre Cloud at
cloud.spectrebowling.comand log in. - Select Settings from the menu.
- Navigate to the Thumb Hole Preferences section.
- Locate the Initial pitch inside the total oval field and select either
EdgeorCenter. - Locate the Add Thumb Pitch to Oval Cut Calculation field and select either
NoorYes. - Changes are saved automatically.

Note: Like all system defaults, these settings control only the pre-selection on new spec sheets. They can always be changed on a per-sheet basis without affecting your shop defaults.
🎬 See It in Action
Watch Mark Buffa walk through the full oval thumb cutting process step by step using Spectre Pro Shop Software: How to Cut an Oval Thumb! | Full Pro Shop Tutorial!
For a deeper dive into the oval drilling process including the tapering method, watch Mark Buffa and Jacob Imoo from Jr Pro Shop walk through measuring for bit size, determining oval width and degree, and using the Spectre Oval Calculator step by step: Oval Calculator — Tapering Process
A full reference presentation covering all four scenarios, the math behind the oval calculator, and cut direction explanations is attached to this page: CUTTING OVALS.pdf
Related Sections
Tip: If you are new to oval drilling or setting up Spectre for the first time, select Center and Yes — Scenario 4. It is the most consistent, the most forgiving, and the method Mark Buffa recommends above all others.
2.3.3 Oval Width Calculator — Bit Size, Decimal, or Difference input method
2.3.3 oval
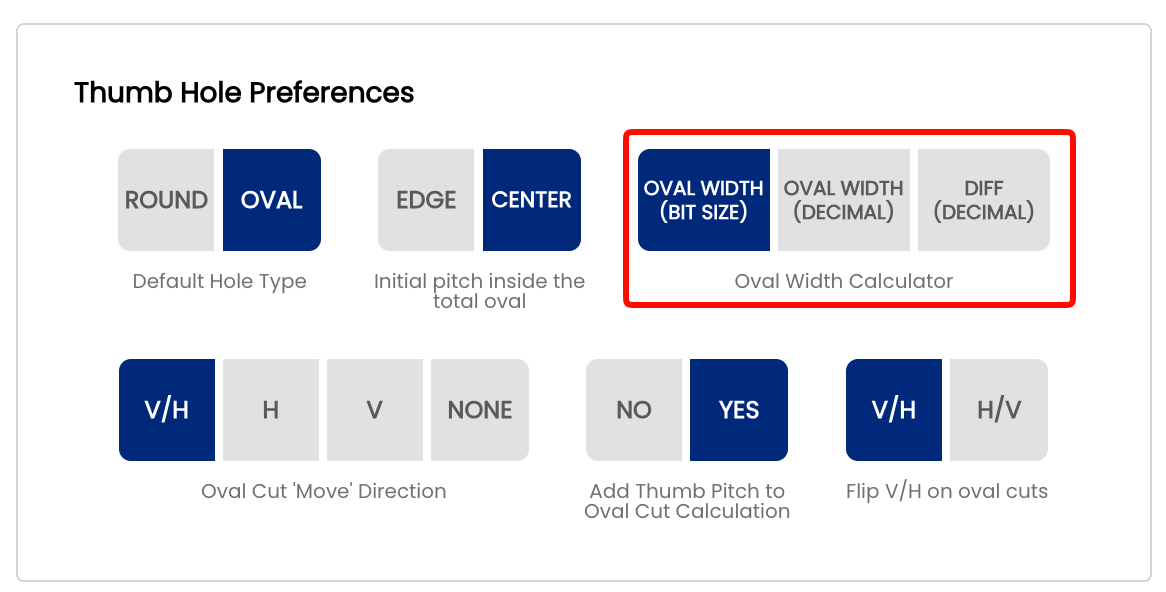
When calculating an oval thumb hole, Spectre Cloud needs to know the oval width — the final size of the opening the bowler's thumb will sit in. This setting controls how you input that measurement. There are three options: Oval Width (Bit Size), Oval Width (Decimal), and Diff (Decimal). All three produce the exact same oval hole — the difference is only in how you measure and enter the value.
The math behind it: Spectre calculates the oval cuts using the formula Oval Width – Starting Bit = Difference. The difference is the hypotenuse of the triangle that determines the V and H moves on your press. Depending on which input method you choose, Spectre either calculates this difference for you or accepts it directly.
📐 The Three Input Options
Oval Width (Bit Size)
You enter the oval width as a drill bit size — for example, 7/8". Spectre Cloud then subtracts the starting bit size from the oval width to calculate the difference internally. This is the most common method for shops that size oval widths using standard drill bits and do not own a caliper.
- ✅ The most widely used method in pro shops
- ✅ No caliper required — drill bits are the measuring tool
- ✅ Input matches the physical bit you used to determine the oval width
- ✅ Spectre calculates the difference automatically — no manual math needed
Example: Starting Bit 3/4", Oval Width 7/8" → Spectre calculates Difference as 0.125" and uses that to determine the V/H cut moves.
Oval Width (Decimal)
You enter the oval width as a decimal value measured directly with a caliper — for example, 0.875". Spectre Cloud then subtracts the starting bit from this decimal value to calculate the difference. This method is preferred by shops that measure oval widths using a digital caliper rather than sizing with drill bits.
- ✅ Precise — caliper measurements capture exact thumb dimensions
- ✅ No conversion needed between bit sizes and decimal values
- ✅ Spectre still calculates the difference automatically from the decimal oval width
Example: Starting Bit 3/4" (0.750"), Oval Width measured by caliper as 0.875" → Spectre calculates Difference as 0.125".
Diff (Decimal)
Instead of entering the oval width at all, you enter the difference directly as a decimal value in thousandths — for example, 0.125. This is equivalent to performing the subtraction Oval Width – Starting Bit yourself before entering anything into Spectre. This method is used by experienced drillers who measure the difference directly with a caliper rather than measuring the full oval width.
- ✅ Fastest input method for experienced drillers who already know their difference
- ✅ Useful when measuring the difference directly with a caliper at the thumb hole
- ❌ Less intuitive for newer drillers unfamiliar with the underlying math
Example: You measure directly with a caliper and determine the difference is 0.125". Enter 0.125 into Spectre — no oval width or starting bit calculation needed.
📊 Which Method Should You Use?
| Situation | Recommended Option | Reason |
|---|---|---|
| Shop sizes ovals using drill bits | Oval Width (Bit Size) | Enter the bit you used — Spectre does the math |
| Shop measures oval width with a digital caliper | Oval Width (Decimal) | Enter the caliper reading directly — no conversion needed |
| Experienced driller who measures the difference directly | Diff (Decimal) | Similar to Decimal Oval width, simply having to 0 your caliper once you have the starting bit. |
| New to oval drilling | Oval Width (Bit Size) | Most intuitive — matches the physical tool you use to size the hole |
🧮 Understanding the Math
Regardless of which input method you choose, Spectre Cloud always uses the same underlying calculation to determine the oval cut moves:
- Oval Width – Starting Bit = Difference — the difference is the hypotenuse of the triangle formed by the oval cut path.
- The oval degree is used as the angle of that triangle.
- Spectre applies trigonometry (
sinandcos) to the difference and degree to calculate the precise V and H displacement needed for each cut. - Cuts are displayed in 32nds at most — cutting in 32nds produces a smooth oval hole with minimal chatter.
Note: No matter which input method you use, all three options produce the exact same oval hole when the underlying values are equivalent. The choice is purely about how you prefer to measure and enter the data.
⚙️ Changing This Setting
- Open Spectre Cloud at
cloud.spectrebowling.comand log in. - Select Settings from the menu.
- Navigate to the Thumb Hole Preferences section.
- Locate the Oval Width Calculator field and select Oval Width (Bit Size), Oval Width (Decimal), or Diff (Decimal).
- Changes are saved automatically.
Note: Like all system defaults, this setting controls only the pre-selection on new spec sheets. It can always be changed on a per-sheet basis without affecting your shop default.
🎬 See It in Action
Watch Mark Buffa demonstrate the full oval measurement process using drill bits and Spectre Pro Shop Software: How to Measure Ovals | Bowling Pro Shop Tutorial
For the caliper method specifically, watch Mark Buffa walk through measuring an oval thumb using a digital caliper and entering the value directly into Spectre: How To Measure An Oval Thumb | Caliper Method
For the full oval cutting process including how these measurements feed into the Spectre Oval Calculator, see: How to Cut an Oval Thumb! | Full Pro Shop Tutorial!
A full reference presentation covering the oval calculator math, all four Edge/Center + Pitch scenarios, and cut direction explanations is attached to page 2.3.2: Cutting Ovals — Spectre Pro Shop Software.
Related Sections
Tip: If you are new to oval drilling, start with Oval Width (Bit Size) — it is the most intuitive method and matches the physical tool you use at the press. As your workflow develops and you start using a caliper for more precise measurements, switching to Oval Width (Decimal) or Diff (Decimal) is a natural progression.
2.3.5 Oval Cut 'Move' Direction — V/H, H only, V only, or None
2.3.5 oval
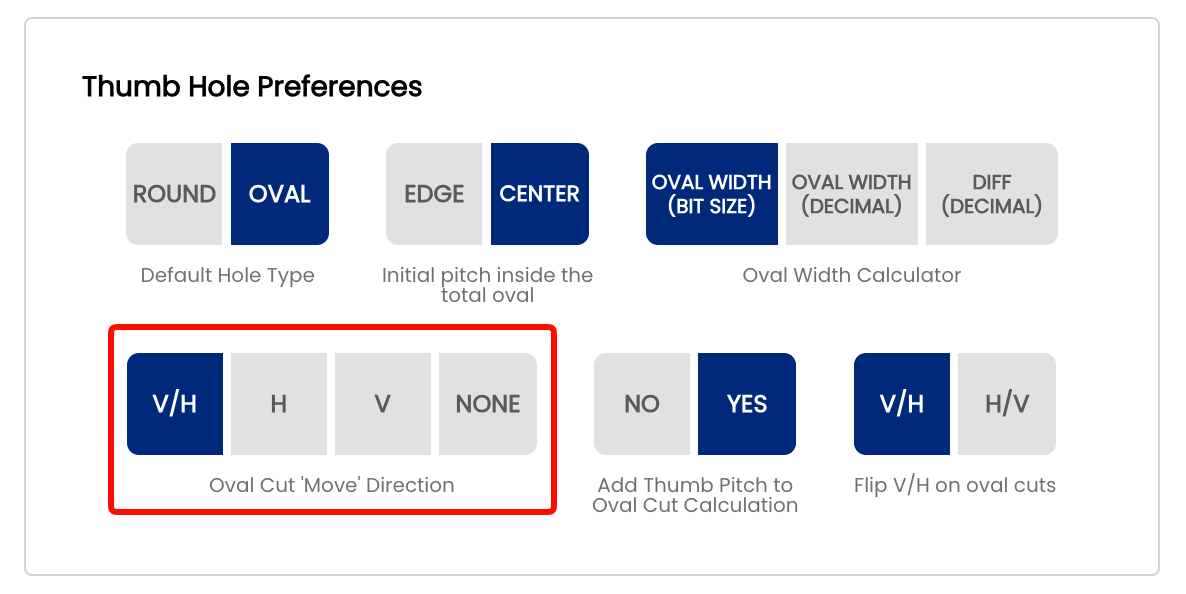
The Oval Cut Move Direction setting controls which directional components Spectre Cloud calculates and displays when outputting oval cut values. Depending on your drill press type and how you cut ovals, you may work with both vertical and horizontal movement, one direction only, or prefer to enter the values manually without the calculator's guidance. This setting ensures the oval calculator output matches exactly what your press needs.
🔄 The Four Options Explained
V/H — Vertical and Horizontal
Spectre Cloud calculates and displays both the vertical (V) and horizontal (H) movement values needed to cut the oval along the hypotenuse of the desired triangle. This is the standard method for most drill presses with independent X/Y axis digital readouts. The V and H values are the two sides of the right triangle formed by the oval cut path — together they define the full shape and direction of the cut.
- ✅ The most common setting for standard drill presses with digital readouts
- ✅ Full oval specification — both axes displayed for every cut
- ✅ Required when your press needs both figures to execute the cut sequence
- ✅ Matches the cut tables shown in the four scenarios on page 2.3.2
H — Horizontal only
Spectre Cloud calculates and displays both values, but only the horizontal (H) axis will have movement calculated. The vertical (V) value will display as 0.000 — or as the pitch value if Add Thumb Pitch to Oval Cut Calculation is set to Yes — since no vertical movement is needed. Used mostly when you have an Ovalmatic press, VISE Ferrari Jig or similar equipment where you can swing the ball to a desired degree on the vertical axis. From there, you cut in one direction only — horizontal — and the oval shape is achieved through the combination of the swing angle and the single-axis cut.
- ✅ Designed for Ovalmatic-style presses that swing the ball to set the vertical component
- ✅ V value still displays — shows
0.000or the pitch offset if pitch is included - ✅ No vertical movement is calculated — only horizontal cuts are needed at the press
V — Vertical only
Spectre Cloud calculates and displays both values, but only the vertical (V) axis will have movement calculated. The horizontal (H) value will display as 0.000 — or as the pitch value if Add Thumb Pitch to Oval Cut Calculation is set to Yes — since no horizontal movement is needed. The mirror of H only — used for presses that cut ovals on a single vertical axis where the horizontal component is handled by swinging or rotating the ball.
- ✅ For presses that cut ovals on a single vertical axis
- ✅ H value still displays — shows
0.000or the pitch offset if pitch is included - ✅ No horizontal movement is calculated — only vertical cuts are needed at the press
None — Manual input
No directional movement values are displayed by the oval calculator. This option allows you to manually input your cuts and bypass the oval calculator's directional output entirely. The oval width and degree are still used for reference, but Spectre Cloud does not output V or H values — you determine and enter the cuts yourself.
- ✅ For experienced drillers who prefer to work from their own calculated values
- ✅ Useful for shops using external reference charts or custom cut tables
- ❌ You do not benefit from Spectre's automatic V/H calculation in this mode
Note: Even if you calculate an oval, you can always add manual cuts to the calculated math by pressing the + button.
📊 Quick Reference
| Press Type / Workflow | Recommended Setting | Reason |
|---|---|---|
| Standard drill press with X/Y digital readouts | V/H | Both axes needed — Spectre calculates the full V and H move sequence |
| Ovalmatic or swing-style press | H or V | Ball is swung to set one axis — only one directional value needs movement calculated |
| Manual entry, external charts, or custom cut tables | None | Bypass the calculator output and enter your own values |
📐 The Math Behind the Cut Directions
Spectre Cloud uses the oval difference (Oval Width – Starting Bit) as the hypotenuse of a right triangle, and the oval degree as the angle. It then applies trigonometry to determine the precise V and H displacement for each cut:
- The V value is calculated using the
sinof the oval degree applied to the difference. - The H value is calculated using the
cosof the oval degree applied to the difference. - Spectre displays cuts in 32nds at most — cutting in 32nd increments produces a smooth oval hole with minimal chatter on the ball surface.
- No matter which direction setting you use, Spectre always cuts in a linear direction from the top of the oval moving toward the bottom, minimizing table movement for greater time savings and consistency.
Note: All four direction settings produce the exact same physical oval hole. The setting only controls what is displayed on screen — the underlying calculation is always performed in full.
⚙️ Changing This Setting
- Open Spectre Cloud at
cloud.spectrebowling.comand log in. - Select Settings from the menu.
- Navigate to the Thumb Hole Preferences section.
- Locate the Oval Cut 'Move' Direction field and select V/H, H, V, or None.
- Changes are saved automatically.
Note: Like all system defaults, this setting controls only the pre-selection on new spec sheets. It can always be changed on a per-sheet basis without affecting your shop default.
🎬 See It in Action
Watch Mark Buffa walk through the full oval cutting process including how V and H cut values are used at the press: How to Cut an Oval Thumb! | Full Pro Shop Tutorial!
For the complete tapering process and a deeper look at how the oval calculator generates cut values: Oval Calculator — Tapering Process
A full reference presentation covering all four oval cut scenarios, the math behind the calculator, and detailed cut direction diagrams is attached to page 2.3.2: Cutting Ovals — Spectre Pro Shop Software.
Related Sections
Tip: Not sure which option your press needs? Start with V/H — it gives you the full picture. Once you have confirmed which axis or axes your press uses for oval cuts, you can narrow the display to keep the calculator output clean and unambiguous at the press.
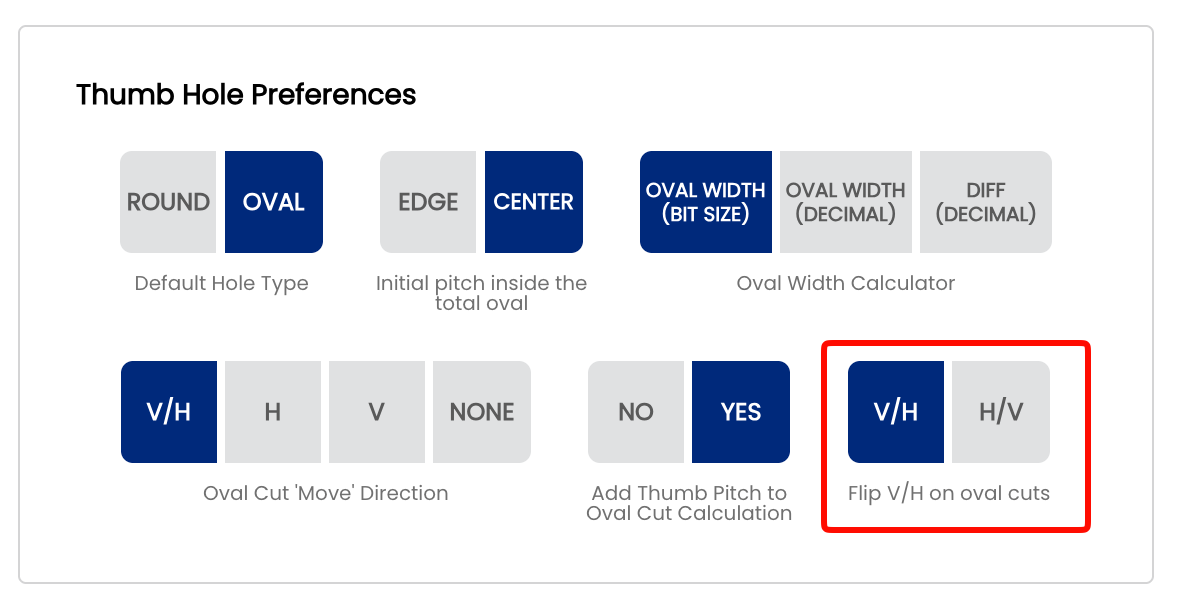
2.3.6 Flip V/H on oval cuts — matching your drill press DRO display order
2.3.6 oval
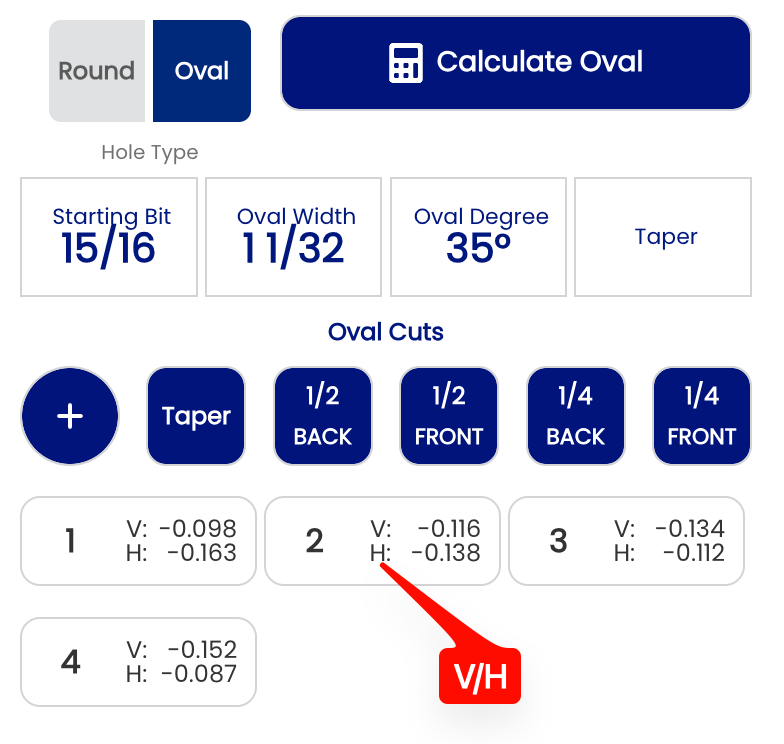
The Flip V/H on oval cuts setting controls the display order of the vertical and horizontal values in the oval cut cards shown by the Spectre Cloud oval calculator. This setting should match the order your drill press digital readout (DRO) displays its axes — so that what you read on screen matches exactly what you see on the press. This is a display-only preference — the underlying oval calculations, cut values, and spec sheet data are completely unaffected.
🖥️ What Changes
Each oval cut is displayed as a numbered card showing the V and H movement values for that step. This setting controls which value appears on top within each card:
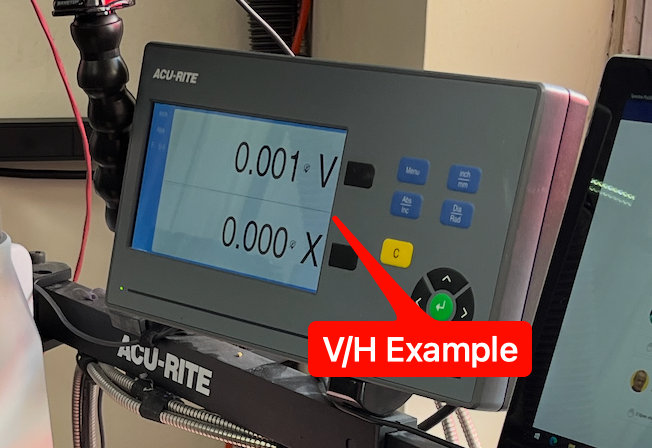
- ✅ V/H — V on top of H. Use this if your DRO displays the vertical axis first.


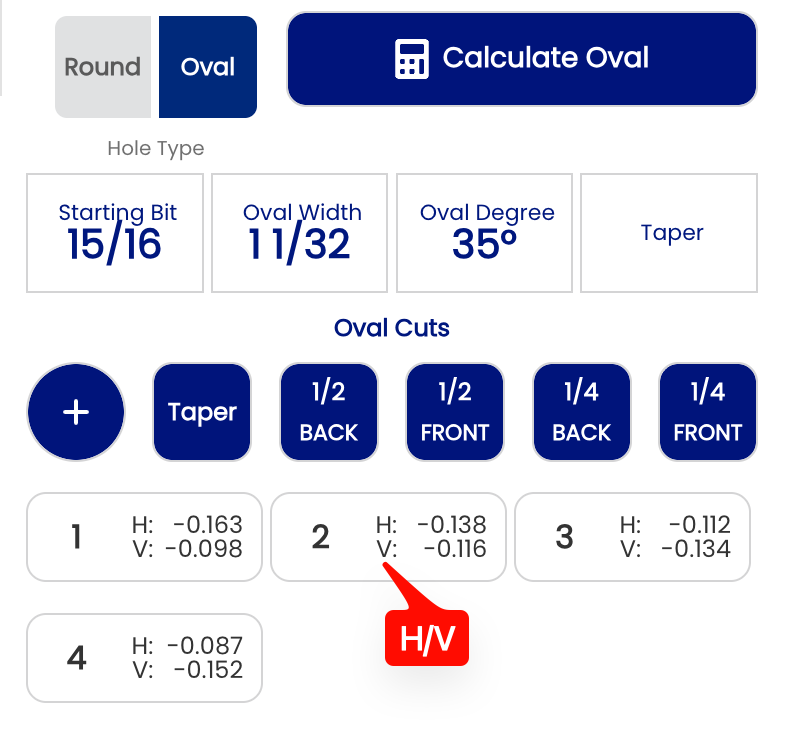
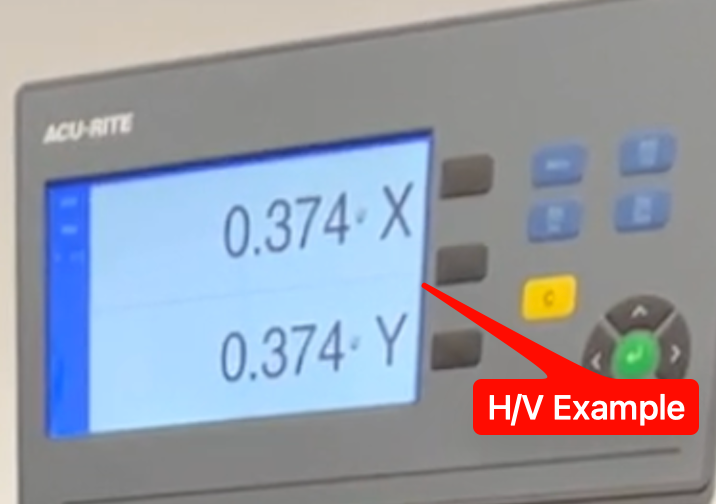
- ✅ H/V — H on top of V. Use this if your DRO displays X on top of Y — the standard configuration for new DROs from Jayhawk and Innovative.


Note: This setting only changes the order in which V and H are displayed in the cut cards. The values themselves — and the oval hole they produce — are identical regardless of which option is selected.
⚙️ Changing This Setting
- Open Spectre Cloud at
cloud.spectrebowling.comand log in. - Select Settings from the menu.
- Navigate to the Thumb Hole Preferences section.
- Locate the Flip V/H on oval cuts field and select either V/H or H/V.
- Changes are saved automatically.
Related Sections
Tip: Match this setting to the axis order on your drill press DRO. If your readout displays X on top of Y — as is the case with new DROs from Jayhawk and Innovate — select H/V to keep the display consistent between Spectre and your press. Eliminating the mental transposition between screen and press reduces errors during the cutting sequence.